Translate

====================

====================
Dear Reader,
I share here what I like and what works for me. If you've been following me, you know that I can change my mind from time to time, and feel free to comment that I'm completely wrong, you may be right. I'm not running a business. I'm not paid and have never received any compensation or facilitation for any review/brand/site here mentioned. In case one day we'll ever meet, I'll be the one offering you a cup of Italian coffee, too.
====================

Tuesday 22 December 2015

a pattern under the tree

--------
UPDATE (May 2020): this angel has a name! Thanks to some Facebook's friends, especially to Emanuela Ranieri.
Her name is "Ariel"
--------

It's worked with 2 shuttles, filled with two threads, pink 100% pure silk (seta Faro n.3) and DMC n.283 silver metallic thread (3 strands). That resulted about a size 10 thickness, but I've used the same pattern with a size 70 cotton thread.

The dress start from the neck, all external rings and split rings have a picot, tatting proceeds in a "S" wave, swapping first and second shuttle. Don't cut ends but leave a long tails in both. I left 20cm.
(post edited to update this picture with a better quality image)
Better a summary?

Wings are tatted separately:
Cut and tie the ends. Start the second wing, connecting the first row to the other wing.

The dress is closed in the back, using the long ends. How many ways to lace up your shoes? That's mine!

But there's the wings, so BEFORE the second last fastening, join wings in two points, as showed by those arrows: untie (not showed in the picture) join the bottom part of wings, then tie the second last picots, then join the middle picot of wings, then tie the last picots of the dress.
That's the result:
Then, to keep the "head" in the middle, I took one of the ends and passed through the central picot of the neck:

That's now the time for the head. I inserted both ends in a wooden bead, then added a sort of aureole as a little ring, 10 picots separated by 1ds, leaving a tail of about 10cm. I've inserted that tail from up to down, inside the head and the dress, joined a transparent plastic bead and anchored head and bead with a couple of knots. I passed inside the little ring the long tail coming from the dress.
That's where you may want to add a weight (a heavy bead) or a jingly bell charm!

Here it is, standing up and also dangling from my hand:

Buon Natale! Merry Christmas!
I'll be back with the new year. Happy holidays!
Ninetta

Monday 21 December 2015

yellow metal is...

...gold?
I'm just fooling myself, thread is metallic gold dmc 282, a miyuky pearl and very cheap earwires. The pearl has been positioned in the SCMR using this method: (the picture describes a ring but there's no differences if it is inside a SCMR)
https://flic.kr/p/mTMZeB

The little ring for the earwires has been made following Miranda's instructions here:  http://tattingfool.blogspot.com/2011/07/finishing-with-sssr.html

I made a second pair with a bigger agate pearl, thread is two strands, one is yellow Special Dentelles dmc number 743 and the other is metallic light gold Finca (Hilo Metalizado, 1000mts, Presencia Hilaturas, double strand, 35% Polyester and 65% Viscose):
Ciao,
Ninetta

Thursday 17 December 2015

strength is in little things


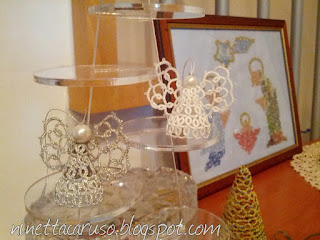
It keep itself standing up, without any stiffener. It is soft white dmc cotton, size 70, the pattern is that one in previous post, still to be refined. I should tat a couple more, what do you think about one pink and another light blue?

I think its strength come from its short size. I doubt that an higher cone would have supported the weight of the wings and of the pearl used as head.

Have you ever seen an angel from this inconvenient perspective?

Between an angel and the other, I finished the Morimoto's doily (http://ninettacaruso.blogspot.com/2015/06/glutton.html), I found the right colour number at the craft fair in October, so also Mr. Meticulous will be happy for Christmas!!


Ciao,
Ninetta.

Monday 14 December 2015

What makes it an angel

What it lacks is more than what it has. Wings, of course. Skirt, possibly.


Pattern can't claim originality, but has not been copied and wasn't a miracle as it came out after many trials! One of the first attemps was starting from a doily, like that paper angels that I saw here: http://couturecraft.blogspot.com/2010/11/paper-angels.html  
But my first angel was misshapen, by all means I did something wrong, so I thought it was better tatting 3 parts. The cool angel next year!

Thread is metallic silver dmc 283, size 70, the angel is 4cm high. Body and wings are tatted separately.
I tatted it with cotton, too. I should show you.

Ciao,
Ninetta

Thursday 10 December 2015

fragile and plasticky

That is about the same pattern of the ball (http://ninettacaruso.blogspot.com/2015/11/romper-suits-for-ball.html), rings and chains are 6-6 instead of 8-8. I also added floating rings to reach the top. Thread is dmc Diamant 100% polyester, D5200. That is sold in spool of 35meters, only sufficient to tat two pairs, or better... one pair good and one pair prototype!


Polyester is plastic, isn't it? It stands up even without the glass ball inside...

That has been the first time that I needed pliers to hide the end!

Ciao,
Ninetta

Monday 7 December 2015

winter collection

The fashion show is today, attended by celebrities from my mum to my aunt, in the runway the new winter collection of earrings from international tatting designers.


One pattern is from Jane (http://janemactats.blogspot.com/2015/12/pattern-for-dewdrop-earrings.html), the basic pattern is in her blog, then I added sparkles and gold (dmc metallic 282).
The second pattern: I don't know where this simple technique is from, it is one shuttle pattern and it was inspired by the little lovely tatted angel sent me by Lenka (http://frivolenka.blogspot.com). Same thread, same swarovsky. You can see the angel, beautifully tatted by Lenka, here: http://ninettacaruso.blogspot.com/2015/11/8-times-3.html


Ciao,
Ninetta

Thursday 3 December 2015

rompers - part II

The second pattern for my little balls, circumference 9cm, it is just a wheel.
Wheels are comfortable to me to tat, after having done a lot in Anne Orr's large doily and in Priscilla's frame.


Pattern, only one shuttle.
Leave a tail of 25cm. Start with a ring:
R1: 6-6 with a long central picot.
Leave about 1/4" of thread,
R2: 4-4-4-4, leave about 1/4" of thread,
R3:  4+4-4-4, (join to R2) leave about 1/4" of thread,
R4:  6+6 (join the long central picot), leave about 1/4" of thread,
- repeat  R2,R3,R4, R2,R3,R4, R2,R3,R4, R2,R3,R4,  R2 AND climb to the upper row with
SR1: 4+4 / 4+4 (use the tail left at the beginning)

Leave a mock picot
SR2: 4+4 / 4+4 (use the tail left at the beginning)
Leave about 1/8" of thread,
R5: 4-4, leave about 1/8" of thread,
R6:  4+4+4-4, (join to SR2 and previous round R3) leave about 1/8" of thread,
R7:  4-4, leave about 1/8" of thread,
R8:  4+4+4-4, (join to R6 and previous round R2) leave about 1/8" of thread,
Go all around (at the end there are 11 little rings of 4-4) then the last to do it is a split ring 4/4 to climb up, tie ends together and use these to "dress" the little ball, I threaded it in all picots of the little rings.


Ciao,
Ninetta

Thank you very much for all your nice comments.

Ciao
Ninetta