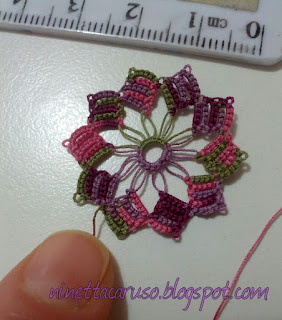
Pattern's from a book, but also proposed in a magazine that I've had for 20 years and my copy is in Italian.
I started buying "Anna by Burda" because they used to offer a yearly section for tatting, always in May. At that time that was my only source for learning "new" tatting, other than simple rings and chains. This issue is from May 1996.
Thread is Lizbeth size 80, color num.131. I used a gauge of 0.5cm and - luckily -, it worked at the first attempt!
There's a light celtic effect in this pattern, a round with block tatting has to be tatted apart and then connected to the central flower. Of course they simply say "join the block". Of course they say nothing about the direction of the tatting blocks and looking carefully at the picture it seems they actually didn't care too much. I worked with 2 shuttles in "direct tatting" (that is tatting chains as they are the second part of the split ring) and I always kept the tatting already done under my shuttles. That was a good solution for me, I had very few glitches. But this pattern challenged me!
Another round, another challenge. What I learned in previous round, I had to tune in a different way in the next. I tatted in direct tatting in a counterclockwise direction for the first part, then I had to change to a clockwise direction for the other round that connect the 5th to the 4th round. I'm still at this connection round. I tatted the second round of blocks with a dmc size 80 color num.3687.
To be continued...
Sampai jumpa (see you later)
( http://www.studyindonesian.com/lessons/greetings/ )
Ninetta
Related posts:
aunts' recipe
P.S. Technical note. Since HTTPS settings have changed, visitors are now able to view my blog over an encrypted connection by visiting https://ninettacaruso.blogspot.com. Existing links and bookmarks will continue to work. But, there's mixed content here so something can't be viewed over encrypted connections, like widgets by third parts, for example LinkWithin. I know the problem, I may fix it when I find the time.


 :)
:)
 :(
:(
 :))
:))
 :((
:((
 =))
=))
 =D>
=D>
 :D
:D
 :P
:P
 :-O
:-O
 :-?
:-?
 :-SS
:-SS
 :-f
:-f
 d(
d(
 :-*
:-*
 b-(
b-(
 h-(
h-(
 g-)
g-)
 5-p
5-p
 y-)
y-)
 c-)
c-)
 s-)
s-)
 d-)
d-)
 w-)
w-)
 :-h
:-h
 :X
:X
Oooh, your doily looks so beautiful already!!!! :)
ReplyDeleteIt's a really lovely design, and I think you are definitely up to the challenge. You've got a beautiful start. Is that outer round done in separate block tatted motifs.
ReplyDeleteI used to get Anna Burda too. Fabulous patterns, but the instructions were sometimes a bit skimpy or even confusing! My favourite small doily pattern is from Anna. You're doing a wonderful job, I love how it looks in that thread.
ReplyDeleteTa serwetka będzie bardzo ładna. Kolor nici prześliczny.
ReplyDeleteI used to buy Anna the English version from 1973 to when they stopped the English version in 2008, I had every copy but then my husband said I needed to downsize it, every copy that had tatting in I kept the patterns, the May issue was always the most interesting, and I know that Jan before he died had patterns printed in Anna.
ReplyDeleteIt's looking lovely and lovely colour
Margaret