Translate

====================

====================
Dear Reader,
I share here what I like and what works for me. If you've been following me, you know that I can change my mind from time to time, and feel free to comment that I'm completely wrong, you may be right. I'm not running a business. I'm not paid and have never received any compensation or facilitation for any review/brand/site here mentioned. In case one day we'll ever meet, I'll be the one offering you a cup of Italian coffee, too.
====================

Monday 30 June 2014

adopt a little trifle, please!

I've loved the tutorial posted by Robin Perfetti in her blog, she gave us plenty of inspiration! I played as a kid! I've played for hours with the app she talks about, then I've looked for others, similar apps.

I've found another one that is called Kaleider Free (by Whizical), and it works transforming pictures. I've started with one doodle drawn with the Kaleidoscope application suggested by Robin, the one showed in the previous post, then I've saved it as an image and loaded it in the Kaleider app. It lets you play with many different kaleido effects and, after one hour - yes, you got it: over one hour! - I obtained 25 acceptable screenshots. I selected only 5 among that, because I think they are the most "tat-able". You should choose one and adopt it. Eventually, let me know if it will even become a real tatting.
Are you inspired?


Ciao,
Ninetta

Friday 27 June 2014

up to you

That is another one bracelet with superduo, may be the second last, as I've almost run out all beads I had. I've memory of another one little packet in a deep side somewhere, then I've already started the hunt.
From now on, it's up to you: I wonder if anyone has found superduo ?!?
I've used for about one year the method of finishing with SSSR. If you don't know about it, you'll be happy to read this great tutorial: thank you, Miranda!
In the little picture you can see that I'd only left a short end, but no panic: I've made a loop with another thread, inserted it in an empty shuttle and worked the second part of the sssr. At the end, you'll have only a little loop of thread to work with, but the ring will be closed nicely!
Thread is dmc metallic n.283 worked together with the white silk I've bought some month ago, made in Calabria.

I've something else to say, about a wonderful tutorial by Robin Perfetti, but I'll tell you next time.
Ciao,
Ninetta

Wednesday 25 June 2014

an old friend

I haven't done bobbin lace for ages, but (perhaps, thanks to my new bag for the bobbin lace's pillow) I felt I should have had to brush up on it.


I did the most part very late at night, so I'm not showing all the aargh and the grrr!! Then, I resolved to call my friend Cristina, a very talented artist, who solved all my doubts. That is the result of weeks of attempts! Not so much, but I'm happy and determined to make another pair or two! I've drawn the pattern too, because that is a nice peculiarity of this kind of bobbin lace: when you learn it, you also learn to design your own patterns. Well, I know, I need practice with that.

That ring has been done with left overs. I leave thread on shuttles (laziness?) and try to use all the thread left on them for test tatting. This time it comes out something that asked me to be used ... Thread is silk (seta Faro) and DMC n.282 gold metallic woven together in one shuttle, pattern is only rings. Stones are agate.


Ciao,
Ninetta

UPDATE: new link for Cristina's work is
https://www.facebook.com/tomboloaquilano/

Tuesday 24 June 2014

unexpected lifeless vitality

I weekly go to a local market and during one of these visits this month I found an amazing natural stone, with a flower that Mother Nature has drawn on it. I cannot say what is it called, maybe it's agate, but I love it and tatted around a crown of rings, so that I can wear it. But only after a week, the thread loosened and needed a little surgery.

After some therapy, it can be put on again, without fear to lose it.

In the same day, I found a little carnelian stone too. It needed something very simple, and here it is. Only a little spiral chain adds a bit of attraction for the eyes.

I sweated brushing up my bobbin lace too, but this is another story to tell.
Ciao,
Ninetta

Monday 23 June 2014

ain't got no

I hesitated before posting again because I thought "ain't got no" new tatting to show you. Have you ever listen the song? It's something lovely that can make your day: Nina Simone - Ain't Got No...I've Got Life

But I've tatted, indeed!

I've tatted some tiny motifs with my "butterfly on trefoil", to be used on July, as little rewards: in fact, there will be a meeting of lacemakers in my town, and I offered to teach how to tat. I hope that someone come and want to learn how to tat my little butterflies!

 Then I've played around the little glass bauble. Recently, a friend lets me take photocopies of her mother's old "il chiacchierino n.1". There are some nice little motifs, for example there's one that is often seen these days, a diamond pattern with 4 trefoils facing outside, a "never-out-of-fashion" appeal! There's also the classic wheel pattern found in Elgiva Nicholls' book "Tatting - technique and history". I used that basic pattern for the bottom and added only another round of rings. Thread is dmc, gold n.282 and red Special Dentelles wound up together (HWT, as it's called by Jane Eborall).

Initially I thought about a single post, but realized it's better to divide photos in groups. So, my "ain't got no" became "I've got more"! Absolutely true, we've got our hands!

Ciao,
Ninetta

P.S. if you are near Rome in July and want to come and join the fun, here's the link to the attendance -only Italian- form (relax, there's nothing to be payed!): http://agofilofuselli.altervista.org/formiscrizione.htm

Sunday 1 June 2014

Little superduo squared motif with tutorial

For all of you that want to know more about super-duo and twin beads, I've found an interesting video (and I'm soooo happy that I can understand it without subtitles!!!). The link to the video is here.

I hope you will enjoy this little motif. This time I've tried to write a tutorial instead of a visual pattern, let me know if this works for you. The 2 strands of dmc metallic thread I've used is very similar to a size 40 thread. Superduo beads are about 1/4" high, normal beads are Gutermann rocailles 9/o.
quad_22
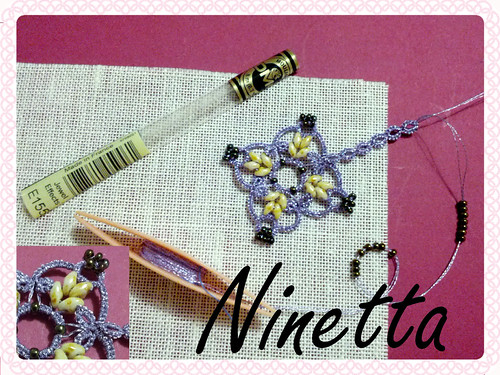
Tools: a gauge half inch wide (I used one plastic collar stay for men dress shirt) used horizontally;
another gauge of 1cm wide (or 0.4 inch), used vertically;
a thin wire, folded, to be used as a needle.

Load CTM 2 shuttles, putting 20 normal rounded glass beads in SH2 and 8 super-duo beads, then 4 normal beads, then another 8 super-duo beads in SH1.

From now on, SD will stand for "super-duo bead", and NB for "normal rounded bead".

First round: Start with a ring with SH1, putting 8 SD plus one normal bead inside the ring. Tat 4ds, then slip 2 SD in place of a picot, 4ds. Put one NB from the shuttle and use the gauge half inch wide horizontally for a long picot. Repeat the sequence for other 3 times.Close the ring.

Second round: Climb to the next row leaving a bit of thread (half of a picot size), then with SH1 start a ring of 4ds, leave a long picot, vertically using the gauge of 0.4 inch, then other 4ds, close the ring. (*) Reverse work and start a chain: 10ds long. With SH2 make a split ring, slipping inside 5 NB. Split ring is: 4ds, then slip one NB in place of a picot, first half of a ds, split second NB, second half of a ds, slip third NB, first half of a ds, slip fourth NB, second half of a ds, slip fifth NB, then tat 4 ds. With SH1 tat the down side of the split ring: 3ds, one SD, 3ds, another SD, 3 ds. Close the split ring. Now tat a chain of 10ds.
Using a thin wire as an helper, fold it and grab the long picot of the first 4-4 ring through the SD holes.
Reverse work and with SH1 start a ring of 4ds, join to the picot coming from inside SDs, then tat 4ds and close the ring. Don't take out the wire before you have the join completed.
Make a lock join with SH1 to the long picot of first round. Then tat another ring with SH1: 4ds, long picot 0.4 inch, 4ds. Repeat from (*) another 2 times.

For the last corner, tat the chain of 10ds and then the split ring, equal to previous one, tat the second chain of 10ds and the joining ring of 4-4, then lock join to the starting point and tie. If you want, you can cut there the thread or make a decorative chain of split rings, 6/6 , as I did.

Ciao,
Ninetta

Thank you very much for all your nice comments.

Ciao
Ninetta