Translate

====================

====================
Dear Reader,
I share here what I like and what works for me. If you've been following me, you know that I can change my mind from time to time, and feel free to comment that I'm completely wrong, you may be right. I'm not running a business. I'm not paid and have never received any compensation or facilitation for any review/brand/site here mentioned. In case one day we'll ever meet, I'll be the one offering you a cup of Italian coffee, too.
====================
Showing posts with label cabochon. Show all posts

Tuesday, 16 June 2020

pattern for the tiffany bezel

That is the pattern for tatting around a rivoli 14mm with a thread size 20, the same that I showed in previous post:
https://ninettacaruso.blogspot.com/2020/06/tiffany-bezel.html

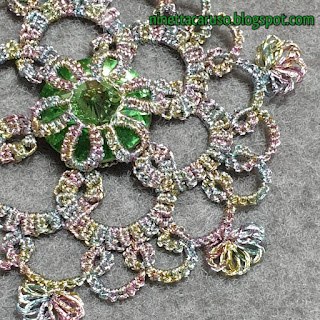
I've used Sanbest metallic 4 strands, colour number 121, a rivoli Swarovski Peridot 14mm, and 8 miyuki delica seed beads 15/0.

(In theory, with slight modifications, the pattern could be adapted to different size for rivoli and thread.)

LEGEND
ds : double tatting stitch
tds : treble tatting stitch
b : bead 
vsp : very small picot
R : ring
SR : Split Ring
vsp : very small picot

Wound 2 shuttles CTM, loading 8 beads in the core shuttle.

Start a ring:
Notice that this ring starts directly with treble tatting stitches:
https://ninettacaruso.blogspot.com/2019/02/jumping-in-place-starting-without-very.html

R (put 1b in the loop): 3tds,b,3tds,b,3tds,b,3tds,b,3tds,b,3tds,b,3tds,b,2tds,vsp,1ds.

Close the ring and climb out in this way:
- Take a loop of the core shuttle's thread, through the last very small picot.
- Then, take another loop of the core thread and pull it through the previous loop. 
- Slip the other shuttle through the loop thus formed. 
- Pull the core shuttle tight. 
Then, there's the back side, that is all rings:
SR: 6ds / 6ds
R: 6ds, join to the next hidden picot (same place of each bead underneath), 6ds.
Repeat R for 6 times.
- Insert the rivoli -
Finish with a split ring:
SR: 6ds (join to the last hidden picot) / 6ds.

To insert the earrings' post, I used the same method that I used for the earrings in the "Parure Anne", that I explained here: https://ninettacaruso.blogspot.com/2020/06/parure-anne-with-pattern.html#Anneorrearringspattern
That is:
SR (name it A): 8ds-8ds
SR (name it B): 8ds-8ds
Multiple onion ring:
innermost ring: 6ds-6ds.
second inner ring: 8ds, onion ring join, picot, 8ds.
outer/third SPLIT ring: 12ds, onion ring join, picot, 12ds.
Finish with a small ring of 8 double stitches (I ended with the SSSR method by Miranda).

Assembling:
Insert the small ring, from front to back inside the SR named A, then pick up the post and put it between the multiple onion ring and the SR named B, then inside the small ring.
I finished it sewing small ring and SR B together with a needle, using 2 strands of my thread.

Ciao,
Ninetta
UPDATE: Please refer to the page "Treble Tatting Stitch - Summary" - https://ninettacaruso.blogspot.com/p/blog-page_95.html for any info about treble tatting stitches, thank you.

Tuesday, 9 June 2020

tiffany bezel

That's a nice way to tat around a rivoli. I learned that the "Tiffany setting" is the most famous engagement ring, since 1886. That one with the diamond, of course.

In my tatted version with the much cheaper rivoli, I have two rounds: front side there is a ring with only treble tatting stitches and the second round has rings on the back of the rivoli.

I didn't cut the thread for the entire length of the bracelet:
Thread is Sanbest metallic 4 strands, colour number 108. I used rivoli Swarovski 14mm.

I'm still playing with this method, I will share it as soon as I'm more confident that it works well.

In the next pendant I put the bezel in the centre and then I tatted 3 repetitions of the square pattern "oh, sugar sugar!" (visual pattern is in Flickr: https://flic.kr/p/HRYJaF)
Thread for that necklace is Sanbest 3 strands, colour is called Chameleon, a multicolored green and gold, mixed metallic and polyester. The rivoli is a beautiful "Crystal Sunshine DeLite" 14mm. Little beads are miyuki rocailles 15/0, copper.

Ciao,
Ninetta
UPDATE: Please refer to the page "Treble Tatting Stitch - Summary" - https://ninettacaruso.blogspot.com/p/blog-page_95.html for any info about treble tatting stitches, thank you.

Tuesday, 14 January 2020

shine the light on the tds

That is a new-to-me thread, Sanbest polyester, 6 strands. It comes from China, very smooth and perfect for tatting, even for tatting the treble stitches! I found it thanks to a Facebook group, led by Eva Antonucci.

It inspired me a new design:

It shines like the gold thread, I did my best to take a good pic but it's not easy.

It started as a snowflake but ended like an ice-drop, in fact the rivoli was added at the end.

The problem with any metallic threads is that it twists a lot while tatting the trebles - a lot more than with cotton thread! -, so you need to drop the shuttle very often to let it untangled. In this pattern I did it every 3 tds.

All my patterns need to be reviewed and my files need some "spring cleaning", maybe I should commit myself seriously... This sounds like a new year resolution, but, well, keep an eye on me and in case please help this lazy girl to behave...

And now please let me shine the light on this one: the last doily designed by Sue Bradham. A pic is here:
http://hiskid66.blogspot.com/2020/01/finished-my-first-online-tatting-design.html
That is a great joy for me, a technique is not useful without designers that include it in their tatting!

Ciao,
Ninetta

Tuesday, 26 February 2019

half closed tatted rings with treble tatting

These are half closed rings, pattern is fast said, they are rings with 7 treble tatting stitches.
It's a lovely narrow edging, it would be perfect for a hanky!


When it happened to me to tat a line of half closed rings, I soon discovered that adding a second half stitch at the end helps in blocking the ring in position, in this way the bare thread doesn't slide and the half ring doesn't close.
In the case of treble tatting stitches, making a second half of a double stitch helps the core thread to be moved to the right position, to start the next half ring. Also, the half ring doesn't close if you, accidentally, pull the thread.


❁❁❁❁❁❁❁❁❁❁❁❁❁❁❁
Thanks to Georgia Seitz and Muskaan, who gave me a chance to brush up on my pattern for a cabochon (treble tatting in hearts ). In fact, it was shared in the Online Tatting Class on Febrary 18th.

I bought 4 rivoli and started trying the pattern with 2 of  them, but I forgot to protect the back, following a great hint by Yarnplayer (Marilee Rockley), that you may find here:
https://yarnplayertats.blogspot.com/2018/07/a-rivoli-is.html
I'll do it, with the other two.

The pattern worked well, even with these rivoli, that have a diameter of 18 millimetres.
I haven't decided yet, if I'll add the second round.

 ✿✿✿✿✿✿✿✿✿✿✿✿✿✿✿✿✿
I updated the header bar here, to add the "TREBLE TATTING STITCH - SUMMARY" page.
I hope it will be useful, it is only one page which can be attached with any teaching pattern.
The pdf version is available, too:
https://drive.google.com/file/d/1LVFAASQpj8H54fhavEEWgokMQ8gAuiHM/view?usp=sharing

Ciao,
Ninetta

Tuesday, 20 November 2018

treble tatting in hearts

For the sequence of steps for tatting a tds, please refer to this post: treble tatting - ideas or watch this video in YouTube: https://youtu.be/ra0NnlqR0oA

What you see (if, by any chance 🙀) inside the tatting, it is an ice drop, a clear rounded glass, diameter is 2cm. It's transparent, it can be hardly seen in the pics (sorry, also the gold thread isn't easy to photograph).

In next collage I put together two pics, the front side and the back. The ice drop is clearly visible from the back.
The ice drop, also known as cabochon, was already nice, even without the outer round with hearts. Actually, those curled rings shaped little hearts around it.
In next pic I'm sorry it's not so clear, but there are two different parts: one flower, only rings, one shuttle, for the rounded front side,
... and another part, a star with 8 points, curled rings and chains, for the back side:
Rings are all 5ds between each picot, and curled rings are 8ds, very small picot, 8ds. Chains are 5ds, picot, 2ds, picot, 5ds, and are connected each other in their picots.

The two parts, flower and star, are connected while tatting the back side, with those curled rings wrapped around the top beads in the flower. The cabochon was inserted before tatting the last chain.
#######
UPDATE: link to a post by Muskaan, her tatting and variations:
https://tipsaroundthehome.blogspot.com/2019/02/due-credit.html
#######

But there weren't treble stitches around my cabochon... 🤔😄
Of course you already know that I'm in the "tatting treble mode", Lol!

I thought the ice drop would have been even nicer with another round, then the heart with treble stitches it's something I've been thinking about for a while...
That is only a first idea, I think that it's something that I would love playing with again. Can you imagine how many tatting combos there are, with ds and tds together in tatted dimpled rings?


Thread is Finca metallic gold colour 0006 n.2/C, doubled (that is, shuttles are wound with 2 strands of Finca thread, it is almost like a size 20 thread), beads are rocaille miyuki 15/0 galvanized dark mauve (4213).

🌹🌹🌹🌹🌹🌹
An update about the embroidered netting lace, that is a pic with the rectangular doily finished, now I have to fill the remaining space, so the precious handmade net won't be wasted.

Ciao,
Ninetta

Tuesday, 10 July 2018

cabochon with tds - part IV

This is only the rough idea, not a pattern. I've been tatting again onion rings with tds, and I found a version I feel it could be a possible one, intriguing, with tds inside and ds outside - but opposite, facing head-to-head:
a close up:

Then it happened that I pulled too much the second ring, and those 2 rings collapsed.
I thought it was a nice place where putting a bead, like when you are making a cabochon. I took one random stone and tried, I had to test tat a couple of rings more to find the right number of stitches, but it seems it could work.
treble tatting tds

Something to play with, again, definitely 😋

The shuttle you see in pictures, it is a shuttle made in USA, called "The Astro-Knot Tatting shuttle". It's a most welcome gift from the Colours' Fairy, Fox (tat-ology), she sent it a very long time ago! These shuttles are made one by one on a 3D printer! Thanks again, Fox!

Ciao,
Ninetta

Tuesday, 27 June 2017

had nice days

I spent last week tatting more cabochons, they're such fun, I tried some different options and rummaged through my buttons' stash, but did you know that almost all of them are those which have that ring behind? So, what do you think, is the back of the earrings acceptable? Beg your pardon, I need time to tat something else that can "use" that ring...


I like having all beads already loaded in the shuttle. I've made another very short video, about the way I put beads in picots, they need to be a little loose because those picots are going to be used as joining picot. Please, I love reading your comments.This is the link:
https://youtu.be/FO-2JwiKRe4

On Sunday I went with friends, to the National Museum of Popular Arts and Traditions, which is in Rome (EUR). It was the "International Lace Day 2017" (there's a group in facebook with the same name plus the word ITALIA, you can go there to find some pictures) and I enjoy meeting others who loves lace. There's a lace exhibition too, until the 9th of July it will be open.


Old bobbin laces were in a glass showcase, those are just bits of the enormous collection (thousands of pieces) owned by the museum, unfortunately not always visible to visitors and they not always let you take pictures, they let us do it just because of the international lace event.


I was prepared to meet only bobbin lacers but as soon as I entered in a big room, a nice smiling girl looked at me, I was wearing a blue top with tatting sewed on, and she introduced herself as a Canadian tatter! The surprise was not only just for me, in fact she was there as a tourist, not even knowing about the event. What a lovely happy coincidence! Thank you for your kindness, Stephanie!


During the meeting, in the morning, there was the inauguration of the beautiful exhibition, with amazing bobbin lace designed by Keyko Fukumoto, you may want to watch her video here in Youtube:


Ciao,
Ninetta
Related post

Tuesday, 20 June 2017

naughty sewing thread!

Again about cabochons and a new video of mine.

Earrings with buttons (backside tatting is equal to front, Russian method - as far as I know). There are Usha's dot picots in chains, hardly visible in that picture, it's a pity, they are pretty and delicate. She made a video to show how to tat dot picots: Dot Picot in Tatting by Usha Shah
Thread is HWT, one thread is Finca light gold (Hilo Metalizado, 1000mts, Presencia Hilaturas), double strand, 35% polyester and 65% Viscose, the second one is an anonymous metallic sewing thread.

About HWT, please read this post by Jane Eborall:
Tatting and not a lot else!: HWT
I made a video to show how I'm winding the shuttle HWT, one of which is a very hard to manage metallic sewing thread. I've some spools of various brands, all of them unroll very easy and I soon look like a cat tangled in its yarn ball. You won't see me tangled in the video, in fact I'm sharing my way to fill the shuttle without having a headache.


In next picture there are cabochons made with my method that is tatting two rounds of rings and chains around the stone, but is seems that it doesn't work! I made 19 rings and it was very loose, so well I didn't worry and I changed it for another stone, then I made 18 rings and it was still loose, the last is 17 rings and it is loose again! Ah! this naughty HWT has got elastic properties! I bet it will work with 16 rings... no, I'd better don't bet.

In the two on the notebook, rings are 4-4-4, chains are 4-4. I think I must change the stitches' count. The stones are 3cm wide and 4cm high and they are thick.

Ciao,
Ninetta
Related post

Tuesday, 13 June 2017

international drop addiction


Thank you very much for your nice comments in my last post.😍🌹

That's the international story: after last year Edda Guastalla's tutorial on Etsy ("Come si costruisce un castone a chiacchierino", tutorial and 14 patterns), many tatters around the world became addicted in making bezels with tatting, especially Diane, who wrote a very clear Ice Drop Tutorial and started her VERY contagious series of ice drops, two or more per days for months, so beautiful that any attempt to resist is vain. There are many other patterns online in "Tatternet" (the internet looks like that if you only look for tatting!).

I had resisted till last week, but now you can say I've taken the worst infection.

I remembered a clear post in 2014 by Corina about Tatting and cabochons, then I followed her instructions for the method she had found in a Russian forum. Fast said: you tat detached R1 and R2 with the shuttle, then a chain, then tat R3 joined to R1, and in the same place tat R4 joined to R2. Continue with another chain and so on, R5 joined to R3, R6 joined to R4, chain again...
Those are stones, quartz. The method is simple and versatile (ops! another English word equal in Italian!), in fact the two rings, that you tat in the same place, let you fine-tune the bezel as you go around, there isn't the need of many prototypes to find the right measure. Corina mentions that you can draw the shape and plan ahead a little your path. I found that is better stay a bit larger, because stones have their thickness and they are all different. My first trials are very basic though.

In the next, R1 is 4-4-4, R2 is 6-4-6, chain is 6-6.

Thread is almost a size 70, HWT (ask Jane Eborall the acronym), the thin multicolour is metallic Madeira.
The next is tatted with DMC 283 metallic silver, "he" is the most photogenic in the group...
Pattern is like Diane's, in fact it has been tatted one side then, without cutting the thread, the other side.
These are black faceted glass beads.

The next are handmade glass beads that I bought in Venice in 2015, pattern is following the Russian method, then I added one or two rounds with curled rings. R1 and R2 are 8-3-8.
The next  is another stone (agate?) that I bought in the local market some time ago, pattern is equal to the cabochon that I tatted and showed in a post of June 2014 (unexpected lifeless vitality), they are two equal rounds, rings are 3-4-3 and chains are 4-4, I had to guess the number of rings because you can't say that it fits the stone till you had tatted everything, so it isn't an easy method, at least one prototype is needed. I added the last outer round of chains at the end. I don't feel to recommend this method. Thread is HWT but the little spool with sewing thread hasn't a label, I can't remember where it is from.

That in next pic is a clear glass bead, I've bought 2 but in one the hook had broken. Thread is dmc 283, sorry I didn't write down the stitch count.
Finished? Oh no! I still have a spool and miles of gold thread!

And that is an empty cage, "non tutte le ciambelle riescono col buco", i.e. things can't be expected to turn out right every time.

Now I should choose one of the drops to match with my new silk dress, if ever it will be finished in time for a wedding in early July I have been invited to.

Ciao,
Ninetta
Related post

Update: this is me with the new dress, pattern is from Burda:

Thank you very much for all your nice comments.

Ciao
Ninetta