Translate

====================

====================
Dear Reader,
I share here what I like and what works for me. If you've been following me, you know that I can change my mind from time to time, and feel free to comment that I'm completely wrong, you may be right. I'm not running a business. I'm not paid and have never received any compensation or facilitation for any review/brand/site here mentioned. In case one day we'll ever meet, I'll be the one offering you a cup of Italian coffee, too.
====================
Showing posts with label VP. Show all posts

Tuesday, 4 June 2019

moving forward

Now that I found the two doilies, I can move forward with them, granted that I won't be distracted by something else - nobody should bet on it!

I really wish I would finish this one for the end of this month:

Lately, I added "Il Lavoro Chiacchierino (Frivolité), II Album" to my personal tatting library, publication date is 1942, there are some patterns that are in previous publications, but there is one doily that looks uncommon, at least for me. It looks like another example of "reverse engineering", but I still can't say the lace which could have been the inspiration for. I'll tell you more, after some research...

Ciao,
Ninetta

Monday, 25 March 2019

temporarily out

I'm not disappearing from the blogsphere, I'm only temporarily out for fun...

Ciao,
Ninetta

Tuesday, 1 May 2018

wonder! (chissà!)

I wonder if the venetian picot can set tatting forth to drawing new shapes... I'm very curious to see what tatting designers are going to do! In Italian I'd say "Chissà!" 💕💗😍
(how to pronounce Italian "chissà"  https://forvo.com/search/chiss%C3%A0/it/)

✿❀❁❂❃❄❅❆❇❈❉❊❋
I'm very very happy to share here with you the pendant "Corallo", original design by Lalla Caliò. She shared it in an Italian tatting group in Facebook, and I love that so much, I asked her permission to post it here too. She kindly agreed to and sent me her photos, the next is a collage of her tatting:
In the next picture there's my attempt at the design by Lalla, I started a simple chain with 3 beads in the starting point, then there is a venetian picot with beads trapped in the top, that is the auxiliary thread is inserted and 3 or 4 beads are put just in the top, after then you go forward to the chain, passing each and every subsequent fhs (first half stitch) over the beads. The pattern goes on alternating chain and VP with a variable number of stitches.
That's lovely, isn't it?
✿❀❁❂❃❄❅❆❇❈❉❊❋
After the first rosette and the the thin bookmark with venetian picots, I've been playing with the idea of "joining venetian picots", that is something similar to what I did in the body of Muskaan's butterfly in last post (butterflies).

I found that it's better to keep something like a pin or another thread (this works better for me) inside the top of the VPs, because it happened that when I was looking for the 2 top loops to join the VP, I had troubles, due to my short-sight and to the "shifty" picot.

I already wrote this but it's better to repeat, otherwise I'd hear you expressing yourself in French and that's not convenient for any nice tatter. You have to be very careful when joining, in fact you see that the venetian picots have two loops to be taken in the join, if you take only one loop they unravel!

Well, I have a little square that I think it's "the less tatting-like thing" that I've tatted:
--- Pattern ---
Legend:
CTM continuous thread method
VP4 = venetian picot, in this case I write VP4 to indicate that the picot has got 4hfs, I measured all picots with a gauge of 4mm
puncetto tatting (also called the pointed chain): https://flic.kr/p/9Cbk3R 
CWJ = Catherine wheel join
LJ = lock join
JSS  = Karen Cabrera's video 117 - Anne Dyer's JSS

Wind up 2 shuttles CTM. I used dmc ecrù thread, size 40.
The centre is a ring with 1ds, 7 VP4 separated by 1ds each, end with 1ds and close the ring, then I climbed to the first round with a line of puncetto tatting (5 puncetto stitches) and then
The first round is: a chain of 8ds, picot, 8ds, lock join to 2VP together, repeat all around.
The second round is: a chain of 8ds, then a CWJ in the picot, then picot and another CWJ in the same underlying picot, 8ds and LJ to same point of the underlying LJ, repeat all around.
The third round (is similar to 2nd but with VPs, that is): a chain of 5ds, VP4, 4ds, CWJ in the underlying picot, {FR: 6ds,picot,6ds}, and another CWJ in the same underlying picot, 4ds, VP4, 5ds, LJ to same point of the underlying LJ, VP4 , repeat all around and don't tat the last VP4, in fact that is the point where I climbed up to the next round, again with a line of puncetto tatting (5 puncetto stitches). (Maybe here I should have tatted one puncetto stitch more, something to tat again)

The pattern can go on and on, adding chains' rounds and VP4 all around, just increasing the right number of ds, that is what has kept me busy for a week, ruffling and cupping and grumbling!

Fourth round:  5ds, JSS to join the underlying VP, 10ds, then a CWJ in the picot of the FR, then picot and another CWJ in the same underlying picot,10ds, JSS to join the underlying VP, 5ds, JSS to join next VP, repeat all around.
Fifth round: 5ds, LJ, 11ds, then a CWJ in the corner picot, then picot and another CWJ in the same underlying picot, 11ds, LJ, 5ds, LJ, repeat all around.
Sixth round: (it is similar to 3rd but with VP4 separated by total 6ds, that is): a chain of 5ds, LJ, 1ds, VP4, 6ds, VP4, 5ds, CWJ in the underlying picot, {FR: 6ds,picot,6ds}, and another CWJ in the same underlying picot, 5ds, VP4, 6ds, VP4, 1ds LJ 5ds, LJ, VP4 , and repeat all around.

I stopped there. If you'd like to continue (and add your count for ds and VPs), don't tat the last VP4, in fact that is the point where you can climb up to the next round, again with a line of puncetto tatting.

I like a lot the Anne Dyer's JSS to join this tricky VPs. If you haven't read it yet, I highly recommend the book "To Boldly Go Where No Shuttle Has Gone Before or Tatting Definitely Not for Beginners" by Anne Dyer, it is one of the best tatting books I've bought.

Ciao,
Ninetta

Tuesday, 24 April 2018

butterflies

I thought I would have had something designed and tatted with venetian picots by the end of this month, but I haven't. Instead, I love butterflies and the past week I lost all my tatting time to catch two of them!

The first one is the butterfly designed and shared by Muskaan, she asked us to beautify her already nice pattern: https://tipsaroundthehome.blogspot.com/2018/04/make-me-pretty-please.html

That is my version
I added some downwards facing picots, that are explained here:  http://www.janeeborall.freeservers.com/DownPicot.pdf (she has everything about tatting! Thank you Jane Eborall!)
In the little ring for the butterfly, for example, the original stitches count is 6-10, with the downwards facing picot, it becomes: 6ds, picot, 2ds, (seta, picot, setb), 6ds.

The next picture is to scale the butterfly to her real size...
I used a thread that I hadn't tried before, it's Anchor size 70, very similar to a size 80 DMC but much more soft

I hope Muskaan likes how I added the body and the head to her butterfly. The head is a ring (3ds, long picot, 2ds, long picot, 3ds). The body is a venetian picot, I think that is easier than the puncetto tatting that I used to tat for the body of my little butterflies, back in 2011:
motif.17
(there's a set in Flickr, here is the link: tutorial butterfly on cloverleaf).
But you have to be very careful when joining, in fact you see from the close up picture next here, that the venetian picots own two loops to be taken in the join, unless they unravel.

🦋🦋🦋🦋🦋🦋🦋🦋🦋🦋🦋🦋

The second butterfly is the one shared this week in the Online Tatting Class:
http://www.georgiaseitz.com/2018/patterns/20180422nyh39.html
Pattern is from "Forty Original Design in Tatting by Nellie Hall Youngburg, Novel and Unique Designs with Complete Instructions for Every Pattern Designed and Executed by Nellie Hall Youngburg, Brookings, SD ©1921."
Almost 100 years and still flying! And that is the same age of my granny...

Ciao,
Ninetta

Tuesday, 3 April 2018

video for the venetian picot

Venetian picots in tatting.


That is a tatted picot resembling the venetian picot in needle lace.
It can be done in rings or chains, as though they were normal picots (maybe also as a joining picot - to be tried).
You need an auxiliary thread, length 20cm at least, folded in half, that it is used for finger tatting.
The rosette pattern in this video is original @Antonina Caruso 2018
Thread used in the video is DMC ecrù size 10

Tat a first half stitch, leave the stitch open. Put the auxiliary thread back the first half stitch, pull it and fold it in half.
Gently pull up the half stitch with the auxiliary thread,leaving the space for a short picot.
Finger tat one first half stitch, using the auxiliary thread.
Move the stitch OVER the picot, close to the upper part of it.
In this way the picot is trapped in length and position.
Finger tat a second half stitch and slide it towards the base of the picot, close after the previous stitch.
Finger tat a third half stitch; repeat as already done:  slide it towards the base of the picot, close after the previous stitch.
Repeat more first half stitches till you fill the picot and reach the base, here I finger tatted only 3 first half stitches.
Now you can take the core shuttle again and continue with normal tatting.

❀❀❀❀❀❀❀❀❀❀❀❀❀
<<< Italiano >>> 
Pippiolini veneziani inseriti nel pizzo chiacchierino. 

Questo è un pippiolino per il pizzo chiacchierino a navetta che somiglia ai pippiolini del merletto veneziano ad ago. Può essere fatto in qualunque parte del lavoro al posto di un normale pippiolino (forse può essere usato anche come pipp. di unione - da provare). E' necessario un filo ausiliario di almeno 20cm piegato a metà, che serve per lavorare a chiacchierino sul picot con le dita senza navetta. Lo schema della rosetta è originale @Antonina Caruso 2018. Il filo usato per il video è DMC ecrù num.10.

Fare un primo mezzo nodo (prima parte) e lasciarlo lento. Mettere il filo ausiliario sul retro del mezzo nodo e tirarlo attraverso l'asola del mezzo nodo, piegarlo a metà per poterci lavorare. Tirare con gentilezza il filo ausiliario per formare un picot. Lavorare con le dita un primo mezzo nodo e farlo scorrere SOPRA il pippiolino vicino alla parte alta. In questo modo il pippiolino viene bloccato in posizione e in altezza. Con le dita lavorare un secondo mezzo nodo e farlo scorrere verso la base del pippiolino, vicino e appena sotto il precedente mezzo nodo. Lavorare con le dita un terzo mezzo nodo; ripetere come appena fatto: farlo scorrere verso la base del pippiolino, vicino e appena sotto il precedente mezzo nodo.
Ripetere tanti mezzi nodi fino a riempire il pippiolino e raggiungere la base, nel video io ho fatto solo 3 mezzi nodi.
A questo punto si può riprendere la navetta e continuare a lavorare normalmente.

❀❀❀❀❀❀❀❀❀❀❀❀❀

Thank you for watching.

Ciao,
Ninetta

Tuesday, 27 March 2018

venetian picots

I absolutely love venetian needle lace but I can't do it. If you feel ready to get amazing inspirations, you may follow this blog: Merletto Veneziano by Ombretta Panese.
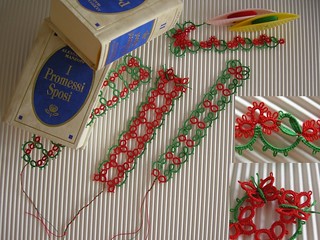
Lately I've been playing with venetian picots, they have a characteristic look that is like a stick. I think I've found a way to tat them and after many failed attempts, eventually I've got something very similar:
You can see from the picture that I used an auxiliary thread:
The trick is finger tatting the picot, with an auxiliary thread, looped inside a first half stitch, and to go back toward the chain with first half stitches
Of course it can be done in rings or chains, as though they were normal picots
I tried to film myself but I need more time to have a video good enough for youtube.

I've bought one of the books written by Ombretta Panese and Marialuisa Severi, there's wonderful lace and even if I won't learn how to do it, it's very interesting to have an idea of the technique
You see I couldn't resist to buy the reprint of Palliser's, for only 4,32 euro. And I also bought that one by Alicja Kwartnik, "Bordi con il chiacchierino ad ago", a gift for a friend, new tatter (hurray!).
Another 2 books that I bought in the last few weeks: one is another reprinted old book and the other is new and very interesting, by Alessandra Caputo (her site is Merletto Italiano) "Il baule di Angelina". It is about how Alessandra received a chest full of old sets of samples, bobbin lace and needle lace, belonged to a lady who used to teach in a female professional school in Rome, and that lucky, fortuitous finding was the great opportunity for her to study the lace and the history of the school from the last years of the XIX century till about our days.

Ciao,
Ninetta

Update: video added: http://ninettacaruso.blogspot.com/2018/04/video-for-venetian-picot.html

Thank you very much for all your nice comments.

Ciao
Ninetta