Translate

====================

====================
Dear Reader,
I share here what I like and what works for me. If you've been following me, you know that I can change my mind from time to time, and feel free to comment that I'm completely wrong, you may be right. I'm not running a business. I'm not paid and have never received any compensation or facilitation for any review/brand/site here mentioned. In case one day we'll ever meet, I'll be the one offering you a cup of Italian coffee, too.
====================
Showing posts with label "curled ring". Show all posts

Tuesday, 17 September 2019

thumb sized pillow

At last! I've started decorating a box for making the dollhouse's bedroom, I had already finished the bedspread (https://ninettacaruso.blogspot.com/2017/12/spread.html) and the toilette (https://ninettacaruso.blogspot.com/2018/01/nothing-is-perfect.html), then I needed only one pillow, something to put into the wardrobe, curtain and drapes. And the help of a friend 😉

That's the pillow. Thread is DMC Spécial Dentelles Size 80, colour number is 397 Pale mauve.
Tassels are made with the same thread and then sewed at corners. I designed the square pattern including curled rings and treble tatting stitches.


It is about 4x4 cm, about the half of a thumb size (length), according to what I've just discovered, googling "what is the size of an average thumb". It's incredible how many things you can find googling, but then, who can question that? I can measure just my own, it's not convenient going around measuring thumbs 😕

I haven't decided yet how to set the bedroom.

And now, my stitches' count, sorry that's a little tricky to read, but actually put numbers on a picture is a lot far easy and fast than preparing a tidy drawing... I hope you'll like it anyway and forgive my laziness... 🙇

The CR (= Curled Ring) is joined using the hidden picot in the middle (I joined it and the picot of the  chain together, to block the CR in its position), that is between the second and the third tds.
Those rings in the outer round are normally joined, you tat the second one in the corner and join previous ring in its vsp, just after the 5tds, before tatting the 10 double stitches.

Please refer to the page  "Treble Tatting Stitch - Summary" for any info about treble tatting stitches, thank you.

Ciao,
Ninetta

Tuesday, 10 September 2019

trebles in curled rings - mad mad snowflake

That is my "mad mad snowflake", if you have time to read you'll know why, otherwise have fun with pictures (especially the last one)!

A treble tatting stitch can be used in any tatting element, grant that you have the pattern! Otherwise you should have to write your own...
Thread is DMC Spécial Dentelles Size 80, colour numbers are 701 green and orange 740.

I designed this little motif to see how curled rings could work when you have treble tatting stitches in the ring.
Initially, my idea was to tat a curled ring with all tds, but actually the back of the CR is not visible on the front, so it's been sufficient tatting trebles on the half visible side! Except if you like the treble stitches showing off on the back, too. That is the third attempt at the pattern, the first one had 2 rounds with all trebles in curled rings, then I told myself that was a mad mad snowflake...
Just to mention, in curled rings you need a very small picot to fold it, that can be in any place it depends on the pattern. In the case of tds, any of the hidden picots can be used to fold the curled ring.

##############
But then I added a little madness more.

I've also tried a technique showed in a Japanese site, but actually it is the same as the monster (or "wide") picots, just used there in order to have a better front appearance when tatting a double picot. Of course it shows like a charm with thick thread, but it is a madness (and worthless!) with my tiny size 80 thread!
So why? There's moments when you just have your shuttles loaded and a voice says "what if", how can you resist?
The technique was showed in a blog by a tatter that the automatic translation introduces you as "Hello, this is YuiYui", that sounds like a very sweet name. It's a great thing that we have automatic translation but I wish I  had found a name and surname to tell you. The link where you can find the technique is this one: http://www.yuitatting.com/2017/06/15/82/

Thanks YuiYui, that was really fun to tat 🤗 !!

Here it is my stitches' count, for anyone who's willing to tat my mad mad little snowflake:
WP = monster (or wide) picot 
The CR (= Curled Ring) is joined using the hidden picot in the middle (I joined it and the picot of the green chain together, to block the CR in its position), that is between the second and the third tds.

Please refer to the page  "Treble Tatting Stitch - Summary" for any info about treble tatting stitches, thank you.

Happy tatting!

Ciao,
Ninetta

Tuesday, 22 January 2019

ready and steady for Valentine

These are ready and in time for Valentine's Day!


Red thread is 2 strands of DMC Mouliné Metallisé, Jewel Effects, number E321, sold in skeins.
Gold thread is 2 strands of Finca metallic gold colour 0006 n.2/C.

I'll put the pattern in Flickr, soon. In the meantime, I'm already wearing them, just the size I like!

And then, I'm very ready for an upcoming event: on February 2nd, I will be teaching one day course about the treble tatting stitch, at the local lace's association, I'll teach an original unpublished pattern of mine, that, I'm sorry, I won't share online.

Ciao,
Ninetta

UPDATE: pattern is here: https://ninettacaruso.blogspot.com/2019/01/pattern-ready-for-valentine.html

Tuesday, 1 August 2017

having a tuft on the ring

This little motif has been tatted with an idea in mind, that is trying to use an effect I discovered some months ago while playing with picots. Thread is DMC size 80. I love the little star that the bare thread makes in the centre. I'd like adding antennas to the tip so those can resemble butterflies, so maybe I can rework this pattern again.

The blu&white motif is showed the back side. Pattern is my original, but - as usual - if by chance it is like another one already seen, please tell me.

The "tuft" on the ring is tatted with only one shuttle, formed by the same thread wrapped around the hand and I admit I used a gauge, but now I'd like playing a little... as a joke.

Do you guess how it is tatted? I'm listening...

Ciao,
Ninetta

Friday, 27 January 2017

ideas from scraps

I'm sorry I've been neglecting my blog, lately. Before I start talking about scraps, here it is the measure - as promised - of the doily I've just finished:
and that is the same doily and Wiosna2016 side by side, just for get the idea of the size.

I've something else that came again in the spotlight this week, that is about the snowflake with bugle beads "sbrilluccicante", it has just been shared in the Online Tatting Class, with a video-tutorial, too.  Thank you so much to Georgia Seitz and all. Have you heard that they are collecting donations via yotube videos? Read more on their website: http://www.georgiaseitz.com/2017/2017index.html .
I'd like sharing with you two versions, the first has longer beads than in the first one, so I had to add ds in the outer round:
The second one is with 2 colors' beads, one shuttle was loaded with one color, the second shuttle was loaded with the second color:
Long post, I see.
Let's go on, please.

I started the edging that had been on my to-do-list for ages: that one that is at page 8 in fig. 23 in Priscilla #1, I'm using white dmc size 100 thread.

The book is here: http://www.antiquepatternlibrary.org/pub/PDF/DeWittPriscillaTat1.pdf

I changed the length of bare threads, they are all 0.5cm, also picots are the same size high. It's quite different from the original but I like it this way, more regular.

my plastic gauge
Maybe someone remembers that I tested the wheel motif in October, 3 months ago! please don't ask what happened then, time flies so fast that I can't answer.

Per Priscilla's words: "Make 40 of these wheels for the border, joining them as seen in the illustration." The picture in the pdf is quite blurry, I think. I copied it and played a little with Serif software, and I obtained the pic already shared with you:
Looking at this kind vintage tatting, I can't help myself thinking that "tatting" is a word that also translates with the italian word "brandello", that is something made with shreds, scraps, and this also reminds me of old ladies who can't throw away anything even bits of thread, that couldn't go wasted!

More than a century later from that picture, I tatted 5 wheels to visualise how big the edging is, and I think that 6 wheels in each corner would be good for a rings' pillow. 24 wheels instead of 40, split rings and modern technologies! good enough for me! 😊😊 Motifs are not yet joined, I only put them close each other to see where the joins should be.
But at first glance, it looked crowded, too many picots, my personal taste. I'd rather prefer something quite easy to iron, isn't it?

...those motifs will soon become tatting scarps, but the idea came to me. I'll show you in next post (I hope).

I'll keep my scraps, I always keep them. Since I've had a notebook, it has been stuffed with scraps, then when I think I'm having that "tatter's block", I look into my notebook and there's always something that can be rescued. A lot of ideas comes from scraps.

In the meanwhile, I found that variegated thread, already wound on the shuttle. A bird told me that it can be a butterfly, so it's time to Tat It And See if it flies ...
Ciao,
Ninetta

Tuesday, 6 December 2016

half

First of all, congratulations to the winners of the 2016 Craftree Awards! Everyone nominated are talented tatters, master tatters indeed, and I'm very grateful to have been part of the fun, still can't believe it. Thanks soooo much to each one of you who took the time to show your appreciation.

Today is a cloudy day, the photo hasn't come out well, it's blurry and I couldn't get a better one. Tatting is slow these days. I also knitted a sock - something I must unravel, I'm very bad at knitting, 8 hours for one wrong slipper. But the pleasure comes from the craft itself, I don't mind re-do that. That's the same with tatting, that's my favourite craft. Tatting the same flower again and again all around, it's a pleasure, relaxing and almost therapeutic.


I'm halfway with this, I can't say the same about xmas' gifts and other stuff to be done before Christmas. I wonder why time flies so fast?

Chau
( http://goperu.about.com/od/cultureandsociety/fl/How-to-Say-Goodbye-in-Peru.htm )
Ninetta
Related posts:

Tuesday, 15 November 2016

on the edg-ing

Edgings are the only kind of edge where you can see me on! Right now, I'm going to do that extreme sport, that is tatting a round of flowers, but I still must try few options, if 64 flowers or less with different elements in between. The risk here is to be on it till next year, but extreme sports - as per definition - must involve speed, too!


Finally I got one picture with almost the right threads' hue:
Threads: green dmc 471 and  mauve dmc 3687. For center rings in flowers I'm using lizbeth 131.

In the next picture there's a pair of earrings in which I tried another combination of split rings and wide monster's picots. The pattern starts at the bottom and finishes at the "fish hook", also called "french hook". I like this type of earrings' hooks, we call them "monachella" (I can't see any relations with nuns, though!!), but I've lost so many earrings so it's been a while that I started putting a soft rubber back stopper.

My favourite earrings? Dewdrop Earrings by Jane McLellan (janemactats.blogspot.com)

Sahha
(http://www.mydestinationmalta.com/usefulinfo/maltese-language-basics)
Ninetta

Wednesday, 5 October 2016

blog anniversary

Thank you very much for visiting me during these 3 years! Time flew!

I know Who has to be blamed for these almost 300 posts of mine that you've had to put up with ;-) ... (thank you dear!), but I don't know how it's been possible that I had over than 200,000 visits! My heartfelt thank you to everyone! Thank you so much for your support and for sharing with me your love for tatting. If you are a blogger too, please let me know with a comment, I'll add it in "My Blog list" in the sidebar. (I'd also say thanks to Google Translator, indeed!)

This week I'm going on with the green&purple doily, but I just needed a break. That's how the centre looks in white:

Sorry, I can't say what that thread is, very thin but without a label, it's a cotton ball my aunt gave me last year so it's been something old, not so much twisted in fact the lace turned out very soft.


chau
( https://halupi.us/2012/06/28/uruguayan-greetings/ )
Ninetta
Related post

Friday, 30 September 2016

this way or that, it's always a fun time

I'm enjoying all rounds. I wonder if this patter could work in total white ... I'm sorry, this doily hasn't a proper name yet!


While tatting, I make a note about the way I'm doing it, as suggested in Muskaan's This Way or Tat exercise, and I found that for this doily - unconsciously - there's a mix of ways and changes of directions and not always the same method to hide ends, too. In the case of a new design, often the thread must be cut, just because that is the prototype, so it happens that I cut a quarter of one round to change stitches' count.

Basically I'm having fun, so in general I don't care cuts nor the direction.


Nevertheless, I like the look of all front side tatting, in this case emphasized by the curled rings.

Rounds with only chains: tatted with normal ds (flipped), clockwise direction.
Rounds with little rings and curled rings: chains tatted with reverse stitches – these are not flipped, and the order of half stitches is reversed; rings tatted normally. These rounds grow in counterclockwise direction.

All little rings used in centres are tatted separately and closed using the magic trick to hide their end.

Chào + [The correct word to address that person]
( http://yourvietnamese.com/vietnamese-phrases/learn-hello-goodbye-in-vietnamese )
Ninetta
Related posts:

Friday, 23 September 2016

go on


12th round... to be continued!

Wuasleglla!
( http://www.guidebolivia.com/pratique/gb_quechua_aymara.htm )
Ninetta
Related posts:


Friday, 16 September 2016

juncture

It looks pleasant till now, but I'm afraid to overload it with more curled rings. Stop it or continue? It's a wee bit larger than a coaster.


Doviđenja
( http://learn-croatian.com/croatian-phrases.php )
Ninetta
Related posts:

Friday, 9 September 2016

around

Slowly growing around.

Slán
( http://www.omniglot.com/language/phrases/irish.php )
Ninetta
Related post

Thursday, 8 September 2016

o-beads again

Oh well, I need a matching pendant now!


I've been playing with O-Beads, nicely shaped as a tiny tiny donut!

Thread is metallic gold DMC 282.


Five grams are a lot of beads! I still have the packet full!


La revedere
( https://www.tripadvisor.com/Travel-g294455-s604/Moldova:Important.Phrases.html )
Ninetta
Related post:

Wednesday, 7 September 2016

that's not that!

That's not that! That's just my doodle, let me say, transformed in tatting... All knotted and curled! Just my "light-ANKARS" style! I find very difficult designing a pure ANKARS motif, hat off to those talented tatters who can!

If you like learning what ANKARS really is, you may read this first: http://www.ankars-club.ru/index.php/o-tekhnike-ankars/o-tekhnike-ankars/about-technics-ankars.html

Blue and pink versions are from the same pattern.

That is the back side:

I've used 2 shuttles filled with 3 threads, one size 80 cotton Lizbeth col.122 and  2 strands of metallic gold DMC E677 - and loaded seed beads. Then I sewed swarovski beads on, with an invisible sewing thread 100% polyamid.

Threads loaded for the pink version are cotton DMC size 80 col.3778 and one strand of mouliné DMC E677.

That is the pink motif before sewing beads on:

Uz redzēšanos
( http://www.latvia.travel/en/article/useful-words-and-phrases )
Ninetta

Friday, 2 September 2016

wide

Adjective "wide" not (yet) referring to that doily!! But you should make those picots out, don't you? That is called - as I just discovered - "wide or lochness monster picot". They are great to be gripped by curled rings!

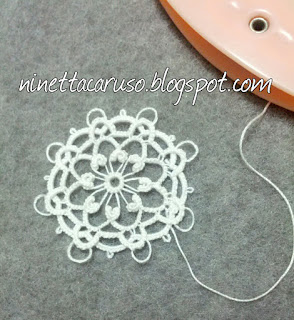
I thought that I would have never managed to tat even one wide picot, but then I found a great video by mytattingplace (Shannon I don't know/remember her name, sorry) here: https://youtu.be/qONlAylfXIQ ;and a tutorial by Claudia Meza here: http://howtotat.blogspot.com/2010/04/lochness-monster-picot.html and here: http://howtotat.blogspot.it/2010/04/wide-picot-picot-ancho.html
There's another video by Karen Cabrera (Lesson 34), here: https://youtu.be/IaT-Pktx9nw  , the difference between those videos is that Karen makes it in the way also explained by Claudia (2ds followed by 1ds over the picot's loop), while the lady "mytattingplace" tats only one ds and then tats the next over the loop. I like this second one, the loop is hidden inside all ds under the wide picot, just to my liking.
---------------------------
UPDATE: that is the original link by ©2003 Dan Rusch-Fischer:  http://pages.suddenlink.net/tatmeister/widepicot.html
---------------------------

I promise this motif will be bigger, as the size 80 thread permits!


Where I'm going to use these?


Ha det!
( http://mylittlenorway.com/norwegian-lesson/hello-and-good-bye/ )

Ninetta

Thank you very much for all your nice comments.

Ciao
Ninetta