Translate

====================

====================
Dear Reader,
I share here what I like and what works for me. If you've been following me, you know that I can change my mind from time to time, and feel free to comment that I'm completely wrong, you may be right. I'm not running a business. I'm not paid and have never received any compensation or facilitation for any review/brand/site here mentioned. In case one day we'll ever meet, I'll be the one offering you a cup of Italian coffee, too.
====================
Showing posts with label Riego. Show all posts

Tuesday, 9 October 2018

treble tatting wrapped around your finger

Thank you very much to all tatters who have generously shared their knowledge online. I've first learned about Maltese Ring from the pages "TAT'S AMORÉ, Martha Ess' Tatting Page", unfortunately now not yet available (lost since 2013). Then I have rarely used this technique, and also I know only few patterns that use it. Some are also by Martha Ess, but I don't know which book of hers.
(For some references about Maltese Ring Tatting, please read at the end of this post.)

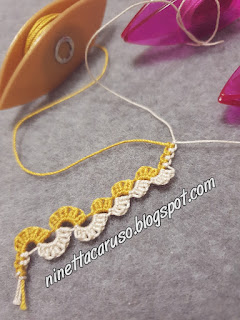
In previous post I tried to use treble stitches in pearl tatting. In this post I show you my samples with Maltese rings. That is an old technique in tatting, originally found in "The Pearl Tatting Book" by Riego, 1866. Maltese Ring is pearl tatting done in rings. But, while pearl tatting is made using 3 shuttles, only 2 shuttles are required in Maltese rings. However, I'm not going to explain how to do a Maltese Ring. There are very clear tutorials and videos online. 

Abbreviations:
ds=double stitch;
rs=reversed double stitch;
tds=treble tatting stitch (it starts always with a vsp, then it's never mentioned);
vsp=very small picot;
SH1: shuttle used to wrap the loop around the hand (white thread in pictures)
SH2: shuttle used to make the stitches that are on the core thread of the ring, those can be flipped or not, and can have picot facing inward or outward (yellow thread in pictures). Also, with tds, picots can be over or behind.

treble tatting tds
tds in Maltese Rings - variations
In previous picture, the rings have all the same number of stitches, what changes is the way that threads are exchanged, up or down, over or below. There are always 8 tds with SH1, rings start and finish with 2ds, one with SH1 and the other with SH2.
Number 1: start with SH2 wrapping both ring threads with a rs. then 1ds with SH1, then alternate 1tds with SH1 and 1rs with SH2 wrapped on the core thread. Finish with 1ds with SH1 and 1rs with SH2 wrapping both ring threads.
Number 2: UPDATE, this is for Number 3:start 1ds tatting with both shuttles in hand, then 1ds with SH2, then always move SH2 over the loop around the hand, then tat the tds with SH1, then pass SH2 inside the loop from back to front and tat the ds. Alternate 1tds with SH1 and 1ds with SH2. Finish with 1ds with SH2 and 1ds with both shuttles.
Number 3: UPDATE this is for Number 2: it is like number  3, but alternately: -->always drop SH2 in the front of the loop and -->move it over the loop.
Number 4: it is like number 1, but always when tatting 1rs with SH2, wrap both ring threads.
Number 5: it is like number 2, but always move SH2 over the loop around the hand.
Number 6: it is like number 2, but between tds with SH1, there are tds tatted with SH2.

When I read this post by Eliz: http://tatknot.blogspot.com/2011/05/maltese-rings.html, I noted her remark about the first and last ds in the ring. I think it is the same or similar technique showed by Anastasija Yelisejeva for the 2-shuttle ring (she has a pdf in her site). Then, that it is what works for me: when I want to tat outward facing picots, I start tatting the first ds in the ring with both shuttles (picture A); if I want to tat inward facing picots, I start tatting the first rs with the second shuttle, encapsulating both the core thread and the thread of the loop around the hand (picture B):
treble tatting tds
I tatted in a similar way the last ds in each maltese ring.
After those first rings...
treble tatting tds
...I became more adventurous:
treble tatting tds
tds in Maltese Rings - more variations
Number 1: it has a dense centre, because I tatted 2 reversed tds  inside the ring, tatted with SH2. (there is a video of mine for how to tat reversed tds)
Number 2: that one has (yellow) tds with SH2, tatted encapsulating both ring's thread. Then (white) ds are tatted with both shuttles in hand.
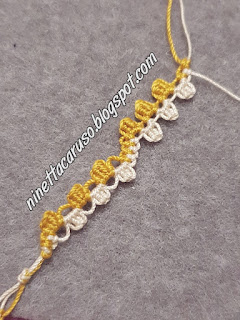
Number 3: experimenting a little, it has daisy picots that look like little hats over the white tds. That is for I have tatted 3 normal ds with the loop around the hand but using the SH2 shuttle, like in a daisy picot, then that chain is followed by a tds tatted with SH2 thread. Maybe, this one had needed its blog post apart.
Number 4: same as number 3, but the daisy chain is with picots.
Number 5: that has a very dense centre, because it is like number 1, but also I tatted a ring inside with the SH2 thread.

I like a lot the effect of the daisy picot combined with trebles, like in number 4. I thought it was nice enough to design a pattern with it.

treble tatting tds
Pattern is like this next (sorry, forgive me any oversight, and please let me know so I can amend):

Modules are tatted with 3 shuttles, let's call them X, Y and Z. Then, for example, 1ds x means one ds tatted with the shuttle named X. In my pictures, Y is the shuttle with the yellow thread, while X and W are two shuttles wound CTM.
Abbreviations:
e. = means tatting encapsulating both ring's thread
dds = daisy chain with ds.
Passing from tds to ds or rs, there is always a vsp, not written in the text.

-----------
UPDATE:
I'm not sure about terminology, that is I'm not sure about what I called here daisy chain, or "daisy double stitch" (dds), in my sample number 4.  In fact, in the daisy picot technique, you make unflipped stitches with the second shuttle over the picot. But here I do the flip. Any help, please?
-----------

First Module:
Maltese Ring: Wrap the loop around the hand with X. Then start with 1ds tatted with both x and y shuttles in hand, 1ds y, put y thread over the loop, *{1tds x, [dds with shuttle y: 1ds, p, 1ds,p, 1ds]; 1tds y, put thread y over the loop}, repeat from * 2 times more;
1tds x, 1rs y,  # 1tds x, 1rs y, 1tds x, 1rs y ; {reverse work, Ring with y: 1ds,p,1ds,p,1ds,p,1ds,close, reverse work};
1rs y, 1tds x, 1rs y, 1tds x, 1rs y, 1ds x, 1rs y,1ds x, 1rs y e.
Close Maltese Ring. You should have both X and Y over the ring, pointing to the left.

Pass both X and Y threads under the base and move both on the right, then tat 5rs with w (that is with the third shuttle), encapsulating both X and Y.

Reverse work and lock join with shuttle x only, to the last hidden picot after the last tds in the Maltese Ring.

Pearl tatting a chain with ds, using shuttle x as the core thread, 1 ds w up and 1rs y down, that is 7 repetitions of 1ds w and 1rs y.
Finish this segment with 1ds w encapsulating both y and x.

Lock join with shuttle x in the hidden picot signed  #  in previous Maltese Ring.

Don't reverse work.

Second Module:
Start next motif with shuttles w and y for the Maltese Ring. In the first module's pattern, read w when x is written, and x when w is.

Alternate First and Second modules for your desired length.


😓😓😓😓😓😓😓😓😓😓😓

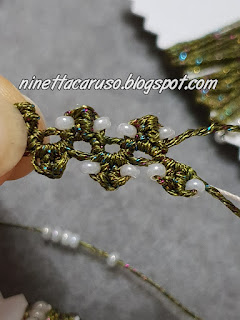
So, I've started another bracelet - or can it be used as a bookmark? -, it's still a work in progress, that goes in the same box of the previously started bracelets (uh-oh!). It's tatted using 3 shuttles. I've used Finca metallic thread for X and W (light gold Hilo Metalizado, 1000mts, Presencia Hilaturas, I've wound 2 strands each), and the Y shuttle thread is dmc diamant D301. Gold is always difficult to photograph.
treble tatting tds

treble tatting tds
----------
UPDATE: Link to the video:
 https://youtu.be/It4NvbMKa8U
----------

🐝🐝🐝🐝🐝🐝🐝🐝🐝🐝
I put here - also for my personal reference - some links about the Maltese Ring technique:

Tutorials:
- by Miranda: http://tattingfool.blogspot.com/2011/04/daisy-picots-and-maltese-rings.html
- by Corina Meyfeldt: http://cmhandmade.blogspot.com/2014/04/fake-maltese-chain.html
- by Eliz Davis (aka Tatknot): http://www.georgiaseitz.com/classes/maltesesnowflake.html
- pdf files by Anastasija Yelisejeva: http://frivolitatting.com/ 
then follow "Theoretical part"--> "2.1  Basic ways of tatting and implementation in methods and elements.". This one in particular is about Maltese Ring: MalteseRing_ENG_18.05.12.pdf

Videos :
- (Needle tatting, by The OTC) Lesson 23 Pearl Tatting or Maltese Tatting: https://youtu.be/lp6AdmkpAfE
- Tatting a Maltese Ring by tatmantats: https://youtu.be/40CoWuUPX8k
- Maltese Ring by Karen Cabrera: https://youtu.be/Ijw7lbhaPvA

Pattern with Maltese Rings from The Pearl Tatting Book by Riego, 1866:
Nov. 3 Bella Online Newsletter Riego pearl tatting pattern

Patterns:
Riego Maltese Butterfly by Jane Eborall (pdf)
Maltese Ring Pinwheel Flake by Eliz Davis
by Anastasija Yelisejeva, patterns at: http://frivolitatting.com/
by Jane McLellan: https://janemactats.blogspot.com/2013/01/sunflower-pattern.html

Books:
- The Pearl Tatting Book by Riego, 1866: http://www.georgiaseitz.com/public/riego/riego10thepearltattingbook.pdf
- The 'Alternate Thread' technique I learned that it's explained in one of the books by Gary and Randy Houtz; unfortunately I still don't have that book. Anyway, I found their link with a drawing: https://www.gr-8shuttles.com/ATbook.shtml

🐝🐝🐝🐝🐝🐝🐝🐝🐝🐝

Treble tatting series finished? Who knows!

Ciao,
Ninetta
UPDATE: Please refer to the page "Treble Tatting Stitch - Summary" - https://ninettacaruso.blogspot.com/p/blog-page_95.html for any info about treble tatting stitches, thank you.

Tuesday, 2 October 2018

up, upper, and down

I've been playing with pearl tatting, using tds and ds in various combos. Like the up-and-down with ds only was not enough...
treble tatting tds
Abbreviations:
ds=double stitch;
tds=treble tatting stitch (it starts always with a vsp, then it's never mentioned);
vsp=very small picot; 

That is a bracelet, it's still a work in progress, tatted using 3 shuttles. It is a chain with equal sections up and down, repetitions of 1ds and 4tds with upper grey thread and down pink thread. One big bead (that is hematite stone) is moved in place from the core shuttle, every each up-and-down sections. I've used 2 strands of DMC Mouliné Metallisé, sold in skeins, and the core thread is cotton, dmc size 10, ecrù.

(For some references about what is Pearl Tatting, please read at the end of this post.)

In the next pic, you can see the "wave" without beads. There is a chain with 3 variations, 2 of them showcase tds. The first group has (like the bracelet) sections of 1d and 4tds each. The second group has 1ds and 2tds. I've finished this sample with consecutive ds on each side.
treble tatting tds
The second group looks like block tatting, isn't it?

For the bracelet, next pic took the moment I put the bead in place:
treble tatting tds
... and the next pic shows 1ds and 1tds just tatted after the bead:
treble tatting tds

🔍🔍🔍🔍🔍🔍🔍
The pearl tatting using tds makes the tatting not only straight or curving, like that one depending on the sequence of only double stitches. The height of the treble tatting lets us playing also with the shape of the line, and also with the bare thread lenght between repetitions:

treble tatting tds
In previous chain you see 3 variations, actually 2 displaying the tds. The first group has repetitions of 1ds,1tds,vsp,1ds each, and also there is space left between repetitions. The second short group is just consecutive ds on each side. The third group has the same repetitions of 1ds,1tds,vsp,1ds each, but I didn't left a space between repetitions.

I used the last sequence in the next bracelet, putting also beads in vsp. That is a prototype and another work in progress, in fact you see that I started without beads. Thread is a very cheap and thick thread, bigger than a size 10, bought at the market, don't know which brand is. Core thread is dmc size 10.
treble tatting tds
A close up:
treble tatting tds

🔎🔎🔎🔎🔎🔎🔎
What if the tds substitute the ds in a chain? Of course you can tat a chain with all repetitions of 1tds up and 1 tds down, exactly the same as you do with ds.

But I think the shape of the chain is made a lot more interesting by alternating ds and tds.

For example, in the next picture the chain looks like a sequence of leaves: it has two groups, one leaf start with a group 1ds up and 1ds down, again 1ds up and 1ds down, then a group with 3 repetitions of 1tds up and 1tds down, then repeat the second leaf from the group with ds.
treble tatting tds

I also tried to hide the core thread inside the leaf. I don't know if it is useful, I haven't yet a pattern that really asks for that!  Anyway, from left to right and up to down, here it is the sequence of steps:
treble tatting tds
The trick is to use the core thread doubled, and in my sample the two other threads are in 2 shuttles wound CTM. Then after the leaf, I inserted one of the other threads inside the loop of the core thread, then I pulled that loop from the base of the leaf, in that way it disappeared.

🐝🐝🐝🐝🐝🐝🐝🐝🐝🐝

I put here - also for my personal reference - some links about the pearl tatting technique:

Tutorials:
- by Jennifer Williams: http://www.cariad-tatting.co.uk/page3.html
- by Riet Surtel and Jane Eborall: http://www.janeeborall.freeservers.com/PearlTatting.pdf
- by Eliz Davis (aka Tatknot): http://www.georgiaseitz.com/classes/maltesesnowflake.html

Videos offered by The Online Tatting Class in YouTube:
- (Neddle tatting) Lesson 23 Pearl Tatting or Maltese Tatting: https://youtu.be/lp6AdmkpAfE
- Pearl Tatting: https://youtu.be/gpN4wPvyRYw

Patterns from from The Pearl Tatting Book by Riego, 1866:
Mlle Riego 4 Shuttle Tatting
Nov. 3 Bella Online Newsletter Riego pearl tatting pattern


🐝🐝🐝🐝🐝🐝🐝🐝🐝🐝

That's not all, also I'm sure that you can find more variations.
There's also something to say about tds in maltese rings, but that is for another post!

Ciao,
Ninetta
UPDATE: Please refer to the page "Treble Tatting Stitch - Summary" - https://ninettacaruso.blogspot.com/p/blog-page_95.html for any info about treble tatting stitches, thank you.

Tuesday, 17 July 2018

crescendo - part V - and other WIPs

This is only another rough idea, I thought about increasing the height of the tds but I had little success. In the next picture, there are 3 groups with 3 tds, but in the second tds the picot is a wee bit bigger and then rolls 5 times, the third again is a little bigger than the previous and rolls 7 times.
The first part of the tds is always the same, that is:
  • Start with a very small picot and one double stitch. 
  • Laying the picot across the ball thread and pull up a loop of thread through the picot. 
  • Then, take another loop of the ball thread and pull it through the previous loop.
  • Now slip the shuttle through the loop thus formed. Don't tighten it, yet. 
  • Take a loop of the core thread in the ring finger, then pass the shuttle from back to front, through the loop, 3 times.
  • Tighten the ball thread and don't let the core thread slip out of place. 
  • Then, pull the core thread.
Second tds:
  • Start with a normal picot and one double stitch. 
  • Laying the picot across the ball thread and pull up a loop of thread through the picot. 
  • Then, take another loop of the ball thread and pull it through the previous loop.
  • Now slip the shuttle through the loop thus formed. Don't tighten it, yet. 
  • Take a loop of the core thread in the ring finger, then pass the shuttle from back to front, through the loop,  5 times
  • Tighten the ball thread and don't let the core thread slip out of place. 
  • Then, pull the core thread.
Third tds:
  • Start with a picot a little higher than previous tds and one double stitch. 
  • Laying the picot across the ball thread and pull up a loop of thread through the picot. 
  • Then, take another loop of the ball thread and pull it through the previous loop.
  • Now slip the shuttle through the loop thus formed. Don't tighten it, yet. 
  • Take a loop of the core thread in the ring finger, then pass the shuttle from back to front, through the loop,  7 times
  • Tighten the ball thread and don't let the core thread slip out of place. 
  • Then, pull the core thread.
I can't go further.

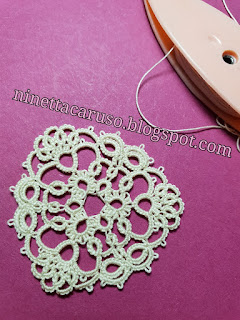
I designed another little motif, this time it is a triangular one. I confess I already shared this with Muskaan (muskaan's T*I*P*S), last week I sent her a close up picture and she's a very talented tatter, she could count my stitches and replicated it in a nanosecond! So, for I haven't written down the pattern yet, you bet she has my full permission to post her stitches' count in her blog! Thank you, Muskaan!

treble tatting tds
UPDATE: link to the pattern for this triangle: http://tipsaroundthehome.blogspot.com/2018/07/treble-with-m.html

I also have other WIPs started, I hope I will stay committed and finish something, sooner or later!
One is "Star Pattern in Tatting for a Chair or Sofa Tidy" by Mrs. Eliza Warren, a pattern from 1868, but I've changed it to have all motifs connected by split rings, instead of many little squared motifs. That is what I did till now:

The second old old pattern that I'm tatting is the modernised version by Ruth Perry of the "narrow edging" in Riego Royal Tatting book, 1864, that one where a real chain appeared for the first time, with clear instructions. The link to the renewed pattern is here:
http://tat-calendar.blogspot.com/search?q=riego+edging+15 , I found it easily, thanks to the hard work of sweet tatters who shares their time and knowledge in Craftree
That will be an edging for the fan, I haven't decided yet for attaching it to the fabric or if I tat more rounds that would substitute the fabric.

Ciao,
Ninetta


✿✿✿✿✿✿✿✿✿✿✿✿✿✿✿✿
UPDATE:
Please refer to the page  "Treble Tatting Stitch - Summary" for any info about treble tatting stitches, thank you.
✿✿✿✿✿✿✿✿✿✿✿✿✿✿✿✿

Thank you very much for all your nice comments.

Ciao
Ninetta