Translate

====================

====================
Dear Reader,
I share here what I like and what works for me. If you've been following me, you know that I can change my mind from time to time, and feel free to comment that I'm completely wrong, you may be right. I'm not running a business. I'm not paid and have never received any compensation or facilitation for any review/brand/site here mentioned. In case one day we'll ever meet, I'll be the one offering you a cup of Italian coffee, too.
====================
Showing posts with label swirling butterflies. Show all posts

Sunday, 12 November 2023

Tatting is a serious matter!


Dear readers,
I am deeply thankful to Karen Cabrera and Muskaan, who took the time to respectively translate and proofread for the English edition of the book. They have my gratitude and high respect. They made it possible to bring this book to many more tatters than I had ever imagined, as my humble goal was only to talk to Italian lacemakers. In particular, I owe a lot to Muskaan for her accurate work. She has a talent in teaching, and learning from her and with her has been an honour. In many parts she suggested the right tatting terms and better sentences, contributed valid points and corrected some accidental incoherence coming throughout from my Italian text. Definitely she made it a better book. Many thanks, Muskaan! Now it’s up to the tatters to take their shuttles or needles and enjoy the result of our work!

Book published!  - "Tatting is a serious matter English Edition” – Amazon link:  https://a.co/d/h1iSEXb

I can't thank Karen and Muskaan enough, for being so generous and wonderful friends. Karen was so sweet when she accepted to do the translation, around one year ago. After some months I received her first version, and I’d tell you the true, proofreading my own book has been very difficult for me! But I’m blessed to have another amazing friend! I feel very grateful to Muskaan, for her important role in checking the content. For this book I'm a lot more relaxed than for the Italian edition, now I'm more confident in the content thanks to Muskaan 🌹. During this past year, since Sept 2022, I haven't been able to correct my own errors in the Italian edition, and this is the proof that learning – both tatting and English - is a “serious” process for me, that will never ends!

For a brief presentation of the book’s contents, read also the following posts:  https://ninettacaruso.blogspot.com/2023/05/hurray.html and https://ninettacaruso.blogspot.com/2022/10/treble-happyness.html

Ciao,
Ninetta
-----------

Saturday, 22 October 2022

treble happyness!

Treble tatting is now part of a published book! 


At the moment it is only in Italian, and available on Amazon: https://amzn.eu/d/4MlEOyX

=======

UPDATE 30th April 2023 -

Currently, the first edition is no longer available, because it has been replaced by a second edition.

"Il chiacchierino è una cosa seria Second edition” – Amazon link:  https://amzn.eu/d/br7ILv8

=======

I think the title can be translated like this: "Tatting is a serious matter". That is funny but there's a good reason, because I found an Italian book, from 1941, where tatting is described by this phrase: "they say that is not a serious thing" - I wrote about it in the introduction of the book and also in an old blog post of mine (https://ninettacaruso.blogspot.com/2017/05/are-you-serious.html). 

There are three chapters: the first covers the history of tatting, mainly from an Italian viewpoint. There are many contradictions and stereotypes about tatting, often confused (by non-tatters) with bottonhole stitch or with the "Fiandra a tre paia" bobbin lace. Some people cannot accept needle tatting. Also, just because we usually say that tatting has only 2 stitches, someone thinks that tatting is meagre. Sometimes it is not even classified as Lace! Alessandra Caputo writes in her foreword: "..., if on one hand needle and bobbin lace are indicated as laces with a capital L, on the other hand there are a whole series of laceworks considered "minor", sometimes with a history not less long and prestigious, which from a technical point of view are undoubtedly self-supporting and therefore can be rightly defined as lace." Phew! Thanks Alessandra!! 😊

In the second chapter there is the treble tatting. I improved my drawings for showing how to tat the treble stitch - and there are links to my videos, easily accessible thanks to qrcodes; I've used a free QR Code Generator: http://goqr.me/

The third chapter contains detailed instructions, pictures and diagrams for the Swirling Butterflies doily pattern. Maybe, some of you remember that I've shared here in my blog the first 3 rounds, and few people had tatted it. For example:

Jane McLellan (https://janemactats.blogspot.com/2018/09/butterflies-tethered.html);

Muskaan (https://tipsaroundthehome.blogspot.com/search/label/swirling%20butterflies)

You can find my old blogposts about this doily, all posts with label: swirling butterflies 

 
This beauty is a gift for a good friend! Many thanks to Alessandra Caputo (www.merlettoitaliano.it) to help make this book a reality.

And many thanks to Muskaan (for her foreword, and for the many tips and improvements, beyond my requests) and Paola Bevilacqua (https://www.facebook.com/legioiedipaola48), who both were so nice to test the doily pattern.

I've sent a gratitude gift to Muskaan and Paola, too! Muskaan was so nice to blog about hers: https://tipsaroundthehome.blogspot.com/2022/10/evviva-and-ouch.html

The next is a third version of the doily, that I've already given away to a close friend of mine.


Ciao,
Ninetta

UPDATE: This is a very short video showing the content of the first edition of the book, previously shared in Facebook: https://drive.google.com/file/d/1k_VVdUAbvybbSeZJbxn4X59vxaZTrHDd/view 

Tuesday, 10 November 2020

derivatives welcome

My post this week is for the "Endrucks 1920 Project" again. It is a collective project, started by Muskaan (read her last post about it here: https://tipsaroundthehome.blogspot.com/2020/11/the-enticing-hole.html ), and I enthusiastically joined in. 

We welcome you to join in, too! All infos and links are in the Endrucks 1920 Project Document, here:
https://docs.google.com/document/d/17LEVftXweztBIOWh4sL4BB7bX65ssoOsOn4oXIgCepY/view?usp=sharing

The pattern of that square is just 4 repetitions of the corner that I designed for the frame showed last week (see previous post), a derivative from pattern #30 in the old book. Then, in the centre, I added a flower, one-shuttle pattern, all rings are 6 double stitches between each picot/join.

The centre of the flower was very open, so I thought that it could have helped the technique learned from a very old rosette, that I showed in my very first YouTube video, here: https://youtu.be/15jm2EkKGTk

About YouTube, one more time I send all my heartfelt thanks to all my subscribers! After the age-restrictions, they deleted all old comments and I lost the infos like the date posted, but videos are still there! I started the channel just to share few unassuming videos, sporadically, so I'm glad they are still public and visible!

For tatting the square, I used Lizbeth size 80 thread,  colour 184.

 
🦋🦋🦋🦋🦋🦋🦋

In the next picture, I'm very proud to show you the Swirling Butterflies doily tatted by a Master tatter, Paola Bevilacqua. 💕 Thank you very much for letting me post your picture here! You are very welcome in my blog! 💕 

She is well know in Facebook for her beautiful tatting, she showed us her bedspreads (more than one, king-size) and jackets and many classical doilies. Also, she has had solo exhibitions with her tatting,  she can fill up rooms!

I am honoured that two Master tatters accepted to help me, testing the pattern. The other lady is Muskaan, she shared her version in her blog (https://tipsaroundthehome.blogspot.com/2020/10/multiples-of-7.html)

Paola used white Ancora size 50 thread and and green is Freccia, size 16 thread.

Ciao,
Ninetta 

Tuesday, 6 October 2020

seventh blog anniversary

Before everything else, VERY important news: thanks to Susan Fuller, Georgia Seitz's site is up again! Visit the new pages here: http://www.georgiaseitz.com/

🎂🎂🎂🎂🎂🎂🎂

Yesterday was my blog anniversary, it started in 2013. Wow, I can't believe that I've been blogging for so long! Thanks to you all, my readers, I couldn't have been here without you 💓 and thanks to all tatters that share their tatting online, so I could learn a bit more every day!

Sorry that I disappeared from the blogsphere for a month! I have been busy test tatting my own pattern, the Swirling Butterflies doily. In this moment the photo-tutorial for the pattern is in Italian and it is still a draft. There are over 20 pages, with a lot to amend! My heartfelt thanks to two sweet ladies and very expert tatters, who are helping me, testing all 11 rounds: one is Paola Bevilacqua (you can find her in Facebook) and the other is Muskaan. I hope to have the privilege to show you soon the doily tatted by Paola.

Now, you would ask, how Muskaan can read Italian... so: she can't, but she's a tatting Master and she is following my drawings, tracking down my mistakes! Her help is priceless, she's been sharing her thoughts and variations in her blog:

https://tipsaroundthehome.blogspot.com/2020/09/4-plus-1-is-5.html
https://tipsaroundthehome.blogspot.com/2020/09/7-plus-6-is-13.html
https://tipsaroundthehome.blogspot.com/2020/09/3-and-1-and-2.html
https://tipsaroundthehome.blogspot.com/2020/09/3rd-times-charm.html

She also partecipated to my tat-along, two years ago, when I shared the first 3 rounds: https://tipsaroundthehome.blogspot.com/2018/09/twist-n-twirl-spiral-n-swirl.html

The thread that I used in the green doily, the prototype, was Anchor size 70. In the new white version I've used DMC Special Dentelles size 80. The two doilies are the same size that is nearly 30cm from tip to tip. The Anchor thread is softer than DMC. I still didn't shorten the antennas in the white doily but it will be gifted away so I will cut them later.

The next picture is my own tatting, I can't remember when I did it (but few years ago), it was a gift and lately I've had the chance to take a photo, that I didn't take at the moment that I gave it away. It is a pattern by Jan Stawasz from the book "Tatting theory and patterns". Thread is dmc Special Dentelles size 80.

The doily is finished but I've some side projects. I still have the Bosa lace to be finished (almost there) and then I decided to join Muskaan in the "Endrucks 1920" project, that is to convert in modern tatting notation and diagrams the patterns in the "Schiffchen-Spitzen" (by E.Endrucks) 1920 book, that is available in Georgia Seitz's archive here: http://www.georgiaseitz.com/public/publicindex.html

I will tat and try to diagram patterns #8, #14, #24 and #40. In the next picture there's my first trial of the #8.

You can read about Muskaan project here:  https://tipsaroundthehome.blogspot.com/2015/11/pattern-eleonores-angels.html

Ciao,
Ninetta

Tuesday, 25 August 2020

swirling earrings

Thread is Sanbest metallic 4 strands, color number 1565. Pattern is the centre of the "swirling butterflies" doily (you can find the link in the patterns page in the menu bar).


With another background:

Ciao,
Ninetta

Tuesday, 23 April 2019

Tuesday, 9 April 2019

cedronella

Cedronella is the Italian name of a yellow butterfly, so I called my tiny tatted butterfly after the real one:
Thread is Anchor, size 70, it is very soft, but it is thin like the DMC size 80.

Pattern is fast and easy: one shuttle and 5 rings. I finger tatted the second side of the last split ring.
Start from the upper right wing, leaving a long tail (about 10cm).
Ring1: 9ds, 5tds, very small picot, 1ds.

Then tat the bottom right wing:
Ring2: 6ds, join, like in the ANKARS down join, the hidden picot between the 3rd and 4th tds of previous ring, then 7ds, picot, 2ds, picot, 6ds.

The pattern continues with another ring:
Ring3: 6ds, join last picot in Ring2, 2ds, picot, 7ds, picot, 6ds.

The last ring is the upper right wing:
Ring4: 1ds, 2tds, TJ (treble join) to the last picot of Ring3, 3tds, very small picot, 9ds.

Finish with the "head", that is:
Split ring: 4ds/4ds.
Cut ends, that become antennas.

Ciao,
Ninetta
UPDATE: Please refer to the page "Treble Tatting Stitch - Summary" - https://ninettacaruso.blogspot.com/p/blog-page_95.html for any info about treble tatting stitches, thank you.

Tuesday, 27 November 2018

break

I'm taking a break from blogging, see you next year 🤗

In Facebook I've found a good wish, for everyone of you:

"I don't want much for Christmas. I just want the person who is reading this to be healthy, happy and loved."

In the meanwhile, I will try to finish the doily that I called "girandolina" in Italian, and you already know the centre as the swirling butterflies motif, for which I have shared the pattern. Only pictures, but I hope to have something better to show, next year...


Ciao,
Ninetta


Tuesday, 11 September 2018

swirling butterflies - it's about time!

Please make yourself comfortable, I took many pictures, all numbered, to show you how I tatted the swirling butterflies. I tried to do my best. Anyway, sorry if you think that I missed/messed-up something, don't hesitate to leave a comment, thank you.
treble tatting tds
For the sequence of steps for tatting a tds (= treble tatting stitch), please refer to my post: treble tatting - ideas or this other post by Muskaan: dissecting tds
Or you would like watching this video in YouTube: https://youtu.be/ra0NnlqR0oA (for shuttle) or this video: https://youtu.be/vxl1ZzPLrZg (for needle)

You'll find all my posts about treble tatting with the label treble.

************
UPDATE: Please refer to the page "Treble Tatting Stitch - Summary" - https://ninettacaruso.blogspot.com/p/blog-page_95.html for any info about treble tatting stitches, thank you.
************

For how to join a tds to a previous element, refer to this post by Muskaan (she shows us two methods, mine and hers): https://tipsaroundthehome.blogspot.com/2018/07/multiples.html

The butterflies are the third round for the little doily showed here: fun swirly effect in treble tatting
You'll find this doily related posts, with pattern, with the label swirling butterflies.
treble tatting tds
But before writing the third round's pattern, I'd prefer sharing 2 samples, step by step.
🐾🐾🐾🐾🐾🐾🐾
In next pictures, from picture 1 to 12, there's one butterfly tatted with the same thread of the chain. That is only to show you that it is just something you can handle with 2 shuttles.
The effect showed in the little doily, that is the butterflies on the chains, it is just a trick, an optical illusion due to a third thread, encapsulated inside the chain. The steps from 13 to 22 show how I tatted it with 3 shuttles.
🐾🐾🐾🐾🐾🐾🐾

CTM= continuous thread method
ds=double stitch;
vsp= very small picot:
tds=treble tatting stitch;
hidden picot= a very small picot every each tds, also between adjacent ds and tds (or tds and ds, as well);
FR= floating ring;
TJ = one tds that join itself to a previous picot (I've used Muskaan's method, please refer to her blog);
ABJ= I used a method similar to an ANKARS back join (https://flic.kr/p/fzjRhh), for joining the two wings, but with a TJ.

The core shuttle in next samples is that one with the white thread, and those white rings are there just for the sole purpose of starting the next chain.

Butterfly with tds, 2 shuttles, from picture 1 to 12.
treble tatting tds
Pic 1) Start a chain: 4ds (the last one is already part of the butterfly)
Pic 2) 3tds
Pic 3) with the second shuttle, start a FR: 6ds, join to the first hidden picot, before the last ds and the first tds on the chain,
Pic 4) continue the FR: 9ds, picot, 6ds. Close the FR.
treble tatting tds
Pic 5) with the first shuttle, tat one tds. Then with the second shuttle: start a FR: 1ds,
Pic 6) 2tds
Pic 7) TJ (Muskaan's method):  here I join the second wing to the first: leave a vsp and tat one ds (that is the starting step of next tds), but then here I put the current FR below the first FR, like you were doing an ABJ. Insert hook through both picot of previous FR and vsp of  current tds,
Pic 8) pull a loop, then pull up another loop through it and finish the tds with 3 wraps.
treble tatting tds
I wrote there "front", where I mean the front side of the chain that we're looking while tatting the chain.
That is not what I call the front side of the 'Swirling Buttlerflies' doily, because I'm reversing the work form rings to chains. For me, the right(front) side of the doily is the side I have in front of me when I tat rings. So, the second wing is over the first, if you look at it from the front side of the doily. I'm sorry if I can't find better words. 🙇
treble tatting tds
Pic 9) Continue the second FR: 2 tds,
Pic 10) vsp, 9ds. Close the FR.

*************************************
UPDATE: Please let me clarify this: 
I wrote in the legend that "TJ = one tds that join itself to a previous picot".
But that definition it's quite unclear, sorry for this. Usually, a join is not counted as a separate stitch.
In this second FR, I started with one ds, then 2tds; then, there is the join to the previous floating ring in pic7 (you can choose my method or Muskaan's), that actually it is in the first half of a tds; then, in the description for pic8, there is the second half of the tds just joined; then 2tds more, a vsp and 9ds. 
So, I tatted a total of 5tds in this FR. In a short notation, I would have written FR: (1ds 2tds TJ 3tds vsp 9ds).
Thanks to Muskaan that has drawn my attention to this.
*************************************

Pic 11) with the second shuttle, start the third FR: 3ds, normal picot, 3ds, close.
treble tatting tds
Pic 12) continue the chain with 4ds.
Then, I reversed the work and tatted another ring with the first shuttle, just to complete the little sample.

Butterfly with tds, 3 shuttles, from picture 13 to 22.
I suggest putting a label on the shuttles, or use different shuttles.
treble tatting tds
Pic 13) the white ring is there just for the sole purpose of starting the next chain. I started with 2 shuttles CTM (white thread)
Pic 14) Reverse work. Add the third thread and work with 2 shuttles in hand, white thread core shuttle and yellow thread shuttle. Tat 4ds in that way.

Pic 15) Here is where the trick starts. Put the yellow thread around the hand and the white threads both in your hand acting together as one core shuttle.
Pic 16) Tat 1ds
treble tatting tds
Pic 17) 3tds
Pic 18) FR: 6ds, join to the hidden picot before the last ds and the first tds on the chain, 9ds, picot, 6ds, close FR;
Pic 19) 1tds; start second FR: 1ds,
Pic 20) 2tds, TJ (joining to last picot in previous FR, same as in pics 7 and 8), 2tds, vsp, 9ds, close FR;
UPDATE: Please read the clarification above.
treble tatting tds
Pic 21) FR: 3ds, picot, 3ds, close FR;
Pic 22) continue the chain with 1ds;

Exchange threads again:
Pic 23) work with 2 shuttles in hand, the white thread first shuttle and yellow thread shuttle, acting both together as core shuttle. Tat 4ds.
Pic 24) reverse work and turn to tat another white ring, if you like. That will end the second sample.

🦋🦋🦋🦋🦋🦋🦋🦋🦋🦋🦋🦋🦋🦋
Pattern for the Swirling Butterflies motif - Third round:
treble tatting tds
Start with 2 shuttles with the green, CTM.
With the first green shuttle:
R1) start a ring (white numbers in pic): 3ds, join to the hidden picot between the 6th and 7th tds of one spiral ring of previous round, 3ds, picot, 1ds. Close.
R2) start a ring (red numbers in pic): 1ds, join to last picot of R1, 4ds, join to the hidden picot between the 5th and 6th tds of same spiral ring of previous round, 6ds. Close.
Reverse work.
Ch1) start a chain with the second green shuttle (black numbers). If you like, you can add the third yellow shuttle, already.  Chain: 4ds, picot, 4ds, picot, 4ds, picot, 4ds. Reverse work.
Repeat R1, joining next spiral ring.
Repeat R2 and reverse work.
Ch2) work with 2 shuttles in hand, green thread core shuttle and yellow thread shuttle. Start 4ds, then exchange threads and start the butterfly with 1ds with the yellow thread, with 2 shuttles in hand, the 2 green thread shuttles. Then the butterfly is exactly the same pattern showed in pictures from 15 to 22. Finish the chain, again with 2 shuttles in hand, the green thread core shuttle and yellow thread shuttle. Tat 4ds. Reverse work
Repeat again R1,R2,Ch1,R1,R2,Ch2, till you have seven butterflies. (The round ends with one Ch2 chain).
Use your favourite method to tie, cut and hide ends.

🦋🦋🦋🦋🦋🦋🦋🦋🦋🦋🦋🦋🦋🦋


Ciao,
Ninetta

Tuesday, 4 September 2018

swirling butterflies need a flower...

... at least one! I've been tatting spirals to test my pattern and I've plenty of yellow and lilac thread, that I'll soon have a spring garden!
treble tatting tds

Starting from this post, I'm sharing the pattern for the "swirling butterflies", the doily with spiral rings and butterflies in treble tatting.

I'm a shuttle tatter, but it can be done also in needle tatting (I've put a video in YouTube to show my way to do it. Link to the video: https://youtu.be/vxl1ZzPLrZg). 

I'm tatting with Anchor thread size 70, very soft.


Note: There is a little bare thread appearing between each tds, so we have a very small picot every each tds. I call it the "hidden picot".

treble tatting tds

ds=double stitch;
tds=treble tatting stitch;
⭐= don't reverse here, if you do direct tatting for chains

treble tatting tds

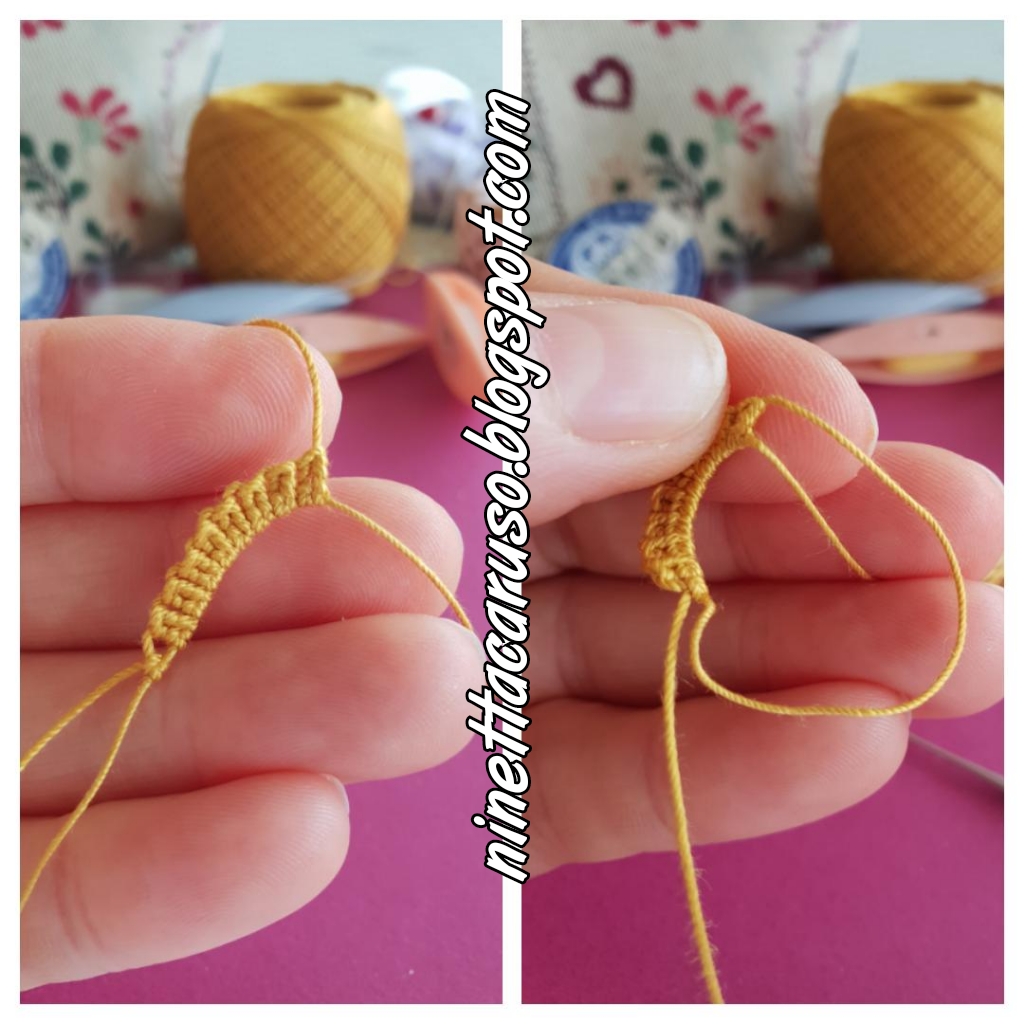
The spiral rings in this pattern are actually all rings of 1ds and 8tds, that is:
With one shuttle:
  1. start a ring with one double stitch
  2. tat 8 tds. (I don't tat any ds after the last treble)
  3. insert the shuttle inside of the loop around the hand, from front to back, before closing the ring.
  4. close the ring.
  5. Then, the thread is passed to the back side and pulled upwards. 
  6. Pull the thread toward the hidden picot between the third and the fourth tds. Then block the spiral in position with a lock join. 
Repeat those steps for a total of 14 spirals. Leave a long tail of thread and cut. Do not close the round of spirals. The spirals have a front and a back side.
(The tail will be used later, to close the round of spirals after you have the centre done).

The spirals will go as a second round, but I tatted them first. Then I tatted the yellow centre. That is because I found easier to join the yellow rings to the spirals, than joining the tds to the yellow rings. You may follow your favourite order.
treble tatting tds

Centre (with yellow thread in my pictures).
They are all rings of 3+3+3-3 and chains of 3, that is:
With one shuttle and ball (or 2 shuttles):
  1.  Start with a ring: 3ds, picot, 3ds, join to the hidden picot between the first and the second tds of the last tatted spiral ring (Picture 1), then continue the ring with 3ds, picot, 3ds; close the ring and reverse work (⭐)
  2. Chain: 3ds;  reverse work (⭐)
  3. Ring: 3ds, join to previous ring, 3ds, join to the hidden picot between the first and the second tds of the next spiral ring (Picture 2), then 3ds, picot, 3ds; close the ring and reverse work (⭐)
  4. Repeat step 2.  then step 3. , till you join all spirals, except the last
  5.  Chain: 3ds;  reverse work (⭐)
  6. Ring: 3ds, join to previous ring, 3ds, join to the hidden picot between the first and the second tds of the last spiral ring, 3ds, join to the very first ring, 3ds; close the ring and reverse work (⭐)
  7. Chain: 3ds; use your favourite way to tie and cut ends. (You see the back side of my centre in previous picture, in the lower right pic. I still have to hide tails)
treble tatting tds

If you like avoiding the colour blip on the back side, you may read this post of mine: http://ninettacaruso.blogspot.com/2016/03/how-to-skin-cat.html

You may find a very interesting - and useful - post by Muskaan that is a compilation of methods for hiding ends: tipsaroundthehome.blogspot.com/2016/11/beginning-or-ending.html

In next post, I'll show you how I tat those "swirling butterflies" all around.

💛💜💛💜💛💜💛💜💛💜💛💜💛💜💛💜
I've been to a fair, last week, thanks to a dear friend, who drove for 3 hours the way to there and back... An amazing fair with any sort of lace! Everything was breathtaking! There are some picture in "Scuola Di Ricamo Valtopina" in Facebook, and also have a look in this site: www.mostravaltopina.it. I'm happy because I met 3 tatters! 😍😍😍 One of them is Giuliana Pizzini, a Master tatter from Abruzzo (you can find her in Facebook, too) a very nice, smiling and friendly person, her tatting is truly beautiful, she sells it and her spot there was full of amazing lace! She gave me 😍😋 this lovely bookmark:

I also met the affable cheerful Giovanna, from Sicily, she embroiders but also tats, and sells, she displayed two amazing tablecloths with traditional tatting and embroidery (it is listed in her site as "Tovaglia in lino e Chiacchierino che può fungere da coperta o tenda").

I bought 2 books: one is "I fazzoletti. Breve storia d'un amore" by Damiano Pellicano; the second one is "Nappe, nappine e bottoni della Scuola del Pischiello di Romeyne Robert Ranieri di Sorbello" by Geneviève Porpora. 

🌹🌹🌹🌹🌹🌹🌹

Dear Reader,
I share here what I like and what works for me. If you've been following me, you know that  I can change my mind from time to time, and feel free to comment that I'm completely wrong, you may be right. I'm not running a business. I'm not paid and have never received any compensation or facilitation for any review/brand/site here mentioned. In case one day we'll ever meet, I'll be the one offering you a cup of Italian coffee, too.

Ciao,
Ninetta
UPDATE: Please refer to the page "Treble Tatting Stitch - Summary" - https://ninettacaruso.blogspot.com/p/blog-page_95.html for any info about treble tatting stitches, thank you.


Tuesday, 28 August 2018

spiral rings with treble tatting

This is how I tat the spiral rings with tds in place of ds, just like the spiral rings by Lenka Hašková, showed in previous post: the spiral ring by Lenka
treble tatting tds
For the spiral ring in that picture, with treble tatting stitches:
  1. start a ring with one double stitch
  2. tat 8 tds (that is: I finished just after the 8th, didn't tat any other ds after that) (*)
  3. insert the shuttle inside of the loop, from front to back, before closing the ring (**)
  4. close the ring.
    treble tatting tds
  5. Then, the thread is passed to the back side and pulled upwards. You see, from the next picture, that there is a little bare thread appearing between each tds, so we have a very small picot every each tds that plays hide-and-seek. I will call it the "hidden picot".  
  6. Pull the thread toward the hidden picot between the fourth and the fifth tds. Then block the spiral in position with a lock join.
treble tatting tds

(*) The number of tds can vary, of course, it depends on the pattern.
(**) The spiral can be oriented in the opposite direction, just don't insert the shuttle inside of the loop, from front to back, before closing the ring.

Depending on the pattern, any of the "hidden picots" can be used to block the spiral in position.
Beads can be added, too. I didn't took any picture, though.

treble tatting tds
I tried another version, combining ds and tds in the same spiral ring. In previous picture, I started with 13 picots separated by 1 normal ds each, then I tatted one last tds, posted the shuttle inside the loop and blocked the spiral, locking the thread in the 7th picot. The height of the picots and the last tds make the spiral look like previous all-tds spiral, but tatting this one is way too faster than tatting all tds!
treble tatting tds

The spiral rings with tds are part of the little motif showed here: fun swirly effect in treble tatting
treble tatting tds
(They resemble those cute aquarium snails, called Planorbis... 🐌🐌🐌🐌🐌🐌)
In that motif, the "hidden picot" is between the third and the fourth tds.

I'm planning to share the pattern, starting from next week. I hope that someone of you wish to tat-along with me and I really hope to have any feedback, too.

If you like, you can start now, as the pattern starts with a lanyard of spiral rings. Actually, there are 14 spiral rings. At least, if not my motif, with 2 detached set of 2 or 3 spirals, you will have a new pair of earrings 🙇 !
treble tatting tds
I admit... that tds aren't fast tatting, definitely.
It is just like when we did the very first "flip", tricky at first but so addictive. Me too, I need more exercise.

Thinking aloud: it seems to me that tds can be used in place of double stitches in a various set of tatting techniques: rings, chains (even in place of picots), block tatting, mock rings, split rings, maltese and pearl tatting, 3D, beanile, ANKARS,... I've just scratched the surface. I need more time to try and share everything, but I know that I'm not alone. Thanks to other nice tatters, who generously share their experiments! Like Muskaan, that already shared her tips for treble tatting! 🤩
I'm a shuttle tatter, but it can be done also in needle tatting (I've put a video in YouTube to show my way to do it). I can't wait to see designers using it 😍 💌🌹

Ciao,
Maybe, you didn't know that "ciao" it's used in place of both "hello" and "bye" and I've learnt that we've used this word in the current way only for a couple of centuries, from the early nineteenth century, so it seems it is just as old as tatting 😍.
Ninetta

Thank you very much for all your nice comments.

Ciao
Ninetta