Translate

====================

====================
Dear Reader,
I share here what I like and what works for me. If you've been following me, you know that I can change my mind from time to time, and feel free to comment that I'm completely wrong, you may be right. I'm not running a business. I'm not paid and have never received any compensation or facilitation for any review/brand/site here mentioned. In case one day we'll ever meet, I'll be the one offering you a cup of Italian coffee, too.
====================
Showing posts with label spiral ring. Show all posts

Tuesday, 29 January 2019

pattern ready for Valentine

This is the pattern for the earrings I showed in previous post, only text.

CTM= continuous thread method;
ds=double stitch;
tds=treble tatting stitch;
hidden picot= a very small picot every each tds;
LJ= lock join;
JSS= Join to the Smooth Side (Anne Dyer's join)

Elements in this pattern:
- Spiral ring with treble tatting;
(UPDATE to add link: https://ninettacaruso.blogspot.com/2018/08/spiral-rings-with-treble-tatting.html )
- Mock ring (SCMR);
- Curled ring;
- SSSR.

I chose to tat the centre and the contour in 2 different colours.

Start with one shuttle, Spiral ring: 1ds, 12tds.
Left and right earring can be tatted symmetrically, depending if you post, or don't post, the shuttle inside the spiral ring before closing it.
In my next pictures, I inserted the shuttle inside the loop around the hand. You should do yourself the other earring.
I closed the spiral ring, joining the hidden picot between the 8th and the 9th tds (there are 4 tds before the joining picot, if you count from the last tatted)

Cut the thread if you like to change colour.

I wound 2 shuttles CTM with the white thread, then I made a lock join with one shuttle to the same hidden picot where I closed the spiral ring. I hid the tail inside the first stitches in next chain.
Chain1: 25ds.
Mock ring: 3ds, picot (here it is where you can put a bead), 3ds.
Chain2: 8ds, JSS (in the hidden picot of the ring, between the 3rd and 4th tds), 12ds, LJ to the starting point of this outer round.
Without reversing work,
Chain3: 5ds
Curled ring: 6ds, picot, 6ds, close.
After that, I closed the curled ring around the Chain1 and ended the pattern finishing with an SSSR (Miranda's method) of 6ds/6ds.


Ciao,
Ninetta
UPDATE: Please refer to the page "Treble Tatting Stitch - Summary" - https://ninettacaruso.blogspot.com/p/blog-page_95.html for any info about treble tatting stitches, thank you.

Tuesday, 22 January 2019

ready and steady for Valentine

These are ready and in time for Valentine's Day!


Red thread is 2 strands of DMC Moulinรฉ Metallisรฉ, Jewel Effects, number E321, sold in skeins.
Gold thread is 2 strands of Finca metallic gold colour 0006 n.2/C.

I'll put the pattern in Flickr, soon. In the meantime, I'm already wearing them, just the size I like!

And then, I'm very ready for an upcoming event: on February 2nd, I will be teaching one day course about the treble tatting stitch, at the local lace's association, I'll teach an original unpublished pattern of mine, that, I'm sorry, I won't share online.

Ciao,
Ninetta

UPDATE: pattern is here: https://ninettacaruso.blogspot.com/2019/01/pattern-ready-for-valentine.html

Tuesday, 4 September 2018

swirling butterflies need a flower...

... at least one! I've been tatting spirals to test my pattern and I've plenty of yellow and lilac thread, that I'll soon have a spring garden!
treble tatting tds

Starting from this post, I'm sharing the pattern for the "swirling butterflies", the doily with spiral rings and butterflies in treble tatting.

I'm a shuttle tatter, but it can be done also in needle tatting (I've put a video in YouTube to show my way to do it. Link to the video: https://youtu.be/vxl1ZzPLrZg). 

I'm tatting with Anchor thread size 70, very soft.


Note: There is a little bare thread appearing between each tds, so we have a very small picot every each tds. I call it the "hidden picot".

treble tatting tds

ds=double stitch;
tds=treble tatting stitch;
⭐= don't reverse here, if you do direct tatting for chains

treble tatting tds

The spiral rings in this pattern are actually all rings of 1ds and 8tds, that is:
With one shuttle:
  1. start a ring with one double stitch
  2. tat 8 tds. (I don't tat any ds after the last treble)
  3. insert the shuttle inside of the loop around the hand, from front to back, before closing the ring.
  4. close the ring.
  5. Then, the thread is passed to the back side and pulled upwards. 
  6. Pull the thread toward the hidden picot between the third and the fourth tds. Then block the spiral in position with a lock join. 
Repeat those steps for a total of 14 spirals. Leave a long tail of thread and cut. Do not close the round of spirals. The spirals have a front and a back side.
(The tail will be used later, to close the round of spirals after you have the centre done).

The spirals will go as a second round, but I tatted them first. Then I tatted the yellow centre. That is because I found easier to join the yellow rings to the spirals, than joining the tds to the yellow rings. You may follow your favourite order.
treble tatting tds

Centre (with yellow thread in my pictures).
They are all rings of 3+3+3-3 and chains of 3, that is:
With one shuttle and ball (or 2 shuttles):
  1.  Start with a ring: 3ds, picot, 3ds, join to the hidden picot between the first and the second tds of the last tatted spiral ring (Picture 1), then continue the ring with 3ds, picot, 3ds; close the ring and reverse work (⭐)
  2. Chain: 3ds;  reverse work (⭐)
  3. Ring: 3ds, join to previous ring, 3ds, join to the hidden picot between the first and the second tds of the next spiral ring (Picture 2), then 3ds, picot, 3ds; close the ring and reverse work (⭐)
  4. Repeat step 2.  then step 3. , till you join all spirals, except the last
  5.  Chain: 3ds;  reverse work (⭐)
  6. Ring: 3ds, join to previous ring, 3ds, join to the hidden picot between the first and the second tds of the last spiral ring, 3ds, join to the very first ring, 3ds; close the ring and reverse work (⭐)
  7. Chain: 3ds; use your favourite way to tie and cut ends. (You see the back side of my centre in previous picture, in the lower right pic. I still have to hide tails)
treble tatting tds

If you like avoiding the colour blip on the back side, you may read this post of mine: http://ninettacaruso.blogspot.com/2016/03/how-to-skin-cat.html

You may find a very interesting - and useful - post by Muskaan that is a compilation of methods for hiding ends: tipsaroundthehome.blogspot.com/2016/11/beginning-or-ending.html

In next post, I'll show you how I tat those "swirling butterflies" all around.

๐Ÿ’›๐Ÿ’œ๐Ÿ’›๐Ÿ’œ๐Ÿ’›๐Ÿ’œ๐Ÿ’›๐Ÿ’œ๐Ÿ’›๐Ÿ’œ๐Ÿ’›๐Ÿ’œ๐Ÿ’›๐Ÿ’œ๐Ÿ’›๐Ÿ’œ
I've been to a fair, last week, thanks to a dear friend, who drove for 3 hours the way to there and back... An amazing fair with any sort of lace! Everything was breathtaking! There are some picture in "Scuola Di Ricamo Valtopina" in Facebook, and also have a look in this site: www.mostravaltopina.it. I'm happy because I met 3 tatters! ๐Ÿ˜๐Ÿ˜๐Ÿ˜ One of them is Giuliana Pizzini, a Master tatter from Abruzzo (you can find her in Facebook, too) a very nice, smiling and friendly person, her tatting is truly beautiful, she sells it and her spot there was full of amazing lace! She gave me ๐Ÿ˜๐Ÿ˜‹ this lovely bookmark:

I also met the affable cheerful Giovanna, from Sicily, she embroiders but also tats, and sells, she displayed two amazing tablecloths with traditional tatting and embroidery (it is listed in her site as "Tovaglia in lino e Chiacchierino che puรฒ fungere da coperta o tenda").

I bought 2 books: one is "I fazzoletti. Breve storia d'un amore" by Damiano Pellicano; the second one is "Nappe, nappine e bottoni della Scuola del Pischiello di Romeyne Robert Ranieri di Sorbello" by Geneviรจve Porpora. 

๐ŸŒน๐ŸŒน๐ŸŒน๐ŸŒน๐ŸŒน๐ŸŒน๐ŸŒน

Dear Reader,
I share here what I like and what works for me. If you've been following me, you know that  I can change my mind from time to time, and feel free to comment that I'm completely wrong, you may be right. I'm not running a business. I'm not paid and have never received any compensation or facilitation for any review/brand/site here mentioned. In case one day we'll ever meet, I'll be the one offering you a cup of Italian coffee, too.

Ciao,
Ninetta
UPDATE: Please refer to the page "Treble Tatting Stitch - Summary" - https://ninettacaruso.blogspot.com/p/blog-page_95.html for any info about treble tatting stitches, thank you.


Tuesday, 28 August 2018

spiral rings with treble tatting

This is how I tat the spiral rings with tds in place of ds, just like the spiral rings by Lenka Haลกkovรก, showed in previous post: the spiral ring by Lenka
treble tatting tds
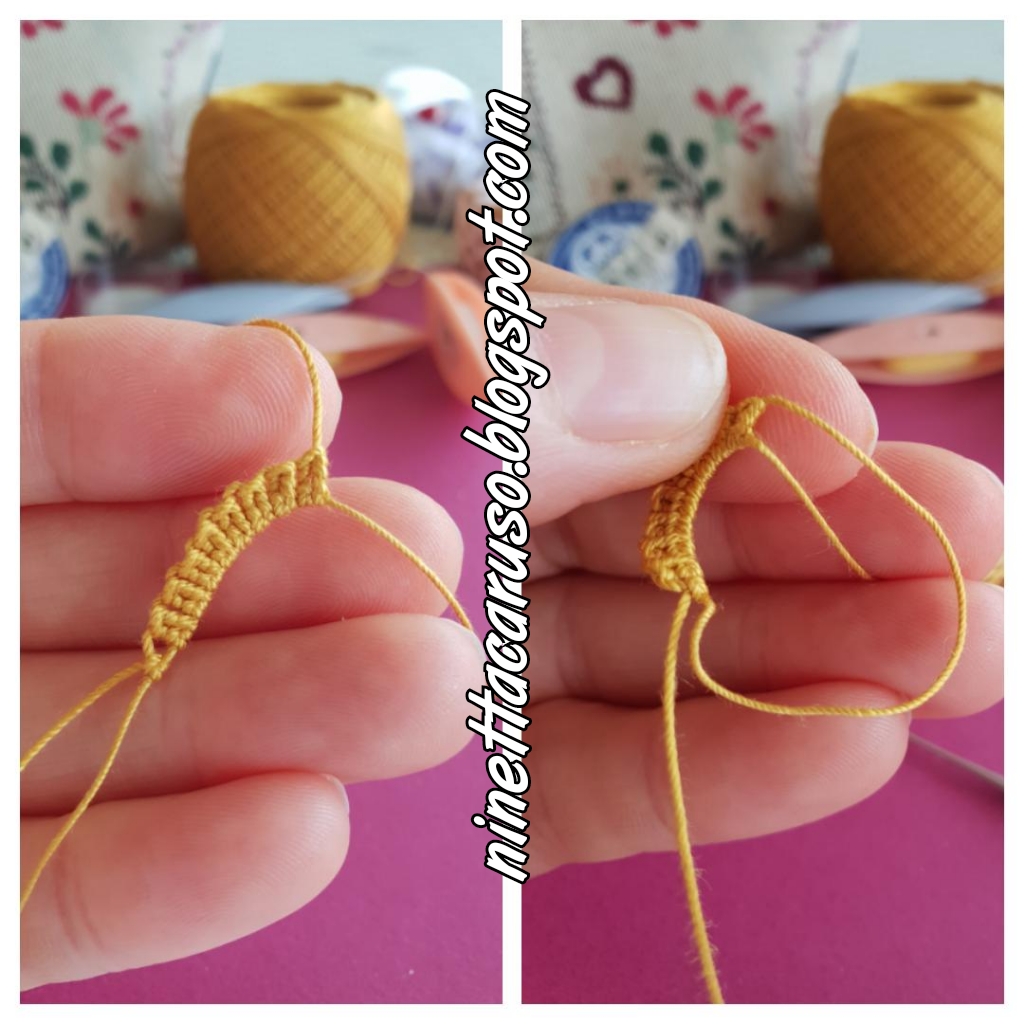
For the spiral ring in that picture, with treble tatting stitches:
  1. start a ring with one double stitch
  2. tat 8 tds (that is: I finished just after the 8th, didn't tat any other ds after that) (*)
  3. insert the shuttle inside of the loop, from front to back, before closing the ring (**)
  4. close the ring.
    treble tatting tds
  5. Then, the thread is passed to the back side and pulled upwards. You see, from the next picture, that there is a little bare thread appearing between each tds, so we have a very small picot every each tds that plays hide-and-seek. I will call it the "hidden picot".  
  6. Pull the thread toward the hidden picot between the fourth and the fifth tds. Then block the spiral in position with a lock join.
treble tatting tds

(*) The number of tds can vary, of course, it depends on the pattern.
(**) The spiral can be oriented in the opposite direction, just don't insert the shuttle inside of the loop, from front to back, before closing the ring.

Depending on the pattern, any of the "hidden picots" can be used to block the spiral in position.
Beads can be added, too. I didn't took any picture, though.

treble tatting tds
I tried another version, combining ds and tds in the same spiral ring. In previous picture, I started with 13 picots separated by 1 normal ds each, then I tatted one last tds, posted the shuttle inside the loop and blocked the spiral, locking the thread in the 7th picot. The height of the picots and the last tds make the spiral look like previous all-tds spiral, but tatting this one is way too faster than tatting all tds!
treble tatting tds

The spiral rings with tds are part of the little motif showed here: fun swirly effect in treble tatting
treble tatting tds
(They resemble those cute aquarium snails, called Planorbis... ๐ŸŒ๐ŸŒ๐ŸŒ๐ŸŒ๐ŸŒ๐ŸŒ)
In that motif, the "hidden picot" is between the third and the fourth tds.

I'm planning to share the pattern, starting from next week. I hope that someone of you wish to tat-along with me and I really hope to have any feedback, too.

If you like, you can start now, as the pattern starts with a lanyard of spiral rings. Actually, there are 14 spiral rings. At least, if not my motif, with 2 detached set of 2 or 3 spirals, you will have a new pair of earrings ๐Ÿ™‡ !
treble tatting tds
I admit... that tds aren't fast tatting, definitely.
It is just like when we did the very first "flip", tricky at first but so addictive. Me too, I need more exercise.

Thinking aloud: it seems to me that tds can be used in place of double stitches in a various set of tatting techniques: rings, chains (even in place of picots), block tatting, mock rings, split rings, maltese and pearl tatting, 3D, beanile, ANKARS,... I've just scratched the surface. I need more time to try and share everything, but I know that I'm not alone. Thanks to other nice tatters, who generously share their experiments! Like Muskaan, that already shared her tips for treble tatting! ๐Ÿคฉ
I'm a shuttle tatter, but it can be done also in needle tatting (I've put a video in YouTube to show my way to do it). I can't wait to see designers using it ๐Ÿ˜ ๐Ÿ’Œ๐ŸŒน

Ciao,
Maybe, you didn't know that "ciao" it's used in place of both "hello" and "bye" and I've learnt that we've used this word in the current way only for a couple of centuries, from the early nineteenth century, so it seems it is just as old as tatting ๐Ÿ˜.
Ninetta

Tuesday, 21 August 2018

the spiral ring by Lenka

How to tat the spiral rings by Lenka Haลกkovรก, showed in previous post.

I've saved her neat and delicate tatting, she sent me in 2015:
I asked her permission to write a tutorial in my blog and she kindly agreed.
She also agreed to call it "the spiral ring", but I'm sorry, forgive me if I call it Lenka's ring! You can find her blog here: frivolenka.blogspot.com, please, take a minute to visit her and say a thank you!

In order to tat Lenka's spiral ring, I learned that:
  • Only one shuttle is needed.
  • Lenka's "spiral ring" is a normal ring, with at least one picot, twisted and blocked in position through one of its picots.
  • After closing the ring, the thread is passed to the back side and pulled upwards,  toward the picot. Then block the spiral in position with a lock join.
  • The picot used to block the spiral in position, may vary in size. That determines the distance between spirals. If you want a lanyard of spiral rings very close to each other, the picot used to block the spiral must be very small.
  • "To post or not to post" shuttle: not the hamletic doubt, but inserting or not the shuttle inside of the loop, from front to back, before closing the ring, that sets the direction of the spiral effect (clockwise or counterclockwise)
  • Any ring can be twisted in this way, as long as there is a picot in it, in any position on the outer spiral; the twist is made only after the ring is closed.
  • As a design element, it is like a single shuttle split ring, where the starting point and the ending point are not at the same point. 
  • It has a front and a back side, because it is just like the nineteenth-century method of tatting a lanyard of rings with bare thread in the middle, in order to climb to the next ring in the line.
  • Beads can be added inside the loop for the ring, too. A bead (or more) can be trapped at the base of the ring to emphasise the twist. 
  • Just after that the ring has been closed and before the lock join, bead/beads can be added in the bare thread between the base of the ring and the join, to put an accent in the centre of the spiral ring.
Thread in my photos is DMC Cebelia n.10. Beads are 9/0. (And ds stands for double stich, as usual.)
In the next collage, I started a ring, putting a bead inside the loop, and tatted 6ds, then a picot, then 6ds more. You can see from the third pic in the collage, that I posted the shuttle inside the loop,before closing it:
So, there I got a normal ring, with a picot in the centre and a bead trapped at the base.

In next collage the spiral is appearing: I put the thread behind the ring, that's the back side from now on, then pull it (in the meantime you hold firmly the thread at the base of the ring) and slide a bead in the bare thread between the base of the ring and the picot, then lock join to the picot.
In the next collage you can see, on the left, the spiral ring completed, the front of the spiral is clockwise. On the right, there is also a second spiral, started over the first, just after the lock join, this time I tatted a ring of 8ds, then a picot, then 6 ds, then, before closing, again I inserted the shuttle inside the loop.
In the third spiral ring, I didn't post the shuttle, closed the ring, then put the thread behind and pulled it upwards toward the picot, so the spiral ring flipped over its vertical axis and it looks counterclockwise:
On the right of previous picture, you see that I didn't put beads in the last spiral ring, the twist is clear indeed.
The size of the picot used to block the spiral in position, determines the distance between spiral rings. I wanted my last spirals very close to each other, so I made a very small picot in my last two spiral rings...
That is a delightful and interesting method and I think it can be a nice effect to learn and use in patterns. I hope that you like it and wish to play with it. Many many thanks to Lenka!

In my next post, I will show you how I tatted the spiral rings with treble tatting stitches in place of traditional double stitches.

Ciao,
Ninetta

Thank you very much for all your nice comments.

Ciao
Ninetta