Translate

====================

====================
Dear Reader,
I share here what I like and what works for me. If you've been following me, you know that I can change my mind from time to time, and feel free to comment that I'm completely wrong, you may be right. I'm not running a business. I'm not paid and have never received any compensation or facilitation for any review/brand/site here mentioned. In case one day we'll ever meet, I'll be the one offering you a cup of Italian coffee, too.
====================
Showing posts with label Bosa. Show all posts

Tuesday, 14 July 2020

weave

I often go to the WordReference.com because you already know, my poor English vocabulary don't let me free to write whatever I want, but just what I can, doing my best (let alone the pronuntiation, that is terrible!). So... I found two meanings for the verb to weave, one is to make something by interlacing and the second is to make a fabric by weaving (in Italian we have two different words). I thought it would have been a nice title for this post.

Thread is cotton size 80, the multicolored is Lizbeth, the green was already on the shuttle and I can't remember the brand.

Sue Hanson shared with the group her early Celtic work on her old Web Page:
She wrote that the pattern for her 6 pointed Celtic design was published in the Lace Guild’s magazine (UK) #93 in January 1999. She's a pioneer in modern tatting.

The appearance of two celtic motifs in a line in my blog, it is due to a Facebook event, in the Italian group, in which we are tatting together and learning what celtic tatting is. I'm very happy that many tatters tried it. That's a wonderful way to weave together tatters! ๐Ÿ˜

Actually it is the only tatted piece I can show you today, in fact I am on finishing the net that I started in October. I'm halfway, I hope to finish it for the end of this month. I'm embroidering or I'm weaving? As per my own literal translation, because I pass the thread through holes under and over, well, I weave!


Ciao,
Ninetta 

Tuesday, 25 June 2019

get away

I feel like I'm on holiday from my "normal" tatting, but everyone needs to get away, from time to time.

I've been tatting just a line of split rings, that I'm going to put around a frame in another doll room box, that is for a gift. Like the previous doll room, I've been helped by my new friend "Dalรฌ L'artista", the lady that decorates the shuttles that are in my photos (she has a profile in Facebook).

Then, I've started embroidering another handmade net, with the technique learnt from the ladies from Bosa, Maestre of the Sardinian filรจt called “SU Lร€URU 'OSINCU”.
It's very relaxing, now that I know how to do it! In the pic, you see that I've only started the button-hole stitch all around the net that I will fill with the embroidery. The net is handmade, I bought it last year.
I'm enjoying this new project!
Do you think that I'm going to replace tatting with the net? Get away!

Ciao,
Ninetta

Tuesday, 20 November 2018

treble tatting in hearts

For the sequence of steps for tatting a tds, please refer to this post: treble tatting - ideas or watch this video in YouTube: https://youtu.be/ra0NnlqR0oA

What you see (if, by any chance ๐Ÿ™€) inside the tatting, it is an ice drop, a clear rounded glass, diameter is 2cm. It's transparent, it can be hardly seen in the pics (sorry, also the gold thread isn't easy to photograph).

In next collage I put together two pics, the front side and the back. The ice drop is clearly visible from the back.
The ice drop, also known as cabochon, was already nice, even without the outer round with hearts. Actually, those curled rings shaped little hearts around it.
In next pic I'm sorry it's not so clear, but there are two different parts: one flower, only rings, one shuttle, for the rounded front side,
... and another part, a star with 8 points, curled rings and chains, for the back side:
Rings are all 5ds between each picot, and curled rings are 8ds, very small picot, 8ds. Chains are 5ds, picot, 2ds, picot, 5ds, and are connected each other in their picots.

The two parts, flower and star, are connected while tatting the back side, with those curled rings wrapped around the top beads in the flower. The cabochon was inserted before tatting the last chain.
#######
UPDATE: link to a post by Muskaan, her tatting and variations:
https://tipsaroundthehome.blogspot.com/2019/02/due-credit.html
#######

But there weren't treble stitches around my cabochon... ๐Ÿค”๐Ÿ˜„
Of course you already know that I'm in the "tatting treble mode", Lol!

I thought the ice drop would have been even nicer with another round, then the heart with treble stitches it's something I've been thinking about for a while...
That is only a first idea, I think that it's something that I would love playing with again. Can you imagine how many tatting combos there are, with ds and tds together in tatted dimpled rings?


Thread is Finca metallic gold colour 0006 n.2/C, doubled (that is, shuttles are wound with 2 strands of Finca thread, it is almost like a size 20 thread), beads are rocaille miyuki 15/0 galvanized dark mauve (4213).

๐ŸŒน๐ŸŒน๐ŸŒน๐ŸŒน๐ŸŒน๐ŸŒน
An update about the embroidered netting lace, that is a pic with the rectangular doily finished, now I have to fill the remaining space, so the precious handmade net won't be wasted.

Ciao,
Ninetta

Tuesday, 30 October 2018

Pattern for the pendant with zoliduo beads

๐ŸŽƒ ๐ŸŽƒ ๐ŸŽƒ ๐ŸŽƒ ๐ŸŽƒ ๐ŸŽƒ ๐ŸŽƒ ๐ŸŽƒ ๐ŸŽƒ ๐ŸŽƒ ๐ŸŽƒ ๐ŸŽƒ ๐ŸŽƒ ๐ŸŽƒ ๐ŸŽƒ ๐ŸŽƒ
That's a treat for you... There aren't treble stitches in this pattern, but you know that has been a real challenge for me resisting the trick ๐Ÿ˜‰ and to do not change anything respect the original pendant shown here:
https://ninettacaruso.blogspot.com/2018/05/zoliduo-again.html

Thread is Finca metallic gold colour 0006 n.2/C, doubled (that is, shuttles are wound with 2 strands of Finca thread, it is almost like a size 20 thread), zoliduo 5x8mm beads matte metallic lava red (3 left and 3 right beads), one swarovski pearl 6mm, rocaille miyuki 15/0 galvanized dark mauve (4213).
You'll need 2 clips (or 2 safety pins).
SH1 = first (or core) shuttle; about 1 meter of thread.
SH2 = second (or ball) shuttle; about 2 meters of thread.
The 2 shuttles are wound CTM.
LJ = lock (shuttle) join
AJ = alligator join (that is, pass the SH1 thread over and the SH2 thread under the work before the next stitch)
LP means long picot. A gauge is needed, 5mm.
Numbers in this textual pattern are double stitches.
+ means normal upper join.
fhs = first half double stitch
shs = second half double stitch

Symbols for beads:
b = rocaille miyuki 15/0
B = swarovski pearl 6mm
Zr =  zoliduo 5x8mm right beads
Zl =  zoliduo 5x8mm left beads

This is a basic pattern, only rings and chains, for only one pendant. If you like adding a tatted lanyard, for wearing it as a necklace, that is left to your creativity.

Symbols are the same that I found in this page by Nina Libin (Beaded Earrings): http://www.georgiaseitz.com/classes2/libinear.html

: = one bead 'up' (on the picot) one 'down' (on the shuttle thread)

Plus these symbols:
Bb* = 8 b beads 'up' (on the picot) one B bead 'down' (on the shuttle thread)
·:· = 3 beads 'up' (on the picot) one bead 'down' (on the shuttle thread)

Please remember (from the same page by Nina Libin):
'UP' BEADS ARE BEADS ON WORKING (left hand = ball) THREAD
'DOWN' BEADS ARE BEADS ON LEADING (right hand = shuttle) THREAD

How to load beads:
Wind SH2 shuttle with 3 and half meters (just a little more than required) and unwind about 1 meter, then load beads (after that, you'll load the one meter in SH1 shuttle). Load beads in this order:
  • 71 b 
  • 10 b
  • 3 Zr (through the hole in narrow front side)
  • 1 B
  • 3 Zl (through the hole in narrow front side)
  • 35 b

Wound SH1 with the thread you had unwound and divide beads: all first 71 b must go on the SH2, then the rest on SH1. That is, you must have 10 b in SH1 as first beads, when SH1 thread will be wound.

Start with a clip (or a safety pin) and the first element to be tatted is a chain.
Chain 5 : 1 : 1 : 1 : 1 : 1 : 1 : 1 : 1 : 1 : 1 Zr 1 Zr 1 Zr 2 Bb* 2 Zl 1 Zl 1 Zl 1 : 1 : 1 : 1 : fhs AJ (after the first 6 pairs of b beads) shs : 1 : 1 : 1 : 1 : 1 : 5 Reverse work;

Ring 6 LP 3;  Reverse work;
Chain  2 : 1 ·:· 1 : 2;  Reverse work;
Ring 3 + 1 LP 3; (join grabbing the long picot passed through the second hole of the zoliduo left bead on the first long chain)  Reverse work;
Chain  2 : 1 : 1 ·:· 1 : 1 : 2;  Reverse work;
Ring 3 + 1 LP 3; (join grabbing the long picot through the second hole of the zoliduo left bead on the first long chain)  Reverse work;
Chain  2 : 1 ·:· 1 : 2; LJ to the long picot passed through the second hole of the zoliduo left bead on the first long chain; (do not reverse work)
Chain  2 : 1 ·:· 1 : 2; LP with the shuttle core thread (block it with a clip or pin, passing the LP through the second hole of the zoliduo right bead on the first long chain); (do not reverse work)
Chain  2 : 1 ·:· 1 : 2;  Reverse work;
Ring 3 + 1 LP 3; (join grabbing the long picot blocked through the second hole of the zoliduo right bead on the first long chain)  Reverse work;
Chain  2 : 1 : 1 ·:· 1 : 1 : 2;  Reverse work;
Ring 3 + 1 LP 3; (remove the clip and join grabbing the long picot passed through the second hole of the zoliduo right bead on the first long chain)  Reverse work;
Chain  2 : 1 ·:· 1 : 2;  Reverse work;
Ring 3 + 6; (join grabbing the long picot passed through the second hole of the zoliduo right bead on the first long chain).
Remove the very first clip and join work to the starting point. Cut and tie and hide threads.

Happy tatting.

๐ŸŽƒ ๐ŸŽƒ ๐ŸŽƒ ๐ŸŽƒ ๐ŸŽƒ ๐ŸŽƒ ๐ŸŽƒ ๐ŸŽƒ ๐ŸŽƒ ๐ŸŽƒ ๐ŸŽƒ ๐ŸŽƒ ๐ŸŽƒ ๐ŸŽƒ ๐ŸŽƒ ๐ŸŽƒ

Do you remember that I've been learning the embroidered netting lace? The ladies from Bosa, maestre of their Sardinian filรจt called  “SU Lร€URU 'OSINCU”, came again last week. I'm very slow with this work, I'm still on the same net started last year, but I always learn something new, every time they come here. That is a pic of the net just today:
and a close up:

Ciao,
Ninetta

Tuesday, 19 June 2018

magic square - and AOB

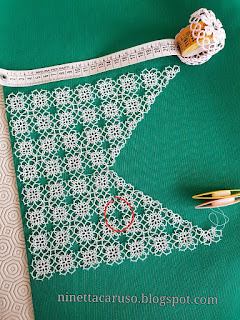
Here it is the square, I'm almost there
Details and pattern are here: the chain does the trick 
The pattern for the little box, that I use as a container for the measuring tape, is by Nancy Tracy, it is here: http://www.be-stitched.com/free-tatting-patterns-3/tatted-box/
I circled with the red line a mistake, that I found too late, a miscounted chain. I called Dr. Downplay again and he assured me that nobody is going to see it ๐Ÿ˜ฑ๐Ÿ˜ฑ๐Ÿ˜ฑ๐Ÿ˜ฑ๐Ÿ˜ฑ๐Ÿ˜ฑ but me...

Then, here it is the AOB ("any other business") part:

I started another little project, just to have fun. I'm planning another thread, maybe a coloured one, and I think to tat it in a squared shape. In the next picture my first sample with DMC white size 80, pattern is from page 57 of a very old book, by Mrs. Warren from 1868, link is here: http://www.antiquepatternlibrary.org/pub/PDF/C-GS001Warren.pdf
I changed the old pattern a little, substituting some rings with split rings, so that a "magic pathway" appeared. I will share a drawing soon, I hope.

The bracelet with zoliduo beads is very close to become an UFO, I can't find it, I'm sure I put it in the "here-where-I-will-find-it" place. We always have such a place, you know!

And here it is my net, it restarted after a winter hiding behind the kitchen's door, I hope to finish it for the end of the summer:

๐ŸŒน๐ŸŒน๐ŸŒน๐ŸŒน๐ŸŒน๐ŸŒน๐ŸŒน๐ŸŒน๐ŸŒน๐ŸŒน๐ŸŒน๐ŸŒน๐ŸŒน๐ŸŒน๐ŸŒน๐ŸŒน๐ŸŒน๐ŸŒน๐ŸŒน๐ŸŒน๐ŸŒน๐ŸŒน๐ŸŒน๐ŸŒน
I'm happy to share with you beautiful photos, too. My DH heard my whines for the "very old" smartphone (6 years) I had and the other day he came home with a present: the new one is great for taking perfect photos of my tatting and flowers, that I love!


Ciao,
Ninetta

Tuesday, 19 December 2017

don't lose the keys (and the tatting, too)

They're 20 in total and I'm glad my friends loved them, they have already been given away as xmas' gifts. The plastic key fob has been tatted around as it was a stone, like the earrings here: "international drop addiction", thread is 2 strands of Finca light gold (Hilo Metalizado, 1000mts, Presencia Hilaturas).
The little crosses inside had been part of the net embroidered last summer, there was some space left after I finished the fans and I thought to make something so the precious handmade net would not have been wasted.
This was the net before I cut the fans, bookmarks and many motifs. I still have to buy a structure for the second fan, but the lace is saved.

I finished a necklace, using the same thread Finca and light blue bugle beads, I also added some little pearl drops. I like it, especially the chain with the interlocking split rings, that gives a pretty touch to the pattern. I plan to make a second one in silver, not soon though.


There is a post of mine about how to tat the interlocking split rings, it was useful as I don't often tat this chain. I tatted using "Method 2" in my tutorial, link is here: interlocking since 1869


I thought that those earrings in previous photo didn't match and then I came up with another pair, much better in my opinion.

In the next picture there is a box that has a pincushion in the cap, I saw this in Pinterest and I couldn't resist to try it out, made from a tuna can, fabric and cardboard. This is the original source: http://1inchminisbykris.blogspot.com/2017/02/something-different-to-do-pouf-for-you.html
I used the wrong type of glue, it smell badly, just because I still haven't learnt how to use the hot glue gun. Next year...


I wish you all my heartfelt Merry Christmas and I'll take a break from the blog, till next year. I'll tat mini roses, mini bedspread and I'll also knit scarves... and I will eat panettone and torrone, of course!

Ciao,
Ninetta

Tuesday, 24 October 2017

light terra cotta

DMC thread, Special dentelles n. 80 colour 3778, "light terra cotta" and rocailles miyuki 15/0 white pearl. Slow tatting...


I'm slow also because I've started another net in Sardinian Bosa filรจt lace (called  “SU Lร€URU 'OSINCU”), it's too early for showing a close up, that is just to get a glance:

Ciao,
Ninetta
Related posts

Tuesday, 17 October 2017

how to go on

Do you remember that I've been learning the embroidered netting lace? The ladies from Bosa, maestre of their Sardinian filรจt called  “SU Lร€URU 'OSINCU”, are coming again this week. I've prepared another frame with the net stretched and I can't wait!

Those are just another two little motifs embellished with tatting:


About the fun, ops sorry, I mean the fan: I'm trying to figure out how to go on filling the space, that is what it looks like by now, stitches' numbers have been made up and I hope that at the end the lace will fit the shape. That is a "work in progress" pattern, so in this moment I don't feel like I can suggest anyone to follow my madness ๐ŸŒธ๐ŸŒธ๐ŸŒธ๐ŸŒธ๐ŸŒธ๐ŸŒธ. Only time will tell ๐Ÿ•›๐Ÿ•๐Ÿ•‘๐Ÿ•’๐Ÿ•“...


And you? How would you do it? In Italian we say "sono tutt'orecchi" (word for word it is I'm all ears), very funny picture to say that: I'm listening...

Ciao,
Ninetta
Related posts

Tuesday, 3 October 2017

chiacchierino facilissimo

✨✨✨✨✨✨✨✨✨✨✨✨✨✨   blog anniversary!   ✨✨✨✨✨✨✨✨✨✨✨✨✨

My blog anniversary is in two days. Thank you so much for all your visits (WOW!) and nice comments (HUGS!), it means a lot to me ๐Ÿ’—๐Ÿ’—๐Ÿ’—๐Ÿ’—๐Ÿ’—๐Ÿ’—

This is the forth blog anniversary, well at this point I think my visitors know that "Chiacchierino facilissimo" in Italian means "very easy tatting" ("chiacchierino" means tatting), but ... Do I really think that tatting is "facilissimo"?
********************
Nothing is as easy as it looks. 
- Murphy's law. 
********************

That looks easy, doesn't it? But there's a lot of work behind it, and I've not yet mastered the netting technique, my net is still unusable! It would be better that I spend my time tatting, that it is easier for me!
The embroidery is part of a bigger net, I've been learning how to do the embroidered netting for 3 years. Last month I took the net off the frame where it was stretched and embroidered. I started the embroidery last year in October and finished last month, but I prefer tatting so the work on the frame was sporadic.
There's some simple tatting embellishment around that little filet lace motif (similar to that one showed here: http://ninettacaruso.blogspot.com/2015/09/use-it-safely.html). There isn't a pattern for that. I have tatted around 2 others motifs, I'll share photos in next posts. Thread is DMC ecrรน size 60.

Then, back to the question, "is tatting easy?" I'd rather say that you can call easy everything that you know how to do. When I started the blog, I thought "facilissimo" would have been an encouragement, I had never thought to make a provocation. Playing like a child is easy, a joy and a relaxation, but tatting...
It is complex, the flip doesn't come at the first try (second neither), someone could be discouraged and throws the towel, or someone else could then say that it isn't worth the effort because it's boring, always the same repetition of rings and chains... Someone even wrote that it is not a serious thing... No looms, just you and your hands. Not even a bunch of stitches, just two knots.

Despite it is not easy to learn - no matter which is your fave, shuttle or needle - I love its simplicity, that is the beauty, the charm of tatting and I've been learning so many techniques beyond the simple look of the double stitch, that it's "facilissimo" for me to fall in love with everything that is tatting!

But I think that if everybody said that tatting is difficult to master, who's willing to try? Once happened to me, long before learning, that I asked a Lady how she could tat and she rose her eyes and said something like that it was a craft difficult to learn. I'm not the kind of person who loves competitions but I've always tried to challenge myself, so she didn't deter me. But  there are people who need encouragement, so, probably, when people look at me while I'm tatting, if I say "you can do it, try it, it's easy", I hope they find the curiosity and willpower to try it out. That is not to diminish its value but to grow the knowledge.

Have you read this post by Muskaan? https://tipsaroundthehome.blogspot.com/2017/06/tell-world-its-not-easy.html


As promised, here it is the tatted motif (or wheel or snowflake -- I'd hire a consultant for names ๐Ÿ˜„) using Lizbeth size 20 thread. I haven't changed anything in the pattern, it only needed some blocking because the cotton in my hands is stiffer than a metallic thread. Pattern is in previous post, http://ninettacaruso.blogspot.com/2017/09/radiant.html

Ciao,
Ninetta
Related posts

Tuesday, 12 September 2017

Robin's magic tutorial

I've followed with great interest Robin's blog, lately she shared her way to recreate a magic square starting from a repeatable square (here: http://tattingbythebay.blogspot.com/2017/07/designing-magic-squares.html ), I love how she explained everything so clearly, step-by-step, and the entire process fascinated me.

I haven't tried her onion ring magic square, though. It's beautiful! But I was curious to try the process, "to embark on my own magic square journeys" (she wrote these words!).

Thank you very much Robin for the fun!

There's a square of mine that is completed in one round and it actually needed a "revision". You may don't know but the most difficult part about designing is correcting your own pattern, when you are stuck and don't now if one double stitch would improve it or get it worse. So I did many tests with this little square, I even used one version in a mat that I gave to my mum (the picture of the square is "quad_23" in the album "granny's squares" in Flickr here: https://flic.kr/p/ou5tHa and here it is the finished mat: http://ninettacaruso.blogspot.com/2016/02/prototypes.html).

I updated the pattern eventually and I like it more, I changed the length of two chains and that made a good difference. I'll share the pattern, sorry it's not yet drawn. Thread is DMC size 80, color number Light Peach 754. Then, following Robin's tutorial, I obtained my quad_23 magic square:


But then I wanted more. It seems that these magic squares are addictive, one is never enough!
Playing with Apps is always fun, just like Robin says the "virtual" tatting saves a lot of time and I was curious to see as soon as possible the bigger square. I downloaded an App called "Photo Collage editor (by Zentertain)" in my smartphone and I had the next picture in an eye-blink!


I can see the inverted square and other squares too! But I don't know if and when I will try them all!
The actual tatting is very little, but I like it and I'm going to try it in two colors.


This week I also finished the Sardinian Bosa filet lace, so I'm ready for the weekend we will have in October with the Maestre who are coming again from Sardinia.

(see the frame with my work started last year here: spare wheels  and the embroidery finished but still on the frame here: don't lose the keys (and the tatting, too) )

Ciao,
Ninetta
Related posts

Tuesday, 1 November 2016

spare wheels

My heartfelt thanks to all of you who were so kind to leave a comment in last post. I tried all options, except the one with little rings of 4-4, and I had a first sample cup that broken in the middle (I won't show you that) but another two that I like. Surprisingly, those two motifs - tatted with the same stitches' count - are (again) very different from each other.
(that one in the right is the same showed in previous post).
My favourite is the one on the left, tatted with a gauge of 0.5cm both for picots and BTS. But I think that the one in the centre looks more like the motif in Priscilla's edging.
For that one I used a gauge of 1cm for long picots in the centre, then 0.5cm for picots in large rings. For the BTS I left about 2.5mm (more or less, without a gauge).

I still don't know which version I'll use for tatting my edging, but now I've a lot of spare wheels to play with!

In the meanwhile... Last Saturday and Sunday we met again those Maestre of Bosa's lace, “SU Lร€URU 'OSINCU, we had 2 intense days of lessons and I started embroidering another net. We were few people, less than in past two years, but we enjoyed every minute. They came for the first time in October 2014 , then in October 2015.
Some of us, with the teacher:

That is my started work, without a drawing to follow but with the help of the sweet teacher:

If you are curious and would like learning more about Bosa's filรจt, you may read a great post by Jeanine: Sardinian Bosa Filet Lace
There's another link I found, with pictures of nets designed and done by the very same ladies who came here, but it's in Italian: 
http://www.ladonnasarda.it/magazine/chi-siamo/3087/tradizioni-e-saperi-si-intrecciano-nel-filet-il-ricamo-di-bosa.html

Adios
( http://www.ecuador.com/language/ )
Ninetta

Related posts:

Thank you very much for all your nice comments.

Ciao
Ninetta