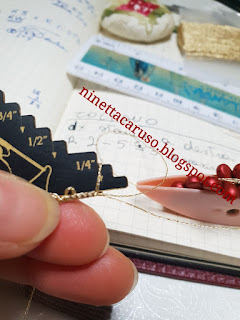
This is just the start of the pattern for my bracelet with zoliduo beads, then you can play with the concept and create your own version.
For this post, I used thread Finca metallic gold colour 0006 n.2/C (very similar to a size 20 thread) and Czech ZoliDuo® ~5mmx8mm beads (Two Hole Pressed Paisley/Comma shape Beads). These are mischievous beads conceived to make you buy the double quantity, in fact there is the "left beads pack" and the "right beads pack" and of course you, just like me, sooner or later, will need both!
Tools: a gauge half inch wide used horizontally (or the half size, used vertically); a tiny latch hook (the Italian name for that is "rimagliatore").
Load CTM 2 shuttles, but before winding the second shuttle, load on the thread 14 "left" zoliduo and then 14 "right" zoliduo. That is for a bracelet length of about 15 or 16 cm.
Split the beads, all "left" beads are on one shuttle and all "right" are on the other one. I started with the "right" zoliduo beads on my right, that for me it is the side of the core shuttle. Then I started a normal ring: 2ds, picot. 5ds, measured picot (that is for the second hole of the zoliduo), and 3ds.
Close the ring. Reverse work.
Slide one "right" zoliduo from the right shuttle (that one just used to tat the ring).
Start a chain: 2ds, picot, 2ds, lock join to the measured long picot, grabbed through the second hole of the zoliduo with the help of the latch hook.
Then 3ds, measured picot, 3ds.
Lock join to the base of the long picot of the first ring. Slide one "left" zoliduo from the shuttle (that one used as ball thread in previous chain).
Reverse work and switch shuttles.
Start a chain: 2ds, picot, 2ds, lock join to the long
picot of previous chain, grabbed through the second hole of the zoliduo with the help of
the latch hook. Then 3ds, measured picot, 3ds. Lock join to the base of long
picot of the previous chain.
Reverse work after each chain and always switch shuttles.
Slide one "right" zoliduo from the right shuttle (that one just used to
tat the first ring). Start a chain: 2ds, picot, 2ds, lock join to the long
picot, grabbed through the second hole of the zoliduo with the help of
the latch hook. Then 3ds, measured picot, 3ds. Lock join to the base of the long
picot of previous chain.
Reverse work, switch shuttles and repeat, alternating with "left" and "right" beads. Etcetera.
I hope that the procedure is clear. You can embellish the line of zoliduo with another tatted round, simple chains or whatever you like. I'll be very happy to see your version. I think that this red zoliduo beads are far better than the first clear crystal that I bought, I can't wait to wear this new one!
You can find other related posts, selecting posts with the label zoliduo.
Ciao,
Ninetta
Handmade tatting lace blog with my own patterns, tutorials, how-to and links to useful resources. It's all about my passion and my joy.
Translate
====================
====================
Dear Reader,
I share here what I like and what works for me. If you've been following me, you know that I can change my mind from time to time, and feel free to comment that I'm completely wrong, you may be right. I'm not running a business. I'm not paid and have never received any compensation or facilitation for any review/brand/site here mentioned. In case one day we'll ever meet, I'll be the one offering you a cup of Italian coffee, too.
====================
Tuesday, 29 May 2018
almost a pattern for zoliduo
 :)
:)
 :(
:(
 :))
:))
 :((
:((
 =))
=))
 =D>
=D>
 :D
:D
 :P
:P
 :-O
:-O
 :-?
:-?
 :-SS
:-SS
 :-f
:-f
 d(
d(
 :-*
:-*
 b-(
b-(
 h-(
h-(
 g-)
g-)
 5-p
5-p
 y-)
y-)
 c-)
c-)
 s-)
s-)
 d-)
d-)
 w-)
w-)
 :-h
:-h
 :X
:X
Show Emoticons 

Subscribe to:
Post Comments (Atom)
Thank you very much for all your nice comments.
Ciao
Ninetta
Ninetta


Fascinating!
ReplyDeleteThank you for the explanations! You are right, looking at the beads, since they have a rounded front and a flat back, you do need left and right beads. Too bad they didn't make both sides rounded so you could turn them which way you wanted.
ReplyDeleteLooks beautiful!!! :)
ReplyDeleteWow!! Ninetta you made it! Actually it was odd shape when I saw it in your previous post but your create a beautiful bracelet.
ReplyDeleteThank you everyone! :-f
ReplyDeleteLooks beautiful and an interesting post, I look forward to seeing the bracelet finished
ReplyDeleteThank you for these indications! I have the beads and some thread, hopefully I'll be able to make them all play nicely together and create a bracelet ;)
ReplyDelete