Translate

====================

====================
Dear Reader,
I share here what I like and what works for me. If you've been following me, you know that I can change my mind from time to time, and feel free to comment that I'm completely wrong, you may be right. I'm not running a business. I'm not paid and have never received any compensation or facilitation for any review/brand/site here mentioned. In case one day we'll ever meet, I'll be the one offering you a cup of Italian coffee, too.
====================
Showing posts with label Priscilla. Show all posts

Tuesday, 10 March 2020

just for one hanky

I've already written about this handbag, here:
https://ninettacaruso.blogspot.com/2020/03/priscillas-bag.html

It's charming but not strong, the bottom is closed with lock joins taking two picots together. That means it can't be used to carry heavy stuff, for example it can't be used as a cell phone holder.

I put a hanky inside, but there's still room for a pack of paper tissues.

The cord is beaded pearl tatting. The material required in the pattern was cotton size 50 and, for the central thread, cotton size 5. I used Sanbest metallic mixed polyester thread, colour number 178, 3 strands that is similar to a size 50, and for the central thread I used a black polyester, without brand or number, thicker than a size 10.

Now that is finished, I'm doubtful about the cord. I carefully followed their instructions, they wrote to tat 2 cords in pearl tatting, starting with a section 1 foot long without beads, then 1 foot long with beads, then another foot without. The 2 cords are joined in the middle beaded section. At the end, the cords is about 90 centimetres long. Don't you think is too long? How did they use to wear it? How many hankerchieves did a lady need?
Ciao,
Ninetta

Tuesday, 3 March 2020

Priscilla's bag

It is the "Bag in beaded tatting", fig.91 in Priscilla#2. I would call it beanile "ante litteram"...

All beads are in the ball thread. All chains. 
Thread is metallic mixed polyester, 3 strands, Sanbest colour number 178.

I started with what I thought was the longest manageable load of beads. I used rocailles miyuki 15/0 and haematite, I made my own mix, I think I loaded around 20gr of beads.

The pattern is 30 rounds for the body, then there's the string and the fringe. The string is beaded pearl tatting and the fringe is just long picots in chains, the pattern says 7cm but I will make mine proportioned, so I think 5 centimetres will fit. 

I climbed to subsequent rounds with split chains, a technique unknown to the 1915's tatter. Lucky me!

My first load of beads finished around round 14.

Then I loaded about another 30gr of beads.
No way they are enough though, they're going to finish soon. I think I need at least another 5 meters of beads for the fringe. In this moment I finished the beads of same colors at home, so I'm going out for "hunting". You're right, I just needed an excuse for shopping 😜.

I hope next week I'll have the finished bag and will show you. Fingers crossed!

That is the original picture in Priscilla#2, beads were white and turquoise:
Ciao,
Ninetta.

Tuesday, 25 February 2020

ivy leaves with roll tatting

The pattern is from Priscilla#3, it's the Ivy Leaf Doily, defined doily but actually it's an edging. Thread is dmc ecru size 20. I tatted only a shorter sample, while in the book there are twenty repetitions.
They wrote also how to apply it to the fabric.

These are their instructions:

"With finer thread, crochet a chain all around inside working a slip stitch into the outer picots of the tatted chains. Then draw a circle on your linen and cut allowing for a 1/8 inch hem. Whip the lace to the edge of the piece taking up each stitch."

But there was the fast&modern way! In fact they continued:

"If you prefer to cover the edge with doubles, machine stitch on the penciled line, so that the linen will not stretch in the working. Cut away linen about 1/8 inch beyond stitching as you work."

Well, I'd rather not machine stitch such an edging, all that handmade work deserves handmade stitches.
It was very difficult for me tatting something acceptable, the roll tatting is fiddly, even if I carefully followed their hint, dividing the number of rolls in ten or twelve and holding them between fingers.
But, well, maybe the writer from 1924 was more modern than me!

I think I will finish the sample with fabric and hidden whip stitches, but without the crochet chain.

Ciao,
Ninetta

Tuesday, 18 February 2020

something in common

All those have something in common...
I'm quite sure that you recognize the little motif that is at page 15 of Priscilla#3.
I've already tatted it, with cotton, but this time threads are poliester metallic silver and red. Well, now that it's finished, I'm dithering, I don't know if I still like it or if I prefer the cotton version 🤔
My first version is here:  https://ninettacaruso.blogspot.com/2016/09/time-means-nothing.html

The red sampler is my first time with roll tatting.  Pattern is at page 24 of Priscilla#3. That's cotton, dmc cebelia size 10. I don't think I gave it justice. I'm going to tat it again, I'll tell you...

The work in progress on the left is a bracelet, I changed the stitches' count, but it's quite the same as the one at page 9 of Priscilla#3... I also added coloured Swarovski bicone beads and pearls.

All those pieces are my tests for something that I'd like taking to an exhibition that the local lacers' association will host in March. It will focus on lace of the first half of XXc.
I hope I'll have enough time to prepare what I've in mind, fingers crossed 🤞!
Ciao,
Ninetta

Tuesday, 21 January 2020

variations on the theme

In Priscilla#3, figure 29, there's an edging that is very nice to tat.
Way back in 1924, they wrote that edgings would be perfect for pillow cases and sheets, but... in case you have a sparkling thread to use up, some edgings and trimmings are perfect for bracelets, too.
It is pretty easy: all chains. Each chain is the same number of stitches and the join is at about a third of the chain. In the "all ds" pattern, you can vary the number of ds, or you can add picots or beads, then you can change the position of the join, to obtain a wide range of similar patterns.


I tatted some variations, but I substituted double stitches with treble tatting stitches and now I wish I could try all possible combinations!

Thread is metallic Sanbest thread, they sold 3,4 and 6 strands, the thickness of the silver in the picture is 4 strands and - my opinion- it is like a Liz cotton size 20. The other two are 6 strands, that are like a cotton Cebelia size 10. In the Facebook group, friends wrote that the 6 strands thread is like a Liz metallic size 20, but I don't have any of that, to compare myself.

Ciao,
Ninetta

Tuesday, 16 July 2019

the "letter e" edging

The sitting room is almost finished, it needs only minor things to be added, then I'll show you a full picture.
The edging you see in my hands has been used to frame the scene, it's about one meter, it's finished now and already glued on.

Thread is ecrù, size 60 DMC Cordonnet Special. Pattern is from Priscilla #3, figure 30 at page 9.
Rings are all 5 picots separated by 2ds, while chains are all 3-2-2-2-2-3. Tat the ring joining it to the second last chain, then the chain, lock join to the picot in the ring and reverse work, switching shuttles. Continue with chain-ring-chain, lock join, switch shuttles and repeat.

I find this edging very fun, it is like a sequence of letters "e", one up and one down. It's a nice variation of the simple rings-and-chains edging, with all "e" in the handwriting position.

Did you know that the letter "e" is the most commonly used letter in many languages? In spite of that, I've learnt that a French author in 1969 wrote a book that is a sort of game, the title is "La disparition", and what disappears is the letter e! In the whole book there isn't a word with the letter e! The incredible thing is that the book has been translated in many languages with the same intent, I should find the Italian version, because I'm really curious now!

I tatted a simple line of rings for the little chair with a size 100 cotton thread (Anchor Artiste Mercer Crochet 100), all rings are 3 picots separated by 3ds, leaving a short bare thread space between rings, you can find the pattern in Priscilla #1 and in Priscilla #3, too. There's a lovely description: "This is the simple edging our grandmothers made, and it is very dainty when made with fine thread and used on the edge of footing to trim handkerchiefs..." Well, it's very dainty also around the chair, isn't it?

Ciao,
Ninetta

Tuesday, 25 July 2017

trimmings

You will never see me cooking for more than half an hour, I like pasta, bread and salad, fast easy and delicious! We're having a lot of salad, mixed and fresh, I love that in this period of the year the market is full of vegetables! Stalls are a rainbow of colours!

About trimmings, I like the fact that in Italian we call  "contorno" everything that is trimmings, food accompaniments. But we also call "contorno" an edging when it goes around a fabric (different from "passamaneria"), in my mind I visualise it as in a circle as around a dish, or, in a figurative sense for example, we say that hair are "contorno del viso" like embellishment of the face. I learned that also the word trimmings has the double meaning, for edging and food. Good to know 😄


About tatting, I picked again the ecrù (that is size 80, DMC), I'm having difficulties with colours (especially red thread) and then I go, to the more relaxing hue, like that one in the fan (see last post).
That one in the picture is from a pattern found in Priscilla #2, fig.13, trimming. I've changed it because I didn't like my first try, it was twisty that is chains didn't follow a plain path, even working with 2 shuttles. I thought that I should have came back to the shuttle and the ball because of the vintage pattern (1915), but strictly following the pattern I didn't like my tatting. In the same old book there's other patterns with the Victorian stitches sets, so I changed all normal chains with that kind of chain and I like it more. Then I cut away a repetition and it lay quite flat, except the first module that was tatted when I was still following the number of repetitions indicated.


What I will do with it it's not clear, even to me, yet. It's just the heat, though.

Lately I 've got back to the Bosa's filèt. I hope to finish it before the summer. (See the frame with my WIP here: spare wheels )

I've bought the book "Tatting Patterns and Designs" by Gun Blomqvist, a reprint issue, original was from 1988 but there are many 'vintage-style' patterns. I like it and probably I'll tat something from that soon.

Ciao,
Ninetta
Related posts (with finished tatting from Priscilla #2)

Friday, 24 March 2017

recap

Not much to show you from the last days, I've been on the edgings for the hanky and for the rings' pillow (both finished) and I did a few more, something with bugle beads, testing a prototype for another edging, 5 and half rounds of Renulek's doily. Two weeks ago there was an exhibition of old laces here, organized by the local association, we had a lot of fun and learned too, about the history of lace in Italy. I've also been fiddling around without the shuttle! That's the good effect of the warm weather! I've also cleaned up the balcony and repot geranium, last year I had a colony of "Licenide" that it is a little beautiful butterfly but its caterpillar lives inside geranium's stem, I hope this year they will choose another balcony for their holiday resort.
Sorry, I digressed.
That is the rings' pillow, that I call finished as it is, I'll tack it in a piece of fabric and wash it, then it will be ready to be put away, I hope it will be used one day.


Then here it is the almost finished hanky, only one corner has still to be attached to the fabric:
 Oh, don't think that it's for blowing the nose!

Ciao,
Ninetta
Related posts
daisy in corner

Friday, 10 March 2017

daisy in a corner

I've naively believed that corners were not an issue for any tatter, but I'm unsure about it now and I'd like sharing what I've done with the edging I'm currently tatting. I admit I didn't look for a pattern, if already available in internet for this edging, in fact I have made this one up taking in consideration simple tips and a bit of experience.
The simplest thing to look for is that: if the next repetition in the pattern can rotate just removing one or two joining picots. In this case you may be content as it is or would like adding a spare motif to fill in the gap. I think that it is understandable, but here it is an example (there's only one joining picot between repetitions):


I first tried with another method, that is the mirror, like in fig.885 here: http://encyclopediaofneedlework.com/chapter_16.html

(Update: https://www.gutenberg.org/files/20776/20776-h/20776-h.htm#fig_885 )

I took a pic, just because I know I would have forget it immediately after removing the mirror. Of course, technology helps a poor tatter 😉


But it was obvious that the line of sloping daisies would have changed on the second side. So I tried just to bend 90° the edging:

it was quite good, because I noticed that only a joining picot should have been removed. Then I added a daisy: 6 rings are 10-8-10 and 3 rings are 10-4-4-10, these last 3 are used to connect the daisy to the edging. Only the next motif in the corner has the very first petal as Ring:14+4-10.


I've found another way to tat a corner for this edging, but the daisies are attached to the fabric instead of the leaves. I found it here: http://macrame-crochet.eu/2013/02/bordura-a-chiacchierino-con-schema/  (it is an image of a pattern taken from an old Burda magazine)

Ciao
Ninetta
Related posts

Tuesday, 7 March 2017

spring at Priscilla's time

This hanky calls for spring and those daisies do the same! (despite the color I chose!) I wonder if the tatter designed this edging in Spring.

Pattern is from Priscilla Tatting Book #2, Fig. 2 page 3. I found that it was published in 1915, but actually I don't know if this pattern is older than the book. By chance, it's the same year that my father's mum was born, in May.


Googling for "vintage tatting pattern daisy edging", it can be found a page via the wayback machine, where the same pattern is rewritten using a modern notation, this is the link: (and I hope it will work for you!)
http://web.archive.org/web/20080229045442/http:/www.wcnet.org/~scwheels/page17.htm

I've just noticed that I'm wrongly tatting the first leaf, with 14+5-9 instead of 9+5-14, but it seems working as well!

Ciao,
Ninetta
Related post

Friday, 3 March 2017

something I like

I'm enjoying tatting this white edging, I like a lot the sheer lace effect of the tiny size 100 thread. That is what I've tatted till now
 

In Pinterest, you know when they send those mails "we found this that might be right up your alley" (and of course I like it), there's the photo of an item (already sold) in ebay, " Antique Tatted Fine Deep Wide lace wedding bridal hanky Circa 1900 NWOT" (in ebay nwot is new without tags); link is here:
 http://pin.it/4kF5a_e


I'm glad that I've found such a clear photo of the edging, probably that one is not so old. I zoomed in with the facility offered by ebay and looked at the connection points between the wheels and the inner round of rings, they are perfectly visible. In a previous post, Martha Ess kindly left a comment here, saying that she tatted it years ago and added some motifs to fill in the gaps, I loved her hint. Looking at the picture in ebay, you can see that the tatter let it almost as equal as described in the Priscilla's but the little flowers connected to the inner rings are five petals (instead of four). That could be another option. But I'm still dithering, I'm also thinking about getting rid of the inner round.

Ciao,
Ninetta
Related posts:

Tuesday, 14 February 2017

out of the corner

Thank you for visiting me, I wish you a happy Valentine!
I've just tatted a little heart, at a glance you can't even see those superduo beads, the same color of the thread:
If you'd like looking at more hearts, try this link:
http://ninettacaruso.blogspot.com/search/label/hearts

I'm very slowly tatting my two edgings, but I managed to have 2 corners for the white one and one corner of the hanky.
Not so much for today's post, but I wonder if you glimpsed my header bar where I've added an "about me" page...

Ciao,
Ninetta
P.S. I updated the post sbrilluccicante  to add the link to the video offered by the "Georgia Seitz Advanced Class" channel. Thank you for watching.

Related posts

Friday, 10 February 2017

vintage

The vintage tatting has been cheering up my days. I'm tatting the second corner of the Priscilla's white edging. Then, last Saturday, I bought two lovely hankies in a market stall, under a pile of secondhand clothes. But it seems they have never been used, there's the label still attached. I love hankies, I just couldn't leave them.

The first one has bright colors. It's so lovely, it's worth a tatted edging, isn't it.

Thread is dmc size 80, pattern is from Priscilla Tatting Book #2, Fig. 2 page 3. It's not the first time I've tatted this pattern and I can remember that some years ago I had troubles to get it done correctly.

(In the photo, there's also the TIAS 2017, thank you very much for the fun, Jane Eborall!)

Ciao,
Ninetta

Friday, 3 February 2017

quite corner

Thank you very much for your comments in last post, I value all your thoughts about how the inner row has to be connected to the wheels, it will be a nice puzzle when I finish the corners, but I'll be on the wheels for a while.

In my quite tatting corner, I'm still playing with bugle beads and I'd like starting something else, perhaps a colored motif. The "Tuesday Tatting Designers Class" has begun again and there will be a lot of inspirations, we are invited to give ideas and suggestions, too. Anyone who wants to join in is welcome! Infos are here: https://tattinghomework.wordpress.com/about/

I also joined the TIAS fun, I'm still hopeful that it is a butterfly... I'm very optimistic :)  it has got one wing, an eye, it is colored (variegated) and it flies around from one table to another. But actually the eye is wrongly placed, I think...

Ciao,
Ninetta
Related posts:

Tuesday, 31 January 2017

froufrou

That's how I'm trying to sort it out, even those joins in the inner row of the border seem barely fathomable in this moment:
I like that froufrou look, very vintage. I've shortened few picots and one corner of my edging is almost completed, I need one wheel and one flower. I played again with the zoom I took from the pfd file, trying to figure out the inner row.

Priscilla's words: "Along the inner edge of the border, make a double row of rings (each of 7ds, 7pp separated by 2ds, 7ds, close) joined by the first picot, and the outer row joined to the wheels and four-leaved figures..."
Well, I'm always puzzled by the word "join" put there as though you were sitting side by side aunt Priscilla while she was tatting and chatting. I can see the rings joined to the wheels by 2 or 3 picots up there, aren't they?

I think I should tat all corners first, then I'll think about it.

Ciao,
Ninetta

Friday, 27 January 2017

ideas from scraps

I'm sorry I've been neglecting my blog, lately. Before I start talking about scraps, here it is the measure - as promised - of the doily I've just finished:
and that is the same doily and Wiosna2016 side by side, just for get the idea of the size.

I've something else that came again in the spotlight this week, that is about the snowflake with bugle beads "sbrilluccicante", it has just been shared in the Online Tatting Class, with a video-tutorial, too.  Thank you so much to Georgia Seitz and all. Have you heard that they are collecting donations via yotube videos? Read more on their website: http://www.georgiaseitz.com/2017/2017index.html .
I'd like sharing with you two versions, the first has longer beads than in the first one, so I had to add ds in the outer round:
The second one is with 2 colors' beads, one shuttle was loaded with one color, the second shuttle was loaded with the second color:
Long post, I see.
Let's go on, please.

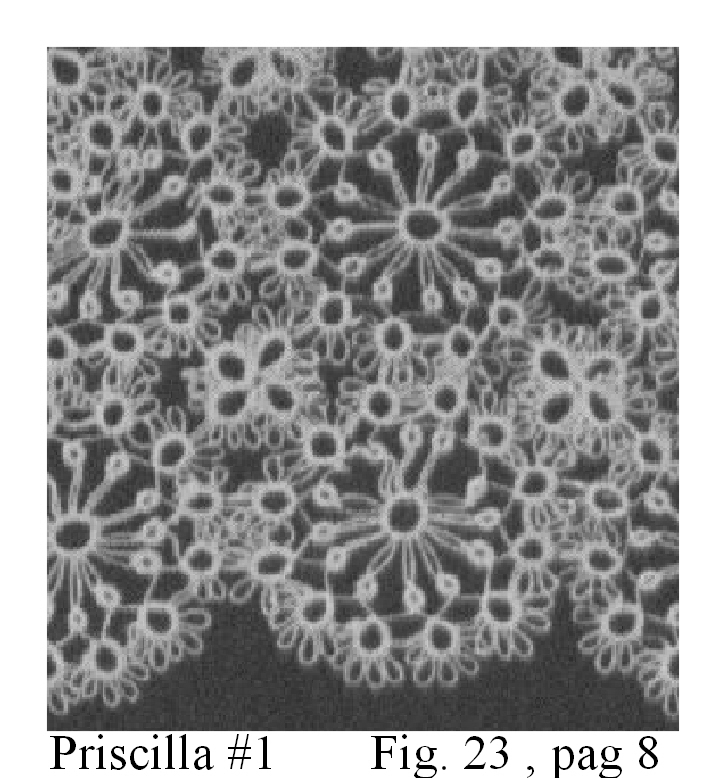
I started the edging that had been on my to-do-list for ages: that one that is at page 8 in fig. 23 in Priscilla #1, I'm using white dmc size 100 thread.

The book is here: http://www.antiquepatternlibrary.org/pub/PDF/DeWittPriscillaTat1.pdf

I changed the length of bare threads, they are all 0.5cm, also picots are the same size high. It's quite different from the original but I like it this way, more regular.

my plastic gauge
Maybe someone remembers that I tested the wheel motif in October, 3 months ago! please don't ask what happened then, time flies so fast that I can't answer.

Per Priscilla's words: "Make 40 of these wheels for the border, joining them as seen in the illustration." The picture in the pdf is quite blurry, I think. I copied it and played a little with Serif software, and I obtained the pic already shared with you:
Looking at this kind vintage tatting, I can't help myself thinking that "tatting" is a word that also translates with the italian word "brandello", that is something made with shreds, scraps, and this also reminds me of old ladies who can't throw away anything even bits of thread, that couldn't go wasted!

More than a century later from that picture, I tatted 5 wheels to visualise how big the edging is, and I think that 6 wheels in each corner would be good for a rings' pillow. 24 wheels instead of 40, split rings and modern technologies! good enough for me! 😊😊 Motifs are not yet joined, I only put them close each other to see where the joins should be.
But at first glance, it looked crowded, too many picots, my personal taste. I'd rather prefer something quite easy to iron, isn't it?

...those motifs will soon become tatting scarps, but the idea came to me. I'll show you in next post (I hope).

I'll keep my scraps, I always keep them. Since I've had a notebook, it has been stuffed with scraps, then when I think I'm having that "tatter's block", I look into my notebook and there's always something that can be rescued. A lot of ideas comes from scraps.

In the meanwhile, I found that variegated thread, already wound on the shuttle. A bird told me that it can be a butterfly, so it's time to Tat It And See if it flies ...
Ciao,
Ninetta

Tuesday, 1 November 2016

spare wheels

My heartfelt thanks to all of you who were so kind to leave a comment in last post. I tried all options, except the one with little rings of 4-4, and I had a first sample cup that broken in the middle (I won't show you that) but another two that I like. Surprisingly, those two motifs - tatted with the same stitches' count - are (again) very different from each other.
(that one in the right is the same showed in previous post).
My favourite is the one on the left, tatted with a gauge of 0.5cm both for picots and BTS. But I think that the one in the centre looks more like the motif in Priscilla's edging.
For that one I used a gauge of 1cm for long picots in the centre, then 0.5cm for picots in large rings. For the BTS I left about 2.5mm (more or less, without a gauge).

I still don't know which version I'll use for tatting my edging, but now I've a lot of spare wheels to play with!

In the meanwhile... Last Saturday and Sunday we met again those Maestre of Bosa's lace, “SU LÀURU 'OSINCU”, we had 2 intense days of lessons and I started embroidering another net. We were few people, less than in past two years, but we enjoyed every minute. They came for the first time in October 2014 , then in October 2015.
Some of us, with the teacher:

That is my started work, without a drawing to follow but with the help of the sweet teacher:

If you are curious and would like learning more about Bosa's filèt, you may read a great post by Jeanine: Sardinian Bosa Filet Lace
There's another link I found, with pictures of nets designed and done by the very same ladies who came here, but it's in Italian: 
http://www.ladonnasarda.it/magazine/chi-siamo/3087/tradizioni-e-saperi-si-intrecciano-nel-filet-il-ricamo-di-bosa.html

Adios
( http://www.ecuador.com/language/ )
Ninetta

Related posts:

Friday, 28 October 2016

a penny for your thoughts

That is not my tatting but picture number 23, at page 8 of Priscilla Tatting Book #1 (1909), it is a beautiful edging, I've already tatted another edging from the same old book, that is available at the site: http://www.antiquepatternlibrary.org/html/warm/tatting.htm

I'd please you first look at the wheel in the book:

And then look at my tatting:
My wheel doesn't cup or ruffle, so I think it's quite good, but they are very different, not alike.

So I beg you don't be silent because I need your opinion.
I'd like you help me to understand, why the old picture shows those very long picots in the centre? How they can work without cupping the wheel? What do you think? Have you ever tried this one? Can the joining picots between large rings play a role? (maybe they should have been very long picots, too)

Changing the length of a bare thread or picots is like changing the number of ds in a chain, it seems affecting the whole pattern... Moreover, there's the tension of the bare  thread, that changes if stretched.

I loved the journey of Jane through the book of Teiko Fujito. Read about it in her blog:
http://janemactats.blogspot.com

Pattern is the following:

- Start the centre ring leaving a tail from the shuttle, about 12cm (5in) of thread: 2-2-2-2-2-2-2-2-2-2-2-2  (11 picots) - I'm purposely not saying the length of picots.
- leave a mock picot then tat a split ring with the shuttle and the tail: 6ds/6ds
- leave a bare thread - 1/8" - then tat a "large" ring: 4-2-2-2-2-2-2-4 (7 picots);

A)- leave a bare thread  then tat a "small" ring 6+6, joining to the next picot of the centre ring
B)- leave a bare thread 1/8" then tat another "large" ring, 4+2-2-2-2-2-2-4, joining the last picot of previous large ring

- alternate small and large rings, repeating A) and B) for 10 times but for the last large ring:
- last large ring: 4+2-2-2-2-2-2+4, joining the last picot of previous large ring and the first picot of the first large ring.
The tail left at the beginning must be hidden inside the last large ring.

Important note: the edging in the book was tatted with size 80 thread and it is written "leave 1/4 inch of bare thread" between rings around, but nothing about picots' length.

That wheel - I hope - is the first for the edging I'd like tatting, with dmc white size 100 thread.
The only difference with the wheel in fig. 30, page 12, that I tatted last year, it is that those large rings have 6 picots instead of 7.

%%%%%%%%%%%%%%%%%%%%%%%%%%

Changing the subject...
Updates for the doily with curled rings and wide picots: it got a name! I choose "falbalà", because all those picots look like a frilled skirt. Falbalà is an Italian word, with uncertain etymology, maybe from French, it means a strip of ruffled fabric put in the bottom of old dresses, it also means volant or ruffles. But actually, a word not so used nowadays!

Eventually I've another question: how do you write instructions for a wide picot in textual or visual patterns? I've never had the chance to read a pattern with wide picots.

Γειά σας (Ya sas)
( http://www.cyprus.com/useful-phrases-in-greek.html )
Ninetta
Related posts:

Thank you very much for all your nice comments.

Ciao
Ninetta