Translate

====================

====================
Dear Reader,
I share here what I like and what works for me. If you've been following me, you know that I can change my mind from time to time, and feel free to comment that I'm completely wrong, you may be right. I'm not running a business. I'm not paid and have never received any compensation or facilitation for any review/brand/site here mentioned. In case one day we'll ever meet, I'll be the one offering you a cup of Italian coffee, too.
====================
Showing posts with label square. Show all posts

Tuesday, 10 November 2020

derivatives welcome

My post this week is for the "Endrucks 1920 Project" again. It is a collective project, started by Muskaan (read her last post about it here: https://tipsaroundthehome.blogspot.com/2020/11/the-enticing-hole.html ), and I enthusiastically joined in. 

We welcome you to join in, too! All infos and links are in the Endrucks 1920 Project Document, here:
https://docs.google.com/document/d/17LEVftXweztBIOWh4sL4BB7bX65ssoOsOn4oXIgCepY/view?usp=sharing

The pattern of that square is just 4 repetitions of the corner that I designed for the frame showed last week (see previous post), a derivative from pattern #30 in the old book. Then, in the centre, I added a flower, one-shuttle pattern, all rings are 6 double stitches between each picot/join.

The centre of the flower was very open, so I thought that it could have helped the technique learned from a very old rosette, that I showed in my very first YouTube video, here: https://youtu.be/15jm2EkKGTk

About YouTube, one more time I send all my heartfelt thanks to all my subscribers! After the age-restrictions, they deleted all old comments and I lost the infos like the date posted, but videos are still there! I started the channel just to share few unassuming videos, sporadically, so I'm glad they are still public and visible!

For tatting the square, I used Lizbeth size 80 thread,  colour 184.

 
🦋🦋🦋🦋🦋🦋🦋

In the next picture, I'm very proud to show you the Swirling Butterflies doily tatted by a Master tatter, Paola Bevilacqua. 💕 Thank you very much for letting me post your picture here! You are very welcome in my blog! 💕 

She is well know in Facebook for her beautiful tatting, she showed us her bedspreads (more than one, king-size) and jackets and many classical doilies. Also, she has had solo exhibitions with her tatting,  she can fill up rooms!

I am honoured that two Master tatters accepted to help me, testing the pattern. The other lady is Muskaan, she shared her version in her blog (https://tipsaroundthehome.blogspot.com/2020/10/multiples-of-7.html)

Paola used white Ancora size 50 thread and and green is Freccia, size 16 thread.

Ciao,
Ninetta 

Tuesday, 4 August 2020

locked in the old corner

I found this interesting pattern in an old book, here: http://www.georgiaseitz.com/public/emmyliebert/liebertbk1reprint.pdf

The original book is Emmy Liebert Book 1, from 1916, then the online book is a Dutch version. The same pattern has been published many times in various books.


It looks like a rounded motif that has trefoils attached in a second moment. But that's not true.
Corners are tatted in the last round, with the second shuttle (ball thread) that is: leave a bare thread space, then tat the trefoil. Just like floating rings.
Then, when I came back to the round, to give the twisted effect, I joined two times the thread, with lock joins. I don't read Dutch, so that is my solution, just looking at the picture and guessing.

I started with two shuttles CTM, and then climbed up with a split ring. If I tat it again, for something like an earring, for example, I would tat it cutting the thread between rounds. But I've had a chat with Dr. Downplay and he said that my sample is pretty good as it is!

It's been a nice challenge and, as always, old patterns teach us a lot. Ready in a couple of hours!
Ciao,
Ninetta.

Tuesday, 17 September 2019

thumb sized pillow

At last! I've started decorating a box for making the dollhouse's bedroom, I had already finished the bedspread (https://ninettacaruso.blogspot.com/2017/12/spread.html) and the toilette (https://ninettacaruso.blogspot.com/2018/01/nothing-is-perfect.html), then I needed only one pillow, something to put into the wardrobe, curtain and drapes. And the help of a friend 😉

That's the pillow. Thread is DMC Spécial Dentelles Size 80, colour number is 397 Pale mauve.
Tassels are made with the same thread and then sewed at corners. I designed the square pattern including curled rings and treble tatting stitches.


It is about 4x4 cm, about the half of a thumb size (length), according to what I've just discovered, googling "what is the size of an average thumb". It's incredible how many things you can find googling, but then, who can question that? I can measure just my own, it's not convenient going around measuring thumbs 😕

I haven't decided yet how to set the bedroom.

And now, my stitches' count, sorry that's a little tricky to read, but actually put numbers on a picture is a lot far easy and fast than preparing a tidy drawing... I hope you'll like it anyway and forgive my laziness... 🙇

The CR (= Curled Ring) is joined using the hidden picot in the middle (I joined it and the picot of the  chain together, to block the CR in its position), that is between the second and the third tds.
Those rings in the outer round are normally joined, you tat the second one in the corner and join previous ring in its vsp, just after the 5tds, before tatting the 10 double stitches.

Please refer to the page  "Treble Tatting Stitch - Summary" for any info about treble tatting stitches, thank you.

Ciao,
Ninetta

Tuesday, 31 July 2018

pattern for the lilac square with treble tatting

Only text, no visual diagram. Pattern is original, @Antonina Caruso 2018.

treble tatting tds
For the sequence of steps for tatting a tds, refer to this post: treble tatting - ideas
or watch this video in YouTube: https://youtu.be/ra0NnlqR0oA

*********
UPDATE: Please refer to the page "Treble Tatting Stitch - Summary" - https://ninettacaruso.blogspot.com/p/blog-page_95.html for any info about treble tatting stitches, thank you.
*********

For this pattern, load 2 shuttles CTM. Otherwise, each round needs cut and tie and restart afresh, avoiding two split rings and one split chain. There are 3 more split rings in third round that can't be avoided. There are both normal joins and lock joins.

Abbreviations:
ds=double stitch; p=picot
tds=treble tatting stitch (it starts always with a vsp, then it's never mentioned);
R=ring; Ch=chain; vsp=very small picot;
SR=split ring (text is in the form SR: first side/second side);
SCh=split chain (text is in the form SCh: first side/second side);
⭐= don't reverse here, if you do direct tatting for chains

Pattern:
First round:
R: 4ds, p, 3ds, 4tds, vsp, 3ds, p, 4ds: close and don't reverse work.
R: 4ds, join to last p in previous R, 3ds, 4tds, vsp, 3ds, p, 4ds: close and don't reverse work.
Tat another ring exactly the same.
SR: 4ds, join to last p in previous R, 3ds, 4tds / 4ds,  join to first p in first R, 3ds; close and do not reverse work.

Second round:
SR (start first side with the second shuttle and leave a very short bare thread -same height of the tds- before starting the second side of the SR): 6ds / 6ds, join the vsp of the first tds of the first ring in first round, 6ds; close and reverse work (⭐)
(*) Ch: 3ds, p, 3ds, p, 3ds; reverse work (⭐)
R: 4ds, join the next vsp between first and second tds of ring of previous round, 4ds; close and reverse work (⭐)
Ch: 2ds, p, 2ds;  reverse work (⭐)
R: 4ds, join the next vsp between second and third tds of ring of previous round, 4ds; close and reverse work (⭐)
Ch: 2ds, p, 2ds;  reverse work (⭐)
R: 4ds, join the next vsp between third and fourth tds of ring of previous round, 4ds; close and reverse work (⭐)
Ch: 3ds, p, 3ds, p, 3ds; reverse work (⭐)
R: 6ds, join last vsp after the fourth tds of ring of previous round, 6ds, join the vsp of the first tds of the next ring in first round, 6ds, close and reverse work (⭐)
Repeat from the chain (*) another 2 times, then:
Ch: 3ds, p, 3ds, p, 3ds; reverse work (⭐)
R: 4ds, join the next vsp between first and second tds of ring of previous round, 4ds; close and reverse work (⭐)
Ch: 2ds, p, 2ds;  reverse work (⭐)
R: 4ds, join the next vsp between second and third tds of ring of previous round, 4ds; close and reverse work (⭐)
Ch: 2ds, p, 2ds;  reverse work (⭐)
R: 4ds, join the next vsp between third and fourth tds of ring of previous round, 4ds; close and reverse work (⭐)
SCh:  3ds, p, 3ds / 3ds; reverse work (⭐) and turn work upside down

Third round:
(core thread of previous round becomes the "ball" thread, and vice versa)
(**) Ch: 4ds; lock join to the second p of first chain (*) of previous round
Ch: 1ds, 9tds, vsp, 1ds; lock join to the first p of next chain (*) of previous round
Ch: 4ds; lock join to the second p of chain (*) of previous round; reverse work (⭐)
SR:  3ds /3ds, p, 3ds; close and normal join to the first p of next chain (*) of previous round; close and reverse work (⭐); 
Repeat from the chain (**) another 3 times, except the very last SR that is:
SR: 3ds, join to the starting point of third round, 3ds / 3ds; close and reverse work (⭐);

Fourth round:
Climb up with a mock picot.
(***) Ch: 3ds, p, 3ds, p, 3ds; lock join to the first vsp of the first tds of the long chain of previous round
Ch: 3ds, join to last p of previous chain, 3ds, p, 3ds;  reverse work (⭐);
R: 3ds, skip one vsp and join the next vsp between second and third tds of ring of the long chain of previous round, 3ds; close and reverse work (⭐)
Ch: 3ds, p, 3ds;  reverse work (⭐);
R: 3ds, skip one vsp below and join the next vsp between forth and fifth tds of ring of the long chain of previous round, 3ds; close and reverse work (⭐)
Ch: 2ds, p, 2ds;  reverse work (⭐);
R: 3ds, join the next vsp between fifth and sixth tds of ring of the long chain of previous round, 3ds; close and reverse work (⭐)
Ch: 3ds, p, 3ds;  reverse work (⭐);
R: 3ds, skip one vsp below and join the next vsp between seventh and eighth tds of ring of the long chain of previous round, 3ds; close and reverse work (⭐)
Ch: 3ds, p, 3ds, p, 3ds; lock join to the vsp just after the last tds of the long chain of previous round
Ch: 3ds, join to last p of previous chain, 3ds, p, 3ds; lock join to the picot of the SR of previous round.
Repeat from the chain (***) 3 times more.

Use your favourite way to tie and cut ends. 
Ciao,
Ninetta

Tuesday, 6 March 2018

old lovely square

I noticed this square only thanks to Moraih in Craftree. She shared the pattern as an alternative for the project tat a monument in pink by Cathy.


Cathy has extended the deadline to 30/3/2018! She wrote this in Facebook:
"If you'd like to share information outside FB, there is a Flickr album where translations and patterns are above other pictures. Don't be angry that I did not copy the textes. "
https://www.flickr.com/photos/138507760@N08/albums/72157669311118639


Remember that there's time till the end of march for sending your squares to Cathy. Anyway, I won't send these 2, I tatted them just because of the pattern, I couldn't resist!

I started from one little ring 6-6, then tatted the first inner ring as a mock ring and so the center with a second shuttle, leaving the bare thread to mimic a picot. The following 3 inner big rings are true rings. The outer rings are mock rings too, and I added 2 very small joining picots to keep them in position, something very useful that I learned from other tatters online.


Original pattern is from
http://www.antiquepatternlibrary.org/pub/PDF/6-TA003Clarks111.pdf
published in 1935. I used size 80 dmc special dentelles, colours are grey number 762 and pink number 3608.

Ciao,
Ninetta

Tuesday, 27 February 2018

Muskaan's heart

It's lovely when a person's smile inspires us, even if he/she is someone who we've never met and don't have an idea of what their face looks like. Maybe some of you know that I've been calling Muskaan "the Smiling Lady", so here it is a link to understand the reason why (click on the "Listen" button):

https://translate.google.com/?hl=en&tab=wT#hi/en/मुसकान

That is a little heart designed by Muskaan, that really inspires me smile:
Thread is DMC size 80. Link to her pattern is here: https://tipsaroundthehome.blogspot.com/2018/02/heart-square-pattern.html

I made some adaptation for I used a different thread's size. I started hiding the second colour thread inside the first stitches of the ring for the heart. I changed a little the dimple, in fact, after the third picot, I tatted 3ds, then took a loop of thread, then 3ds more and joined to the previous picot. That is like in picture 4. in this post of mine: http://ninettacaruso.blogspot.com/2014/02/hearts-cant-hurt.html
Then in the surrounding tatting, I started from the chain, hiding the tail of the first colour thread left at the beginning, 8ds and then the second clover and tatted her first clover in the end. Also, I tatted 9ds instead of 8 in the last chain.

I haven't tatted a lot during the last weeks. Actually, I've been knotting and embroidering, but the finished piece it's going to take a little part in a local exhibition of lace, so I can't show it till after the end of the event. Sorry dears.

I also hopefully will finish a doily. I had tatted the first 6 rounds because I thought it would have fit the dollhouse's table, but then I discovered that it 's bigger. I can't do anything else that continue it and use it in my "real-size" home 😍 . Pattern is from "Il lavoro Chiacchierino" by Mani di Fata and that is the doily on the cover of issue 13. Thread is white Anchor Artiste Mercer Crochet, size 100.


Ciao,
Ninetta
Related posts

Tuesday, 5 December 2017

miniature sofa

Thread is DMC size 80 ecrù.

Those pillows are my second attempt, the first ones were too big for the sofa and I had to start again, measuring the fabric and browsing the internet in search of any help. I found an inspiring site with many tutorials for little furniture, I'd like you have a look, for example at this: http://1inchminisbykris.blogspot.com/2017/11/1-inch-scale-embroidered-table-topper.html

The first pillow version is on the right in that picture.

The "big" ones would be lovely scissors fobs, they will be given away. I only need a cord for the fob, there is a knotted cord here in fig. 835 of the Encyclopedia of needlework by Th.de Dillmont: http://encyclopediaofneedlework.com/chapter_15.html


The pattern in the left is an adaptation of Mrs Odum daisy. Textual directions are in the same style as they are for the original pattern that I found here: http://www.bellaonline.com/articles/art61288.asp

With two shuttles begin with a round centre ring.
1. R 1 - (1 -) x 6, 1 close ring, mock picot climb into next round

2. CH 4 + (join to next picot) vsp CH 4. Repeat 7 times. ((((I used lock joins))))
Lock join thread to first picot and make vsp.

3. CH 5 + (join to that vsp on the previous row) and repeat around. 
4. CH 6 + (join to that vsp on the previous row) and repeat around.
5. CH 7 + (join to that vsp on the previous row) and repeat around. ((((I put in the last chain the magic loop thread for hiding the end tail))))

6.
*make a vsp. CH 7, position chain on top of motif and join it to the first picot on the round centre ring, going across the picot. ((((I only tat a second half stitch after the join))))
CH 7, position chain on top of motif and bring back to the starting point.

((((I used an ANKARS over join in this point, joining the vsp)))) 
Continue to the same direction.
7. CH 4 - 4 as part of the outer round and lock join to the next picot on the outer round. 
8. Repeat from * around for a total of 8 petals positioned on top the flower motif.
(((( I finished with the method by Frivolè for Hiding Ends in the Last Chain and hid the second tail with the magic loop left in previous round ))))
✦✧✦✧✦✧✦✧✦✧✦✧

In the next pic, I used HWT (a cotton without a label and a sewing silk thread) to have a size 20 thread for tatting again the pink square by Cathy de Greef ( Tat a Brussels’ monument in pink ). I've tatted five till now. For the first two squares, I started with a ring, then I tried to go down or up with a chain. I was looking for a simple way to teach beginners how to tat it, in fact I hope to involve my friends - the bobbin lacers of our local lace association. In her video, shared in the site, Cathy started with a chain and now I think I've understood the reason. I think that starting with a chain is clever, as you don't have to worry about how to join the last chain in a narrow curve, that's easier for beginners. But I found that starting from the second chain (labelled 3 in red in her picture with the pattern) it is even easier, that is you join in the normal way the second last chain and then you have the last chain where to finish and hide tails... I hope I was clear. Just my two cents among the many possibilities we can choose for tatting that little square.


Ciao,
Ninetta

Related post

Tuesday, 17 October 2017

how to go on

Do you remember that I've been learning the embroidered netting lace? The ladies from Bosa, maestre of their Sardinian filèt called  “SU LÀURU 'OSINCU”, are coming again this week. I've prepared another frame with the net stretched and I can't wait!

Those are just another two little motifs embellished with tatting:


About the fun, ops sorry, I mean the fan: I'm trying to figure out how to go on filling the space, that is what it looks like by now, stitches' numbers have been made up and I hope that at the end the lace will fit the shape. That is a "work in progress" pattern, so in this moment I don't feel like I can suggest anyone to follow my madness 🌸🌸🌸🌸🌸🌸. Only time will tell 🕛🕐🕑🕒🕓...


And you? How would you do it? In Italian we say "sono tutt'orecchi" (word for word it is I'm all ears), very funny picture to say that: I'm listening...

Ciao,
Ninetta
Related posts

Tuesday, 3 October 2017

chiacchierino facilissimo

✨✨✨✨✨✨✨✨✨✨✨✨✨✨   blog anniversary!   ✨✨✨✨✨✨✨✨✨✨✨✨✨

My blog anniversary is in two days. Thank you so much for all your visits (WOW!) and nice comments (HUGS!), it means a lot to me 💗💗💗💗💗💗

This is the forth blog anniversary, well at this point I think my visitors know that "Chiacchierino facilissimo" in Italian means "very easy tatting" ("chiacchierino" means tatting), but ... Do I really think that tatting is "facilissimo"?
********************
Nothing is as easy as it looks. 
- Murphy's law. 
********************

That looks easy, doesn't it? But there's a lot of work behind it, and I've not yet mastered the netting technique, my net is still unusable! It would be better that I spend my time tatting, that it is easier for me!
The embroidery is part of a bigger net, I've been learning how to do the embroidered netting for 3 years. Last month I took the net off the frame where it was stretched and embroidered. I started the embroidery last year in October and finished last month, but I prefer tatting so the work on the frame was sporadic.
There's some simple tatting embellishment around that little filet lace motif (similar to that one showed here: http://ninettacaruso.blogspot.com/2015/09/use-it-safely.html). There isn't a pattern for that. I have tatted around 2 others motifs, I'll share photos in next posts. Thread is DMC ecrù size 60.

Then, back to the question, "is tatting easy?" I'd rather say that you can call easy everything that you know how to do. When I started the blog, I thought "facilissimo" would have been an encouragement, I had never thought to make a provocation. Playing like a child is easy, a joy and a relaxation, but tatting...
It is complex, the flip doesn't come at the first try (second neither), someone could be discouraged and throws the towel, or someone else could then say that it isn't worth the effort because it's boring, always the same repetition of rings and chains... Someone even wrote that it is not a serious thing... No looms, just you and your hands. Not even a bunch of stitches, just two knots.

Despite it is not easy to learn - no matter which is your fave, shuttle or needle - I love its simplicity, that is the beauty, the charm of tatting and I've been learning so many techniques beyond the simple look of the double stitch, that it's "facilissimo" for me to fall in love with everything that is tatting!

But I think that if everybody said that tatting is difficult to master, who's willing to try? Once happened to me, long before learning, that I asked a Lady how she could tat and she rose her eyes and said something like that it was a craft difficult to learn. I'm not the kind of person who loves competitions but I've always tried to challenge myself, so she didn't deter me. But  there are people who need encouragement, so, probably, when people look at me while I'm tatting, if I say "you can do it, try it, it's easy", I hope they find the curiosity and willpower to try it out. That is not to diminish its value but to grow the knowledge.

Have you read this post by Muskaan? https://tipsaroundthehome.blogspot.com/2017/06/tell-world-its-not-easy.html


As promised, here it is the tatted motif (or wheel or snowflake -- I'd hire a consultant for names 😄) using Lizbeth size 20 thread. I haven't changed anything in the pattern, it only needed some blocking because the cotton in my hands is stiffer than a metallic thread. Pattern is in previous post, http://ninettacaruso.blogspot.com/2017/09/radiant.html

Ciao,
Ninetta
Related posts

Tuesday, 19 September 2017

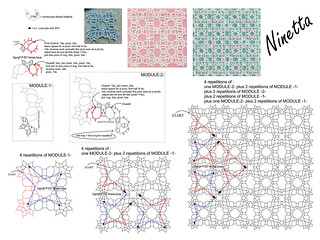
pattern for the quad_23 magic square

Pattern is in Flickr:
quad_23 magic square

I've tatted again the version with 4 repetitions, this time in two colours, threads are DMC size 80 ecrù and a shade of light blue but the ball was without the label, sorry.

I've also tatted again the basic square, just because I needed a pic to be put in the pattern, but I don't have a real use for it yet.

Instead, a friend suggested to sew the other one on the pocket of a shirt, I already found one with little light blue dots, difficult to take a picture as those are very soft dots but here it is

I tatted the "inverted square", too. I suspect I wasn't on task, in fact you see in the picture there are two rings not joined and I simply made knots with a spare bit of thread to take the picture.
and here it is the path, MODULE-2- was repeated four times:

I hope that the pattern in Flickr is clear enough. Thank you very much for visiting.

But it wasn't clear enough the pattern for the "star n.2 with tuft picots", for someone commented to ask how to do the OTT join in round E and also how to do the normal join to round C. I've filmed myself with the smartphone and now there's a new video in my channel. Please, tell me what do you think. Here is the link:


Last about this week: I managed to buy the catalogue I was looking for, it is about an exhibition held in Genova in 2006, "Gioielli di filo", beautiful laces, eye-candy 😍 ! But there isn't tatting, sigh.


Ciao,
Ninetta
Related posts

Tuesday, 12 September 2017

Robin's magic tutorial

I've followed with great interest Robin's blog, lately she shared her way to recreate a magic square starting from a repeatable square (here: http://tattingbythebay.blogspot.com/2017/07/designing-magic-squares.html ), I love how she explained everything so clearly, step-by-step, and the entire process fascinated me.

I haven't tried her onion ring magic square, though. It's beautiful! But I was curious to try the process, "to embark on my own magic square journeys" (she wrote these words!).

Thank you very much Robin for the fun!

There's a square of mine that is completed in one round and it actually needed a "revision". You may don't know but the most difficult part about designing is correcting your own pattern, when you are stuck and don't now if one double stitch would improve it or get it worse. So I did many tests with this little square, I even used one version in a mat that I gave to my mum (the picture of the square is "quad_23" in the album "granny's squares" in Flickr here: https://flic.kr/p/ou5tHa and here it is the finished mat: http://ninettacaruso.blogspot.com/2016/02/prototypes.html).

I updated the pattern eventually and I like it more, I changed the length of two chains and that made a good difference. I'll share the pattern, sorry it's not yet drawn. Thread is DMC size 80, color number Light Peach 754. Then, following Robin's tutorial, I obtained my quad_23 magic square:


But then I wanted more. It seems that these magic squares are addictive, one is never enough!
Playing with Apps is always fun, just like Robin says the "virtual" tatting saves a lot of time and I was curious to see as soon as possible the bigger square. I downloaded an App called "Photo Collage editor (by Zentertain)" in my smartphone and I had the next picture in an eye-blink!


I can see the inverted square and other squares too! But I don't know if and when I will try them all!
The actual tatting is very little, but I like it and I'm going to try it in two colors.


This week I also finished the Sardinian Bosa filet lace, so I'm ready for the weekend we will have in October with the Maestre who are coming again from Sardinia.

(see the frame with my work started last year here: spare wheels  and the embroidery finished but still on the frame here: don't lose the keys (and the tatting, too) )

Ciao,
Ninetta
Related posts

Friday, 1 July 2016

oh sugar sugar!

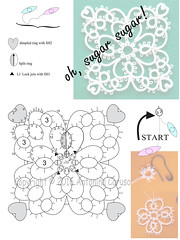
That's just a joke: I posted a pic in my FB page of some squares made with a sugar paste (I used a silicone mold), it's the so called "sweet lace" - also in Italian -, and I found a mold that looks like a tatted square! Who commented laughed a lot, and I did the same, even someone asked for a pattern!

So, why not? Just to have fun, I drew a square, then tatted it with white dmc size 70, and it's almost like the sugar! 
Oh, Sugar, Sugar! It's been since Tuesday that I've in mind that melody and can't help myself, I have to whistle!

Here you are the sugar squares to be compared with it. Truth be told, I don't think that my tatting came out like the mold... especially because one took so long to be ready (about 2 hours), while the sugar paste was very collaborative and I had 24 in one hour!!

The centre is a round of little rings 3-3. I used a pin as an helper, I did the same in the tricky flower in the centre of Renulek's WIOSNA2016. Last ring was a split ring.
That let me climb to the next round with another SR. This is the second round finished:

And this is the third round finished, with a different background:

... I almost forget to show you a gift just received from one of my beloved aunts:
Mani di Fata - "Il Lavoro Chiacchierino #19". There's their usual traditional tatting (a tablecloth, a dozen white doilies, also attached to linen) but this time they put free-form tatting (there's a lovely picture with 2 birds on a branch) and separate written instructions for needle-tatters. Very few schematics (visual patterns) but that's good, they used to have only written instruction. Just as curiosity, one rectangular doily has squared motifs that are the same found in another old pubblication I got, there used as edging's corner, here arranged in a beautiful way, I'll tell you more about it!

Do vasidenia.
(http://wikitravel.org/en/Slovak_phrasebook)
Ninetta

Tuesday, 1 March 2016

braille effect

Tactile texture for a well-known flat/2D pattern.
 Thread is DMC size 80, colours 368(green) and 3608(pink).

This squared motif will be part of a new tattingram (fingers crossed!).
In the next pic it is viewed from the back side:

From now on, I wish (and challenge myself!) to thank my visitors saying goodbye in their language. I hope I won't put any bad word here!! (Please keep an eye on it!) There's a widget at the bottom of this page that link to www.flagcounter.com, I discovered that Poland is the third country in my visitors' list. You also find in flagcounter.com a summary description for each country.

Do widzenia!
(source: http://mowicpopolsku.com/polish-vocabulary-phrases/saying-hello-and-goodbye-in-polish/)
Ninetta

Thank you very much for all your nice comments.

Ciao
Ninetta