Translate

====================

====================
Dear Reader,
I share here what I like and what works for me. If you've been following me, you know that I can change my mind from time to time, and feel free to comment that I'm completely wrong, you may be right. I'm not running a business. I'm not paid and have never received any compensation or facilitation for any review/brand/site here mentioned. In case one day we'll ever meet, I'll be the one offering you a cup of Italian coffee, too.
====================
Showing posts with label falbalà. Show all posts

Friday, 27 January 2017

ideas from scraps

I'm sorry I've been neglecting my blog, lately. Before I start talking about scraps, here it is the measure - as promised - of the doily I've just finished:
and that is the same doily and Wiosna2016 side by side, just for get the idea of the size.

I've something else that came again in the spotlight this week, that is about the snowflake with bugle beads "sbrilluccicante", it has just been shared in the Online Tatting Class, with a video-tutorial, too.  Thank you so much to Georgia Seitz and all. Have you heard that they are collecting donations via yotube videos? Read more on their website: http://www.georgiaseitz.com/2017/2017index.html .
I'd like sharing with you two versions, the first has longer beads than in the first one, so I had to add ds in the outer round:
The second one is with 2 colors' beads, one shuttle was loaded with one color, the second shuttle was loaded with the second color:
Long post, I see.
Let's go on, please.

I started the edging that had been on my to-do-list for ages: that one that is at page 8 in fig. 23 in Priscilla #1, I'm using white dmc size 100 thread.

The book is here: http://www.antiquepatternlibrary.org/pub/PDF/DeWittPriscillaTat1.pdf

I changed the length of bare threads, they are all 0.5cm, also picots are the same size high. It's quite different from the original but I like it this way, more regular.

my plastic gauge
Maybe someone remembers that I tested the wheel motif in October, 3 months ago! please don't ask what happened then, time flies so fast that I can't answer.

Per Priscilla's words: "Make 40 of these wheels for the border, joining them as seen in the illustration." The picture in the pdf is quite blurry, I think. I copied it and played a little with Serif software, and I obtained the pic already shared with you:
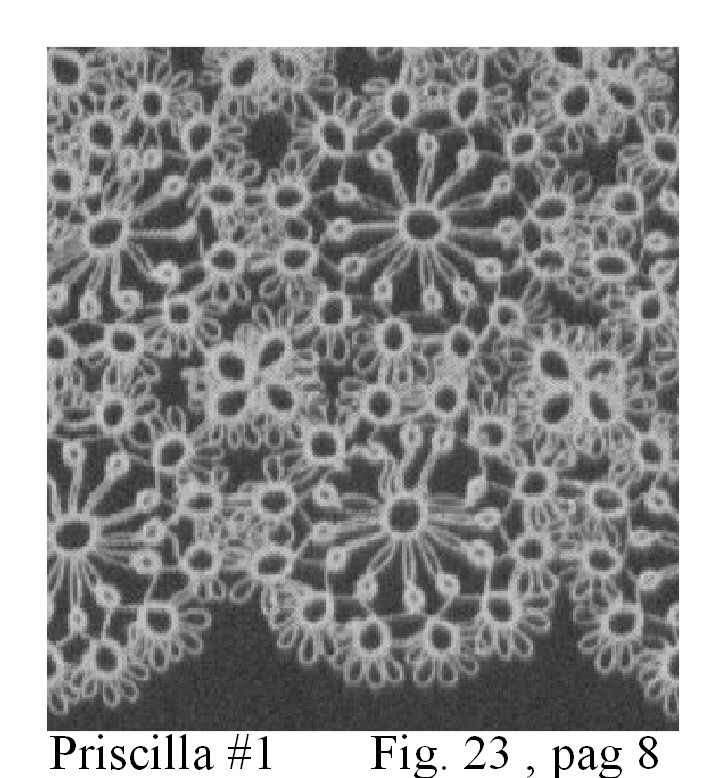
Looking at this kind vintage tatting, I can't help myself thinking that "tatting" is a word that also translates with the italian word "brandello", that is something made with shreds, scraps, and this also reminds me of old ladies who can't throw away anything even bits of thread, that couldn't go wasted!

More than a century later from that picture, I tatted 5 wheels to visualise how big the edging is, and I think that 6 wheels in each corner would be good for a rings' pillow. 24 wheels instead of 40, split rings and modern technologies! good enough for me! 😊😊 Motifs are not yet joined, I only put them close each other to see where the joins should be.
But at first glance, it looked crowded, too many picots, my personal taste. I'd rather prefer something quite easy to iron, isn't it?

...those motifs will soon become tatting scarps, but the idea came to me. I'll show you in next post (I hope).

I'll keep my scraps, I always keep them. Since I've had a notebook, it has been stuffed with scraps, then when I think I'm having that "tatter's block", I look into my notebook and there's always something that can be rescued. A lot of ideas comes from scraps.

In the meanwhile, I found that variegated thread, already wound on the shuttle. A bird told me that it can be a butterfly, so it's time to Tat It And See if it flies ...
Ciao,
Ninetta

Tuesday, 6 December 2016

half

First of all, congratulations to the winners of the 2016 Craftree Awards! Everyone nominated are talented tatters, master tatters indeed, and I'm very grateful to have been part of the fun, still can't believe it. Thanks soooo much to each one of you who took the time to show your appreciation.

Today is a cloudy day, the photo hasn't come out well, it's blurry and I couldn't get a better one. Tatting is slow these days. I also knitted a sock - something I must unravel, I'm very bad at knitting, 8 hours for one wrong slipper. But the pleasure comes from the craft itself, I don't mind re-do that. That's the same with tatting, that's my favourite craft. Tatting the same flower again and again all around, it's a pleasure, relaxing and almost therapeutic.


I'm halfway with this, I can't say the same about xmas' gifts and other stuff to be done before Christmas. I wonder why time flies so fast?

Chau
( http://goperu.about.com/od/cultureandsociety/fl/How-to-Say-Goodbye-in-Peru.htm )
Ninetta
Related posts:

Tuesday, 22 November 2016

that means a bunch

Thank you a lot for all your visits. I'll share with you how I tat those little rings in flowers' centre, with seven long picots 0.5cm high, tatted with a gauge used vertically. I need "only" thirty-two flowers 🌸🌸🌸🌸...puff puff pant pant 🌸🌸🌸🌸 and the doily will be finished! Ten minutes per ring, so it would be tatting about 5 hours before proceeding with my last round!

Each ring is 7 picots separated by 2ds. I start with one ds and end with one ds. That is only my way to do this, not an original way, but a collection and mixture of different ways found in the net.

I start leaving a very short end (about 1cm) and tat over the tail, like in the video by Frivole here: Tatting - How to Start and Hide End (no knot) (https://youtu.be/HkQt-VFZYdo)
But just after the very first ds, I put my plastic gauge vertically, like in the video by Rosemarie Peel here: Tat a measured picot (https://youtu.be/xKwpZUJJ8PE)

1
Tat 2 ds over the tail. I tat over the tail for 3 long picots, then I tat one ds, one first half and cut the tail, then tat the second half ds.
2
Now I tat the fourth picot and following one ds normally, then one first half. At this point, I put a loop of thread for the magic trick, I usually use the same size of thread for the loop (size 80 in these pictures) but in contrasting colour (in pics the loop is white), under the core thread (that eventually makes tail to be cut in the back of the tatting). I tat the second half ds over the loop.
3
I start tatting over the white loop, like in the video by mytattingplace here:  Hiding 2nd end (Magic thread trick) (https://youtu.be/YM5sXR6A3Ls) , for the last 3 picots.
4
Then, also following a note in Debbie Drake’s magic thread way  (www.georgiaseitz.com/classes2001/fall2001/drakemt.html), I add a first half ds but excluding the loop (that is I never tat this last half stitch over the white loop): this also blocks the core thread and avoids that the ring opens when pulling the thread at the end.
5
Now I close the ring (don't post shuttle). Pull tight, then I cut a tail of about 4cm from the shuttle.
6
I thread the tail through the loop, leaving abundant space to bend.
7
(I reverse the ring.) Holding the ring with my left hand, I pull the loop with the right hand to pass the tail through, till it's completely out. I make almost the same movement as though you were closing the ring, slightly rotating the right hand clockwise while pulling the loop.
8
Well, I hope this will be of any help, someday!

You may find a very interesting - and useful - post by Muskaan that is a compilation of methods for hiding ends:
tipsaroundthehome.blogspot.com/2016/11/beginning-or-ending.html

Look! Have you noticed that Blogger started supporting emoticons in posts? There's a special icon in the upper part of the editor that is "Insert special characters". I love it!
💙💚💛💜🌷🌸🌹🌺🌻🌼

Shalom
( https://en.wikipedia.org/wiki/Jewish_greetings )
Ninetta
Related posts:
on the edg-ing

Tuesday, 15 November 2016

on the edg-ing

Edgings are the only kind of edge where you can see me on! Right now, I'm going to do that extreme sport, that is tatting a round of flowers, but I still must try few options, if 64 flowers or less with different elements in between. The risk here is to be on it till next year, but extreme sports - as per definition - must involve speed, too!


Finally I got one picture with almost the right threads' hue:
Threads: green dmc 471 and  mauve dmc 3687. For center rings in flowers I'm using lizbeth 131.

In the next picture there's a pair of earrings in which I tried another combination of split rings and wide monster's picots. The pattern starts at the bottom and finishes at the "fish hook", also called "french hook". I like this type of earrings' hooks, we call them "monachella" (I can't see any relations with nuns, though!!), but I've lost so many earrings so it's been a while that I started putting a soft rubber back stopper.

My favourite earrings? Dewdrop Earrings by Jane McLellan (janemactats.blogspot.com)

Sahha
(http://www.mydestinationmalta.com/usefulinfo/maltese-language-basics)
Ninetta

Friday, 11 November 2016

Tuesday, 8 November 2016

shopping

On Saturday I went! There's a fair in Rome, "Abilmente Roma", and I found my favourite threads, fabric and lace, I also had the pleasure to meet Alicja Kwartnik with her books and delicate tatting ornaments. A very nice tatter, she has been teaching tatting during the fair, I didn't take photos of anything there but everything was amazing.

I couldn't find any transparent plastic ball with diameter 4cm, I discovered ball are produced in plastic but measures are 30mm, 50mm, 60mm and over. It seems that 4cm doesn't exist! I bought one covered by cardboard used for decoupage (I can't say a proper name in English!), so I could have tried the pattern in last post. And I did then.
I used a Lizbeth thread size 40 (color number 167) and I discovered that I forget to mention one ring in previous post, so I went to amend! Eventually I had to stretch the model to fit in, so I think it must be tried again with a thicker thread.

I also bought superduo beads and O-beads to play with and some little gifts for friends; two beautiful pieces of fabric for a tote bag, printed cotton for purses, one book, and thread of course! I had almost finished the green dmc 471 that I'm using in Falbalà doily, but I couldnt find number 3687 (mauve) nor lizbeth 131. One vendor from Gualdo Tadino in the province of Perugia (www.bergamascomerceria.it) didn't come, I missed their great assortment of thread. My prayers and thoughts go to every people there who are suffering the quake consequences, and it still doesn't have a rest, yesterday evening there was another quake.

I think I can add a couple more rows and then finishing it with all flowers around.
I must tell that it smells! I've carried it with me everywhere and now it needs a shower! Ooops!

At the fair I also bought a cute miniature, a purse to save one coin that was so taking I couldn't let it there! It's done by Takako Kulla, an artist that put all her heart in transforming vintage kimono fabric to create scarves, skirts and bags, her brand is Art Kaze.
Head aega
(https://www.speaklanguages.com/estonian/phrases/basic-phrases)
Ninetta
Related posts:

Friday, 28 October 2016

a penny for your thoughts

That is not my tatting but picture number 23, at page 8 of Priscilla Tatting Book #1 (1909), it is a beautiful edging, I've already tatted another edging from the same old book, that is available at the site: http://www.antiquepatternlibrary.org/html/warm/tatting.htm

I'd please you first look at the wheel in the book:

And then look at my tatting:
My wheel doesn't cup or ruffle, so I think it's quite good, but they are very different, not alike.

So I beg you don't be silent because I need your opinion.
I'd like you help me to understand, why the old picture shows those very long picots in the centre? How they can work without cupping the wheel? What do you think? Have you ever tried this one? Can the joining picots between large rings play a role? (maybe they should have been very long picots, too)

Changing the length of a bare thread or picots is like changing the number of ds in a chain, it seems affecting the whole pattern... Moreover, there's the tension of the bare  thread, that changes if stretched.

I loved the journey of Jane through the book of Teiko Fujito. Read about it in her blog:
http://janemactats.blogspot.com

Pattern is the following:

- Start the centre ring leaving a tail from the shuttle, about 12cm (5in) of thread: 2-2-2-2-2-2-2-2-2-2-2-2  (11 picots) - I'm purposely not saying the length of picots.
- leave a mock picot then tat a split ring with the shuttle and the tail: 6ds/6ds
- leave a bare thread - 1/8" - then tat a "large" ring: 4-2-2-2-2-2-2-4 (7 picots);

A)- leave a bare thread  then tat a "small" ring 6+6, joining to the next picot of the centre ring
B)- leave a bare thread 1/8" then tat another "large" ring, 4+2-2-2-2-2-2-4, joining the last picot of previous large ring

- alternate small and large rings, repeating A) and B) for 10 times but for the last large ring:
- last large ring: 4+2-2-2-2-2-2+4, joining the last picot of previous large ring and the first picot of the first large ring.
The tail left at the beginning must be hidden inside the last large ring.

Important note: the edging in the book was tatted with size 80 thread and it is written "leave 1/4 inch of bare thread" between rings around, but nothing about picots' length.

That wheel - I hope - is the first for the edging I'd like tatting, with dmc white size 100 thread.
The only difference with the wheel in fig. 30, page 12, that I tatted last year, it is that those large rings have 6 picots instead of 7.

%%%%%%%%%%%%%%%%%%%%%%%%%%

Changing the subject...
Updates for the doily with curled rings and wide picots: it got a name! I choose "falbalà", because all those picots look like a frilled skirt. Falbalà is an Italian word, with uncertain etymology, maybe from French, it means a strip of ruffled fabric put in the bottom of old dresses, it also means volant or ruffles. But actually, a word not so used nowadays!

Eventually I've another question: how do you write instructions for a wide picot in textual or visual patterns? I've never had the chance to read a pattern with wide picots.

Γειά σας (Ya sas)
( http://www.cyprus.com/useful-phrases-in-greek.html )
Ninetta
Related posts:

Wednesday, 5 October 2016

blog anniversary

Thank you very much for visiting me during these 3 years! Time flew!

I know Who has to be blamed for these almost 300 posts of mine that you've had to put up with ;-) ... (thank you dear!), but I don't know how it's been possible that I had over than 200,000 visits! My heartfelt thank you to everyone! Thank you so much for your support and for sharing with me your love for tatting. If you are a blogger too, please let me know with a comment, I'll add it in "My Blog list" in the sidebar. (I'd also say thanks to Google Translator, indeed!)

This week I'm going on with the green&purple doily, but I just needed a break. That's how the centre looks in white:

Sorry, I can't say what that thread is, very thin but without a label, it's a cotton ball my aunt gave me last year so it's been something old, not so much twisted in fact the lace turned out very soft.


chau
( https://halupi.us/2012/06/28/uruguayan-greetings/ )
Ninetta
Related post

Friday, 30 September 2016

this way or that, it's always a fun time

I'm enjoying all rounds. I wonder if this patter could work in total white ... I'm sorry, this doily hasn't a proper name yet!


While tatting, I make a note about the way I'm doing it, as suggested in Muskaan's This Way or Tat exercise, and I found that for this doily - unconsciously - there's a mix of ways and changes of directions and not always the same method to hide ends, too. In the case of a new design, often the thread must be cut, just because that is the prototype, so it happens that I cut a quarter of one round to change stitches' count.

Basically I'm having fun, so in general I don't care cuts nor the direction.


Nevertheless, I like the look of all front side tatting, in this case emphasized by the curled rings.

Rounds with only chains: tatted with normal ds (flipped), clockwise direction.
Rounds with little rings and curled rings: chains tatted with reverse stitches – these are not flipped, and the order of half stitches is reversed; rings tatted normally. These rounds grow in counterclockwise direction.

All little rings used in centres are tatted separately and closed using the magic trick to hide their end.

Chào + [The correct word to address that person]
( http://yourvietnamese.com/vietnamese-phrases/learn-hello-goodbye-in-vietnamese )
Ninetta
Related posts:

Friday, 23 September 2016

go on


12th round... to be continued!

Wuasleglla!
( http://www.guidebolivia.com/pratique/gb_quechua_aymara.htm )
Ninetta
Related posts:


Friday, 16 September 2016

juncture

It looks pleasant till now, but I'm afraid to overload it with more curled rings. Stop it or continue? It's a wee bit larger than a coaster.


Doviđenja
( http://learn-croatian.com/croatian-phrases.php )
Ninetta
Related posts:

Friday, 9 September 2016

around

Slowly growing around.

Slán
( http://www.omniglot.com/language/phrases/irish.php )
Ninetta
Related post

Friday, 2 September 2016

wide

Adjective "wide" not (yet) referring to that doily!! But you should make those picots out, don't you? That is called - as I just discovered - "wide or lochness monster picot". They are great to be gripped by curled rings!

I thought that I would have never managed to tat even one wide picot, but then I found a great video by mytattingplace (Shannon I don't know/remember her name, sorry) here: https://youtu.be/qONlAylfXIQ ;and a tutorial by Claudia Meza here: http://howtotat.blogspot.com/2010/04/lochness-monster-picot.html and here: http://howtotat.blogspot.it/2010/04/wide-picot-picot-ancho.html
There's another video by Karen Cabrera (Lesson 34), here: https://youtu.be/IaT-Pktx9nw  , the difference between those videos is that Karen makes it in the way also explained by Claudia (2ds followed by 1ds over the picot's loop), while the lady "mytattingplace" tats only one ds and then tats the next over the loop. I like this second one, the loop is hidden inside all ds under the wide picot, just to my liking.
---------------------------
UPDATE: that is the original link by ©2003 Dan Rusch-Fischer:  http://pages.suddenlink.net/tatmeister/widepicot.html
---------------------------

I promise this motif will be bigger, as the size 80 thread permits!


Where I'm going to use these?


Ha det!
( http://mylittlenorway.com/norwegian-lesson/hello-and-good-bye/ )

Ninetta

Thank you very much for all your nice comments.

Ciao
Ninetta