For the sequence of steps for tatting a tds (= treble tatting stitch), please refer to my post: treble tatting - ideas or this other post by Muskaan: dissecting tds
Or you would like watching this video in YouTube: https://youtu.be/ra0NnlqR0oA (for shuttle) or this video: https://youtu.be/vxl1ZzPLrZg (for needle)
You'll find all my posts about treble tatting with the label treble.
************
UPDATE: Please refer to the page "Treble Tatting Stitch - Summary" - https://ninettacaruso.blogspot.com/p/blog-page_95.html for any info about treble tatting stitches, thank you.
************
For how to join a tds to a previous element, refer to this post by Muskaan (she shows us two methods, mine and hers): https://tipsaroundthehome.blogspot.com/2018/07/multiples.html
The butterflies are the third round for the little doily showed here: fun swirly effect in treble tatting
You'll find this doily related posts, with pattern, with the label swirling butterflies.
🐾🐾🐾🐾🐾🐾🐾
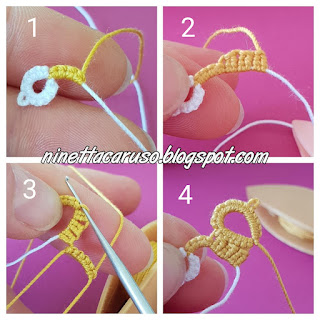
In next pictures, from picture 1 to 12, there's one butterfly tatted with the same thread of the chain. That is only to show you that it is just something you can handle with 2 shuttles.The effect showed in the little doily, that is the butterflies on the chains, it is just a trick, an optical illusion due to a third thread, encapsulated inside the chain. The steps from 13 to 22 show how I tatted it with 3 shuttles.
🐾🐾🐾🐾🐾🐾🐾
CTM= continuous thread method
ds=double stitch;
vsp= very small picot:
tds=treble tatting stitch;
hidden picot= a very small picot every each tds, also between adjacent ds and tds (or tds and ds, as well);
FR= floating ring;
TJ = one tds that join itself to a previous picot (I've used Muskaan's method, please refer to her blog);
ABJ= I used a method similar to an ANKARS back join (https://flic.kr/p/fzjRhh), for joining the two wings, but with a TJ.
The core shuttle in next samples is that one with the white thread, and those white rings are there just for the sole purpose of starting the next chain.
Butterfly with tds, 2 shuttles, from picture 1 to 12.
Pic 1) Start a chain: 4ds (the last one is already part of the butterfly)
Pic 2) 3tds
Pic 3) with the second shuttle, start a FR: 6ds, join to the first hidden picot, before the last ds and the first tds on the chain,
Pic 4) continue the FR: 9ds, picot, 6ds. Close the FR.
Pic 5) with the first shuttle, tat one tds. Then with the second shuttle: start a FR: 1ds,
Pic 6) 2tds
Pic 7) TJ (Muskaan's method): here I join the second wing to the first: leave a vsp and tat one ds (that is the starting step of next tds), but then here I put the current FR below the first FR, like you were doing an ABJ. Insert hook through both picot of previous FR and vsp of current tds,
Pic 8) pull a loop, then pull up another loop through it and finish the tds with 3 wraps.
I wrote there "front", where I mean the front side of the chain that we're looking while tatting the chain.
That is not what I call the front side of the 'Swirling Buttlerflies' doily, because I'm reversing the work form rings to chains. For me, the right(front) side of the doily is the side I have in front of me when I tat rings. So, the second wing is over the first, if you look at it from the front side of the doily. I'm sorry if I can't find better words. 🙇
Pic 9) Continue the second FR: 2 tds,
Pic 10) vsp, 9ds. Close the FR.
*************************************
UPDATE: Please let me clarify this: I wrote in the legend that "TJ = one tds that join itself to a previous picot".
But that definition it's quite unclear, sorry for this. Usually, a join is not counted as a separate stitch.
In this second FR, I started with one ds, then 2tds; then, there is the join to the previous floating ring in pic7 (you can choose my method or Muskaan's), that actually it is in the first half of a tds; then, in the description for pic8, there is the second half of the tds just joined; then 2tds more, a vsp and 9ds.
So, I tatted a total of 5tds in this FR. In a short notation, I would have written FR: (1ds 2tds TJ 3tds vsp 9ds).
Thanks to Muskaan that has drawn my attention to this.
*************************************
Pic 11) with the second shuttle, start the third FR: 3ds, normal picot, 3ds, close.
Pic 12) continue the chain with 4ds.
Then, I reversed the work and tatted another ring with the first shuttle, just to complete the little sample.
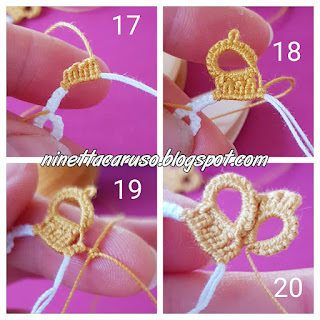
Butterfly with tds, 3 shuttles, from picture 13 to 22.
I suggest putting a label on the shuttles, or use different shuttles.
Pic 13) the white ring is there just for the sole purpose of starting the next chain. I started with 2 shuttles CTM (white thread)
Pic 14) Reverse work. Add the third thread and work with 2 shuttles in hand, white thread core shuttle and yellow thread shuttle. Tat 4ds in that way.
Pic 15) Here is where the trick starts. Put the yellow thread around the hand and the white threads both in your hand acting together as one core shuttle.
Pic 16) Tat 1ds
Pic 17) 3tds
Pic 18) FR: 6ds, join to the hidden picot before the last ds and the first tds on the chain, 9ds, picot, 6ds, close FR;
Pic 19) 1tds; start second FR: 1ds,
Pic 20) 2tds, TJ (joining to last picot in previous FR, same as in pics 7 and 8), 2tds, vsp, 9ds, close FR;
UPDATE: Please read the clarification above.
Pic 21) FR: 3ds, picot, 3ds, close FR;
Pic 22) continue the chain with 1ds;
Exchange threads again:
Pic 23) work with 2 shuttles in hand, the white thread first shuttle and yellow thread shuttle, acting both together as core shuttle. Tat 4ds.
Pic 24) reverse work and turn to tat another white ring, if you like. That will end the second sample.
🦋🦋🦋🦋🦋🦋🦋🦋🦋🦋🦋🦋🦋🦋
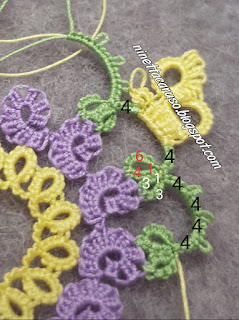
Pattern for the Swirling Butterflies motif - Third round: Start with 2 shuttles with the green, CTM.
With the first green shuttle:
R1) start a ring (white numbers in pic): 3ds, join to the hidden picot between the 6th and 7th tds of one spiral ring of previous round, 3ds, picot, 1ds. Close.
R2) start a ring (red numbers in pic): 1ds, join to last picot of R1, 4ds, join to the hidden picot between the 5th and 6th tds of same spiral ring of previous round, 6ds. Close.
Reverse work.
Ch1) start a chain with the second green shuttle (black numbers). If you like, you can add the third yellow shuttle, already. Chain: 4ds, picot, 4ds, picot, 4ds, picot, 4ds. Reverse work.
Repeat R1, joining next spiral ring.
Repeat R2 and reverse work.
Ch2) work with 2 shuttles in hand, green thread core shuttle and yellow thread shuttle. Start 4ds, then exchange threads and start the butterfly with 1ds with the yellow thread, with 2 shuttles in hand, the 2 green thread shuttles. Then the butterfly is exactly the same pattern showed in pictures from 15 to 22. Finish the chain, again with 2 shuttles in hand, the green thread core shuttle and yellow thread shuttle. Tat 4ds. Reverse work
Repeat again R1,R2,Ch1,R1,R2,Ch2, till you have seven butterflies. (The round ends with one Ch2 chain).
Use your favourite method to tie, cut and hide ends.
🦋🦋🦋🦋🦋🦋🦋🦋🦋🦋🦋🦋🦋🦋
Ciao,
Ninetta


 :)
:)
 :(
:(
 :))
:))
 :((
:((
 =))
=))
 =D>
=D>
 :D
:D
 :P
:P
 :-O
:-O
 :-?
:-?
 :-SS
:-SS
 :-f
:-f
 d(
d(
 :-*
:-*
 b-(
b-(
 h-(
h-(
 g-)
g-)
 5-p
5-p
 y-)
y-)
 c-)
c-)
 s-)
s-)
 d-)
d-)
 w-)
w-)
 :-h
:-h
 :X
:X
It’s a detailed tutorial Ninetta. One day I’ll follow it!
ReplyDeleteThank you dear Jane, I hope so!
DeleteThese are very fun! Thanks for the details on how to do them.
ReplyDeleteThank you Michelle :-f
DeleteAwesome!!! :)
ReplyDelete:X
DeleteYour work is so lovely, like a dream 🌻🦋🌻
ReplyDeleteThank you 🦋😘
DeleteYou've put in so much work to lay out the pattern for us! g-) Thanks :-)))
ReplyDeleteWill start this round soon - including the single butterfly (one can't have too many butterflies). I'm midways through a Cluny bracelet at present, and may start a new pattern if the mood continues ;-P
Thank you very much for your great blog posts and for "dissecting" the tds! You're an angel :-f and your help is precious :X :-h
DeleteBeautiful butterfly! I will have to sit down and learn this new stitch :).
ReplyDeleteThank you Jenn :-f
DeleteThank you so much for this very detailed tutorial! Your butterfly is so cute!!! I hope I'll soon have the time to give this a try :)
ReplyDeleteThank you Sylvie, I hope it's clear enough :-f
DeleteWow that’s one detailed instructions, I have taken a copy and will try this as soon as I can. I’m going on holiday for two weeks but if I can get Wi-fi I will be keeping an eye on these butterflies and what next you do
ReplyDelete:X you're always so kind
Delete