I hope you will enjoy this little motif. This time I've tried to write a tutorial instead of a visual pattern, let me know if this works for you. The 2 strands of dmc metallic thread I've used is very similar to a size 40 thread. Superduo beads are about 1/4" high, normal beads are Gutermann rocailles 9/o.
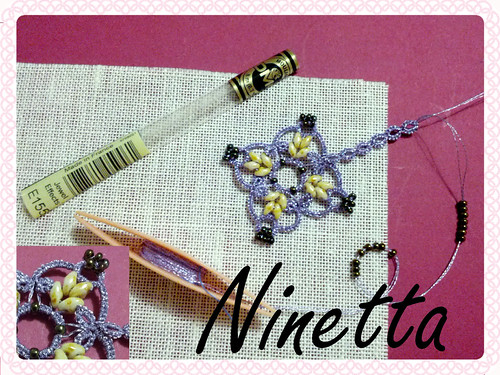
Tools: a gauge half inch wide (I used one plastic collar stay for men dress shirt) used horizontally;
another gauge of 1cm wide (or 0.4 inch), used vertically;
a thin wire, folded, to be used as a needle.
Load CTM 2 shuttles, putting 20 normal rounded glass beads in SH2 and 8 super-duo beads, then 4 normal beads, then another 8 super-duo beads in SH1.
From now on, SD will stand for "super-duo bead", and NB for "normal rounded bead".
First round: Start with a ring with SH1, putting 8 SD plus one normal bead inside the ring. Tat 4ds, then slip 2 SD in place of a picot, 4ds. Put one NB from the shuttle and use the gauge half inch wide horizontally for a long picot. Repeat the sequence for other 3 times.Close the ring.


For the last corner, tat the chain of 10ds and then the split ring, equal to previous one, tat the second chain of 10ds and the joining ring of 4-4, then lock join to the starting point and tie. If you want, you can cut there the thread or make a decorative chain of split rings, 6/6 , as I did.
Ciao,
Ninetta
 :)
:)
 :(
:(
 :))
:))
 :((
:((
 =))
=))
 =D>
=D>
 :D
:D
 :P
:P
 :-O
:-O
 :-?
:-?
 :-SS
:-SS
 :-f
:-f
 d(
d(
 :-*
:-*
 b-(
b-(
 h-(
h-(
 g-)
g-)
 5-p
5-p
 y-)
y-)
 c-)
c-)
 s-)
s-)
 d-)
d-)
 w-)
w-)
 :-h
:-h
 :X
:X
Thanks Ninetta. As soon as I find some of those twin beads, I'll use your tutorial.
ReplyDeletethank you! I'm looking forward to see your tatting!
DeleteThat is a fabulous motif!!! :)
ReplyDeletethank you so much! I had a lot of fun
DeleteLovely! I love the motif but I have never seen those type of beads before.... I had no trouble following your tutorial (but then I follow the pics mostly, I'm very visual) Thanks! Now I will have to just look for some beads :)
ReplyDeletethank you Marla, I love to have this kind of feedback!
DeleteThank you so much, Ninetta!! This is THE pattern I was looking for . Thank you for the great tutorial. OK, I'm off hunting for those beads.
ReplyDeletethank you so much Tally, I'll stay tuned on your blog!
DeleteI've seen those beads but could never figure out what to do with them. That's awesome, thanks so much!
ReplyDeletehappy that you liked it! thank you so much
DeleteYou are so very talented and make such beautiful work and I was looking, your cluny's are excellent too! Thank You for sharing your talents freely you will be blessed hugs.
ReplyDeletethank you Carollyn, it's so kind of you, you have very nice words for me :) hugs
DeleteGreat tutorial, Ninetta! And a very inspired use of the beads. Perfect.
ReplyDeletethank you Corina, I love your tatting and I hope you'll be inspired by those beads too!!
DeleteWow!!! Ninetta splendido tutorial, grazie!!! <3
ReplyDeleteThe visual tutorial is a great benefit to me! Thanks for sharing your talents. This is a lovely motif.
ReplyDeleteWhat exact thread did you use,please?
DMC mouliné effet lumière 100% polyester, E155.
DeleteThe visual tutorial is a great benefit to me! Thanks for sharing your talents. This is a lovely motif.
ReplyDeleteWhat exact thread did you use,please?