Translate

====================

====================
Dear Reader,
I share here what I like and what works for me. If you've been following me, you know that I can change my mind from time to time, and feel free to comment that I'm completely wrong, you may be right. I'm not running a business. I'm not paid and have never received any compensation or facilitation for any review/brand/site here mentioned. In case one day we'll ever meet, I'll be the one offering you a cup of Italian coffee, too.
====================

Tuesday 28 June 2016

still spring

Renulek's Wiosna2016.  (UPDATE: there's a typo in the picture: design by Renata Niemczyk)

Thread is dmc size 80, B5200 bright white, yellow(744) and green(471).

See ya later
( http://wikitravel.org/en/Australian_slang )
Ninetta

Friday 24 June 2016

interlocking since 1869

Well, not me, of course! Learn about it here www.georgiaseitz.com/2014/interlockingringshow2.html.

Rings has been interlocked by tatters for a long time, but I don't know when they started to interlock split rings. In case you have any info, please be so kind to leave me a comment, it's always nice to learn a bit of  tatting history.
I first discovered interlocking rings in 2010, when I found a page at www.snowgoose.com, but it is no more available. About interlocking split rings in the way described here, like a watch chain, last year I found them by chance but then I learnt that I was re-discovering the wheel again... ha ha ha!!!

(UPDATE: The "Interlocking Split Rings" as an element in tatting was first introduced by Mrs Ruth Perry, in 1998 (different method but same result, two lines of split rings tatted at the same time, no bare thread between split rings). Read about it here: http://www.georgiaseitz.com/2004/plaits/rpcane.html)


There's really few differences between 3 methods I've learnt for tatting a soft chain mail of interlocking split rings.

They look all the same, don't they?
I used white thread in SH1 and yellow in SH2.

The method 1 in picture is showed in a video by Karen Cabrera (entrelanzaderas.blogspot.com):
frivolite-tatting lesson 78 - anillos divididos entrelazados - interlocking split rings 1
(https://youtu.be/8ESsbFva82Q)
There's a bare yellow thread pointed by the blue arrow, that's because I prefer leaving a playing space for rings in the chain, on both threads, just my choice.
The SH1 shuttle passes through the loop only one time, from back to front.

The method 2 in picture is almost the same, but rings overlap differently.

As you see, now it's visible (? - at least I see it ^_^ )  a white bare thread.
I found this is easier for me, because I almost close the loop of the first SR, then first I put around the hand the loop for the second SR and then I close the first SR, leaving the second loop in position.
In this case I passed through the loop with SH1 shuttle, two times from front to back. 

The third method is very similar to what has been showed by Kathy Niklewicz for tatting her interlocking rings, here: kathysvictoriantattedlace.blogspot.it/2013/03/interlocking-rings-made-with-shuttle.html
(The bare yellow thread again, like in method 1, but now there's also a white bare thread like in 2!)

This is my favourite method, in fact I can always forget to post the shuttle inside any loop before closing! Poor me, absent minded tatter!

Anyway, who cares the method, with a tiny metallic size 70 thread?

There are at least two other methods for the "tatted watch chain" that I love, even they are not interlocking split rings, but they looks really like that. One is a charming chainmail finger tatted by Teri Dusenbury, it is explained here: teridusenburystattletales.blogspot.it/2014/10/tatted-jewelry-eye-candy-tatbits-tigers.html . Another clever chainmail was tatted by Jane McLellan, using one shuttle and only rings, here: janemactats.blogspot.it/2012/12/how-to-tat-chain-maille.html .

You see, I didn't do much tatting lately, but I progress with the Bosa's lace, it's almost done!

UPDATE 10 FEB 2021: Barbara Arango posted a video in Facebook showing her way to do the interlocking split chain, I hope that this link will work: 

Friday 17 June 2016

back to back

Back to bracelets, back to back rings. (Partially translated in Italian).


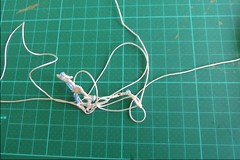
This is a one-shuttle pattern, only rings, with bugle beads (7mm) and superduo beads (2.5x5mm). I used also a mock ring on a ring, but that's optional. Karen Cabrera has a video for it (MROR, video 118) and I have a set in Flickr:
tutorial MR in ring (or SR)

In the next, thread and beads are for a bracelet length of 17.8 cm (7 inches), which comprises the length of a bracelet clasp (I used 1cm lobster claw).

Materials:
- Cotton or Polyester size 20 thread
- 1 shuttle
- 36 bugle beads 7mm (loaded on shuttle)
- 16 Superduo beads
- a crochet hook (I used a 0.40mm, small enough to fit through beads' hole)

Techniques
- bead held in the core thread of a ring
- bead over a picot
- (Optional) mock ring on a ring

(Materiali: col filo numero 20 (io ho usato un poliestere) 16 superduo e 36 tubicini viene un braccialetto di quasi 18cm, compresa la chiusura, sono solo anelli e si lavora con una sola navetta, la parte chiamata MROR è opzionale, per vedere di cosa si tratta ci sono sia delle mie foto in Flickr, sia il video 118 di Karen Cabrera)

String all bugle beads in the shuttle. Take the loop for the ring, slide one bead in the loop and tat 7ds, 1 picot (high enough to host the superduo bead over it), 2ds. Close ring.

(Caricare tutti i 36 tubicini nel filo della navetta, fare il giro attorno alla mano e far scivolare un tubicino nel giro. Primo anello: 7nd, 1p abbastanza lungo da ospitare la perlina superduo e 2nd. Chiudere.)
Take the loop for the second ring, slide one bead in the loop and tat 2ds, insert one superduo over previous picot and join to it, 5ds, 1 picot (high enough to host the superduo bead over it), 2ds. Close ring.
(Fare il giro attorno alla mano per il secondo anello, far scivolare un altro tubicino e fare 2nd, agganciarsi al picot precedente su cui avete messo una perlina superduo, 5nd, un altro picot lungo come il precedente e 2nd. Chiudere.)


Tat rings like the second one for the entire length of the bracelet, I tatted a total of 16 rings, then a last one: slide one bead in the loop and tat 2ds, insert one superduo over previous picot and join to it, 7ds. Close ring.
(Fare tanti anelli come il secondo per la lunghezza del braccialetto, nel mio caso ho fatto 16 anelli. Poi faccio l'ultimo di questo lato, che sarà così: fare 2nd, agganciarsi al picot precedente su cui avete messo una perlina superduo, 7nd. Chiudere.)

Turning to the second side of the bracelet: reverse work.
I tatted a mock ring over a ring.
That is: slide one bead in the loop and tat 6ds, take the loop as in the scmr technique and tat 8ds, insert the shuttle in the loop, 6ds. Close the ring, then close the mock ring.
(This part may be replaced by a normal ring: slide one bead in the loop and tat 12ds, close ring. No picture.)
(Adesso si gira il lavoro e si sceglie se fare un MROR oppure un anello semplice. Io ho fatto un MROR: Fare il giro attorno alla mano, far scivolare un tubicino e fare 6nd, fare un loop col filo della navetta come quando si fa un SCMR, fare altri 8nd, passare la navetta nel loop, fare altri 6nd. Chiudere PRIMA il lato inferiore del cerchio tirando il filo del loop, POI chiudere anche l'anello superiore tirando il filo della navetta. 
Questa parte può essere sostituita da un normale anello: far scivolare un tubicino e fare 12nd, chiudere.).
Reverse work. Start the second side with a ring equal to the very first ring. Then start the second ring the same as the very second one but put over the previous picot that superduo bead that it's just been inserted in the first side of the bracelet:
(Rovesciare il lavoro. Fare un anello tale e quale al primissimo fatto. Poi cominciare il seguente esattamente come il secondo, ma stavolta inserire il picot dentro il secondo buco della perlina superduo del primo lato.).
Repeat the second ring for the length of the bracelet. Finish with a ring: slide one bead in the loop and tat 2ds, insert one superduo over previous picot and join to it, 7ds. Close ring.
(Ripetere il secondo anello per la lunghezza del braccialetto, poi finire con un ultimo anello: fare 2nd, agganciarsi al picot precedente passandolo dentro la perlina superduo, 7nd. Chiudere.).

Reverse work. Finish the bracelet as per your taste, with another mock ring on a ring or with a simple ring. I tatted another mock ring over a ring.
Mock ring on ring: slide one bead in the loop and tat 6ds, take the loop as in the scmr technique and tat 12ds, insert the shuttle in the loop, 6ds. Close the ring, then close the mock ring.
(The simple ring may be: slide one bead in the loop and tat 12ds, close ring. )
(Rovesciare il lavoro. Finire il braccialetto come più vi piace, o con un MROR o con un normale anello. Io ho fatto un MROR: Fare il giro attorno alla mano, far scivolare un tubicino e fare 6nd, fare un loop col filo della navetta come quando si fa un SCMR, fare altri 12nd, passare la navetta nel loop, fare altri 6nd. Chiudere PRIMA il lato inferiore del cerchio tirando il filo del loop, POI chiudere anche l'anello superiore tirando il filo della navetta. 
Questa parte può essere sostituita da un normale anello:  far scivolare un tubicino e fare 12nd, chiudere.).


Cut and tie the end to the very first ring. Hide the end.
(Tagliare e annodare il capo al primissimo anello. Nascondere il filo).

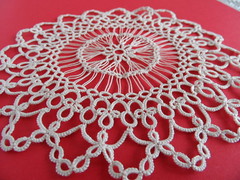
The blue one is tatted with two threads (polyester and silk) wound together so that its size is about a size 10. For this one I used 15 superduo and 34 bugle beads.
 

Vi ses snart (see you soon)
( http://www.speakdanish.dk/en/phrases/0020-greetings-wishes.php )
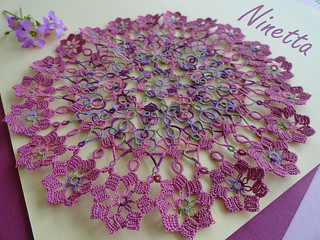
Ninetta

Tuesday 14 June 2016

mauve beauty

Beautiful doily, it's a pity hiding it under bowls or vases or whatever...

Tatted with size 80 thread, it's a diameter of 16cm (6.30in).

Sorry for those blurry photos, I put a better picture in Flickr:

Burda - block tatting

Bless
( http://www.iceland24blog.com/2013/08/useful-icelandic-words-and-phrases.html )
Ninetta
Related posts:

Tuesday 7 June 2016

adagio

(adagio means slowly, cautiously)

The last round has 20 separated motifs, I'm enjoying this round a lot! There was a false start, as I made picots longer than the necessary and the first motif cupped. I cut the first gauge in half (oh, don't worry, it was just a small plastic slice) but was not yet perfect. After smoothing the plastic with a nail file, the third motif was perfect.

Absolutely slow tatting, but I like very much this doily. In case I want to tat it again, I should remember a lesson learnt when I tatted the "Mary Maynard's small doily" (http://www.georgiaseitz.com/2009/marymalltathplacedoily.html), that is - in that doily - the round with hairpin lace rings is tatted before the centre and left open till the last repetition of the centre, this prevented the bigger round to twist and joining picots was easier.
tatted hairpin lace

In Burda's doily, the rounds with block tatting are made first, then you join them and previous round with a next round (that is block tatting isn't directly connected to previous round but "trapped" by next one). It would had been far better if I had left the rounds with block tatting opened till the end of next round, in that case I wouldn't have had one block upside down and a chain twisted.

What's all this about? It is that now I understood why they wrote"TWO tatted doilies" as a title over this pattern! (Implicitly saying "do it twice, the second would be better"?). My opinion: not at an "Intermediate" tatting level, even it is "just" block tatting.

jal-ga
( http://www.mahalo.com/how-to-say-goodbye-or-see-you-later-in-korean )
Ninetta
Related posts

Thank you very much for all your nice comments.

Ciao
Ninetta