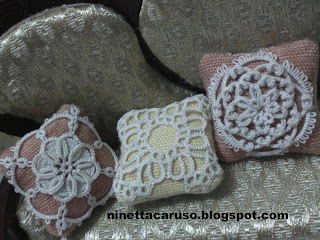
Those pillows are my second attempt, the first ones were too big for the sofa and I had to start again, measuring the fabric and browsing the internet in search of any help. I found an inspiring site with many tutorials for little furniture, I'd like you have a look, for example at this: http://1inchminisbykris.blogspot.com/2017/11/1-inch-scale-embroidered-table-topper.html
The first pillow version is on the right in that picture.
The "big" ones would be lovely scissors fobs, they will be given away. I only need a cord for the fob, there is a knotted cord here in fig. 835 of the Encyclopedia of needlework by Th.de Dillmont: http://encyclopediaofneedlework.com/chapter_15.html
With two shuttles begin with a round centre ring.
1. R 1 - (1 -) x 6, 1 close ring, mock picot climb into next round
2. CH 4 + (join to next picot) vsp CH 4. Repeat 7 times. ((((I used lock joins))))
Lock join thread to first picot and make vsp.
3. CH 5 + (join to that vsp on the previous row) and repeat around.
4. CH 6 + (join to that vsp on the previous row) and repeat around.
5. CH 7 + (join to that vsp on the previous row) and repeat around. ((((I put in the last chain the magic loop thread for hiding the end tail))))
6. *make a vsp. CH 7, position chain on top of motif and join it to the first picot on the round centre ring, going across the picot. ((((I only tat a second half stitch after the join))))
CH 7, position chain on top of motif and bring back to the starting point.
((((I used an ANKARS over join in this point, joining the vsp))))
Continue to the same direction.
7. CH 4 - 4 as part of the outer round and lock join to the next picot on the outer round.
8. Repeat from * around for a total of 8 petals positioned on top the flower motif.
(((( I finished with the method by Frivolè for Hiding Ends in the Last Chain and hid the second tail with the magic loop left in previous round ))))
✦✧✦✧✦✧✦✧✦✧✦✧
In the next pic, I used HWT (a cotton without a label and a sewing silk thread) to have a size 20 thread for tatting again the pink square by Cathy de Greef ( Tat a Brussels’ monument in pink ). I've tatted five till now. For the first two squares, I started with a ring, then I tried to go down or up with a chain. I was looking for a simple way to teach beginners how to tat it, in fact I hope to involve my friends - the bobbin lacers of our local lace association. In her video, shared in the site, Cathy started with a chain and now I think I've understood the reason. I think that starting with a chain is clever, as you don't have to worry about how to join the last chain in a narrow curve, that's easier for beginners. But I found that starting from the second chain (labelled 3 in red in her picture with the pattern) it is even easier, that is you join in the normal way the second last chain and then you have the last chain where to finish and hide tails... I hope I was clear. Just my two cents among the many possibilities we can choose for tatting that little square.
Ciao,
Ninetta
Related post


 :)
:)
 :(
:(
 :))
:))
 :((
:((
 =))
=))
 =D>
=D>
 :D
:D
 :P
:P
 :-O
:-O
 :-?
:-?
 :-SS
:-SS
 :-f
:-f
 d(
d(
 :-*
:-*
 b-(
b-(
 h-(
h-(
 g-)
g-)
 5-p
5-p
 y-)
y-)
 c-)
c-)
 s-)
s-)
 d-)
d-)
 w-)
w-)
 :-h
:-h
 :X
:X
Thanks for the tips for the pink square, I do plan to tat a square. Love the little cushions, that house is so well dressed!
ReplyDeletethank you Jane!
DeleteI love miniatures and my daughter has the same couch, I have used doilies for throw rugs and made those little purses too. now I have to make the pillows, these are wonderful and thank you for the patterns they are fantastic !
ReplyDeletethanks! :-f
DeleteWonderful tiny pillow decorations!!! :)
ReplyDeleteGreat pink squares! :)
thank you! :-f
DeleteThank you for setting the ruler next to the sofa. These pillows are so real.
ReplyDelete:)
DeleteSo completely adorable!
ReplyDelete:-f
DeletePositively pulchritudinous pillows!😍
ReplyDeleteoooh! thank you! almost a Latin word! :X difficult to pronounce for me lol!
DeleteThose cushions are beautiful, I sold my dolls house a few years ago, I was going to do it up and all my plans but well there was just not the room for it although I still have the furniture. Your house is going to a wonderful house when you have finished.
ReplyDeletethank you :) neither I do have room for an entire dollhouse, but few furniture can find a place inside a shoes box!
DeleteI love those mini cushion covers, I have already made one crochet sofa (which is on my blog) and I think this size will fit that sofa. I will definitely try. Thanks.
ReplyDeletethank you and welcome Alka!
ReplyDelete