Translate

====================

====================
Dear Reader,
I share here what I like and what works for me. If you've been following me, you know that I can change my mind from time to time, and feel free to comment that I'm completely wrong, you may be right. I'm not running a business. I'm not paid and have never received any compensation or facilitation for any review/brand/site here mentioned. In case one day we'll ever meet, I'll be the one offering you a cup of Italian coffee, too.
====================

Tuesday 29 October 2019

Roberta was her name

Roberta (Bobbie) Demmer invented a technique to tat a 3-dimensional shape, using only chains. The same technique has been popularised by Gary and Randy Houtz thanks to one of their pattern's book (https://www.gr-8shuttles.com/tatting_gr8_baubles.shtml). According to what I learned in Jane Eborall's page, the Demmer's bobble (or bauble) was invented in 1996.

I was very confused about the English terminology (the two terms bobble and bauble are both used by tatters), then I had an enlightening comment by J.Connors who cleared that, actually,... they mean the same thing! Phew!

Even though the population of mice kept growing on this site: https://janeeborall.blogspot.com/p/exclusive-tatting-club.html, I wasn't sufficiently attracted to try it, till a couple of weeks ago... In fact, that is when the challenge in "tatting a beaded rope" started.


But first, I needed to learn the basis.
The two primary source that worked for me are:


I learned that the technique is one, but the result looks different, depending if you tat with the starting ring away from you or toward you (or, in other words, if you tat the bauble clockwise or counter-clockwise):
The following two samples of mine are tatted with the same stitches' count and the same number of "sbt" (that means "stabilising thread"): 4 double stitches between 4 sbt.
The effect is very different, you see my samples in next pic, the yellow is tatted with the starting ring toward you, the red is tatted with the starting ring away from you:
For trying the "Demmer's" tatting beaded rope, I thought that the red one was the best, more stable and compact.

Sigh! I had trouble getting the beads nicely placed! That was because I wanted them put in column (there's more than one possibility to stack beads! Note to myself: try to vary the stitches' count between beads).

The rounded shape of my beads and the height of the double stitches, at first, didn't get along.

I used rocailles glass beads 9/0 and DMC Cebelia size 10. The beads in columns, put on picots, have their rounded side close to each other and they slip a lot.

In fact, when you put a bead on the picot, the bead has the hole aligned with the picot's thread. That is a problem when stacking beaded chains, tatting it becomes very cumbersome. This is my drawing for a bead on a picot.
So, they always say, new problems lead to new solutions.
Eventually I found a way to "twist" the beads so that they can be easily stacked.

I load beads on the ball thread and slide them on the picot, as usual. But after the first half stitch (picture1), I move the ball thread from right to left, in front of the bead, so that the picot thread is  behind the bead (picture 2). Then I tat the second half stitch (picture3).
That makes the trick:
I'm calling this way: the bead "face-up" on picot. I hope that another drawing can help.
And here it is a picture with the "normal way" (on the right) and the beads "face-up" on picots (on the left):

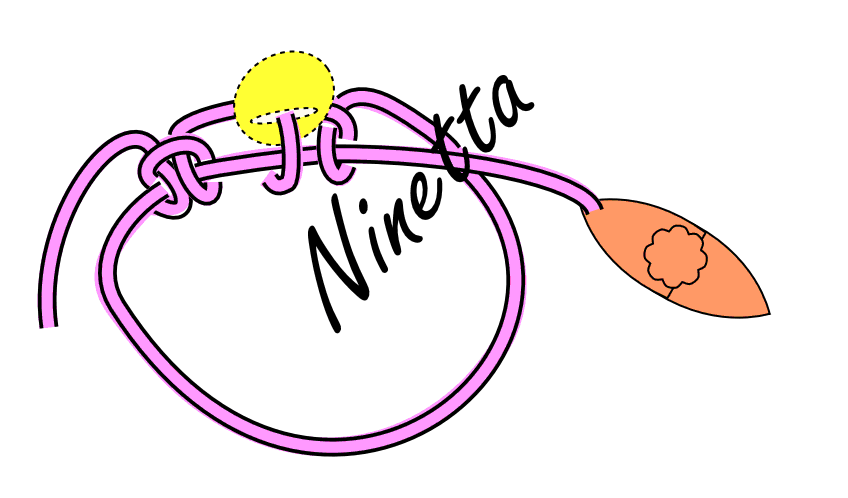
The beads put in that position make the rope easy to tat, because they are stacked in column on their flat face.

For the tatting beaded rope in the first picture, I used a loom beading pattern, with 12 beads in each round, 4 sbt, the pattern is just a long line of one bead "face-up" on picot, then one double stitch, then repeat forever (or till you fall asleep). Dotted lines in my drawing are where I chose to insert the 4 sbt. All beads are loaded on the ball thread (named SH2 in the drawing).


🧵🧵🧵🧵🧵🧵🧵

Demmer's bobble is a very original and clever technique, the outcome of a nonconformist mind.

Roberta is also the name of a dear friend of mine, we met in our twenties and we are still in touch, even if we live very far from each other. She's been always nonconformist, a free spirit. Now I think the name has something to do with it.

💭💭💭💭💭💭💭

How many other different techniques are there for tatting a beaded rope? I'll tell you in a week...

Ciao,
Ninetta

Tuesday 22 October 2019

the contemporary rope by Rhoda

The book "Tatting" by Rhoda Auld might just be the best book I've bought. It's from 1974 but very modern, contemporary, like promised in the subtitle: "the contemporary art of knotting with a shuttle".

Among a galore of techniques, there's "the bobble" that Rhoda Auld invented.

The technique is a clever way to stack rings to create a tube. They are only normal rings, but her original method, that uses two shuttles, makes the technique very interesting. I can see many possibilities to use it in new designs 💡💡💡. At page 40 of the book there's a beautiful butterfly (I absolutely love butterflies 😍) with the body formed by the bobble of rings. (The butterfly is really a piece of art, tatted with different threads: "nylon stitching twine, heavy silk, pearl cotton and copper wire".)

I thought that also the Auld's bobble technique can be used to tat the "tatting beaded rope". And actually, it works!

The technique is well explained in the book, so I hadn't difficulties in reproducing it. Two shuttles are required.
I started with a ring with a short picot in the middle, yellow shuttle. Then I passed the second shuttle's thread (red) through the picot and started the second ring in that point (pics 1 and 2). In the middle of the second ring, I passed the first shuttle's thread between double stitches, no gap (that is no picot), and continued. I closed the red ring, then pulled the yellow thread to put the first ring near to the second. Then I turned the work upside down, switched shuttles and repeated. It turned out a nice coloured rope.

The beaded rope, well, that wasn't easy. The difficult part was recreating the spiral effect with beads, that needed to be shifted in each ring. Moreover, the rings are stacked so that one is upside down from the previous, that is "if we think of rings as fish" (thanks Muskaan!) the tails of two consecutive rings are at opposite ends.
After many trials, eventually I understood two things:
  1. beads in each ring have to be an even number, so that the Auld's join between rings falls on the middle and rings are well stacked.
  2. it can be used a simple loom beading pattern. I loaded on one shuttle all beads needed for odd rows and on the second shuttle all beads for even rows, but the beads on the second shuttle must be loaded in this way: divide the number of beads of the row in two parts, then load first the second part and then the first part.

For the sample in the first picture, I followed this pattern:
Beads are red, black and white. Blanks are white beads.
Greyed rows are meant to be loaded on shuttle SH1. In the pic I showed only how to load the first six rows, starting from the up. The green bar in even rows is where I started loading beads on SH2, that is for example the second row: 2 red beads, 2 white, then 1 black and 3 white.
Each ring in the first picture has 8 beads. Thread is polyester by Edda Guastalla's "Fili & gioielli chiacchierino" (S.Master 30, AR4 rosso-giallo). Here you are my sample for the beaded rope:

R0, R1, R2, etc.. are normal rings.
- = picot
Θ = Rhoda Auld's method to join stacked rings, as showed in previous collage, pics 2 and 3.
B = bead.
The beginning ring is away from the tatter.

After all beads are loaded on the shuttles, start in this way:

R0 with SH2: 12-12 (small picot)
R1 with SH1: 1 B 2 B 2 B 2 B 1 Θ 1 B 2 B 2 B 2 B 1;  close ring. Turn work upside down.
R2 with SH2 (leave a short bare thread space): same as R1.
R3 with SH1 (leave a short bare thread space): same as R1.
Continue for the desired length, alternating rings with SH1 and SH2.

ΘΘΘΘΘΘΘΘΘΘΘΘΘΘΘΘ
I bought the book last year, but I'm still in the phase of staring at pictures 🤩.
Just looking at the cover you get an idea of the avant-garde tatter who wrote it.

My copy smells naphthalene, it's a second hand lucky find on ebay, hard cover, great conditions, quite cheap, but I must confess that it took me a couple of months before I opened it, for the terrible odour.
But then, wow!!! I always put thumb and index fingers on my nose and leaf through it 😊. There are many techniques, ideas and designs that, during the last decade, since I started looking for the word "tatting" online, I've found in various sites. Still, there's more to try!

I need time to read it, twice for me is not enough, sigh.

Link to the book review by M. Leigh Martin:
http://www.somethingunderthebed.com/CURTAIN/REVIEWStat/AULD1.html

In the next post: more on bobble (or bauble!) tatting.
Ciao,
Ninetta

Tuesday 15 October 2019

how to drive me tats

Last week I shared a method for stacking normal rings, with a twisted effect, that is obtained by shifting beads a few double stitches each ring and by the use of the down join.

Sue (God's Kid: http://hiskid66.blogspot.com/) suggested that, adding more beads, we could make tatted versions of bracelets similar to Jane McLellan's crocheted beaded bracelets.
Of course, many trials and errors and many neurons will burn before getting something nearly looking like this: https://janemactats.blogspot.com/2019/10/flowers.html

Well, the title here gives you a rough idea of the current situation here, especially after that I invited my friends in Facebook to play with me the "tatted beaded rope" game!

Muskaan already joined the game (https://tipsaroundthehome.blogspot.com/2019/10/tat-beaded-rope.html), and also Elisabetta De Napoli (she has a Facebook's profile) who shared a picture with her lovely version. I hope there will be someone else! Will you let me drive alone?

At first I tried to play with normal rings, all stacked. I thought I could have used only one joint. But, I had to join in every beaded picot, otherwise the spiral opens, showing the twisted effect of the pattern that is in previous post. (Note to myself: That is another nice effect, to be tried again later.)

Another problem are beads: I shuttle tat, then all beads must be loaded in the only one shuttle required to tat the all-rings pattern. Minimum 4 beads for each ring. They are a lot! (I like having them handy on the thread, instead of putting them on picots.)

Then, because I just wanted to try a version with rings, I switched to mock rings (they're the rings normally tatted by needle tatters): in this case I need to load almost all beads on the ball thread.

The idea  is similar to previous "stacked development" bracelet, but with mock rings.
I loaded some beads in the shuttle, and then put one in the loop needed for the mock ring:
Here you are, quite a pattern:

Start with a normal ring, as in previous pattern: 8ds, bead on picot (hang loose), 8ds, close.
Mock rings: 1ds, bead on picot (hang loose), 1ds, down join in previous ring, 1ds (((... repeat 1ds, join,1ds, after each bead... ))); end with a down join and 1ds, plus one first half stitch.
Each mock ring in my example in the picture has 8 beads in the ball thread and one in the shuttle loop.

When closing the mock ring, pay attention to the position of the bead in the loop, that need to be positioned on the outside part of the rope.

When joining, turn previous ring counterclockwise, on the back of current ring (the beginning ring is away from the tatter). I used the down join showed in the video shared last week, for stacked rings.

Actually, I'm sharing the method that is the application of a technique, not a real pattern. Be creative and tat your own version! 🥰👍

🌹🌹🌹🌹🌹🌹

My general thoughts about tatted beaded rope:

- there isn't only one technique to obtain the rope;
- stacked rings (or chains) are not a "new thing" in tatting;
- each method can lead to many different patterns (just change stitches' count, number of beads, position of beads,...);
- how to join, it counts;
- how you tat, it can change how you join (if you take your tatting with the beginning away from you or toward you);
- how you load beads will change the pattern (on the ball thread, on the shuttle, over picot), take you to different patterns.

That's not all folks and that is sufficient to drive every tatter "nuts"!

In next posts I will show the rest of my journey, that has been leading me to learn old and new techniques, and that really is making me crazy!

Ciao,
Ninetta

Tuesday 8 October 2019

stacked development

They're just stacked rings, one ring above the previous, but I've used "down joins".

If you think that a join is just a join, that's the moment to read Muskaan's blog post (but don't forget to come back here, lol!): https://tipsaroundthehome.blogspot.com/2016/03/demystifying-joins.html

This is a one-shuttle pattern, only rings. Basically, all rings are 8, bead, 3+8.

I always feel concerned when I come up with such simple effects, worrying about having re-invented that famous wheel, that one already invented by another tatter. (A very similar spiralling effect is in the trunk pattern by Muskaan, but tatted with split rings, here: https://tipsaroundthehome.blogspot.com/2016/12/miniature-conifer.html) (Another very similar by MiKyeong Ha, but tatted with chains, here:  https://entrelanzaderas.blogspot.com/2013/12/anillos-navidenos-christmas-rings.html)

In any case, I found this pattern by myself, not fast though. Now I need to find a fast way to recover beads.
I tatted a length sufficient for a bracelet. The spiral development emerged only when I loaded beads in two colours.
Thread is dmc Diamant 100% polyester, D5200. I've tried with cotton, with Finca gold (two strands) and with Combi 0.4 and Penny 20 by "Fili & Gioielli a chiacchierino", they're all good, too.

Pattern (only one shuttle and beads):
Beads are all pre-loaded, I've used a mix of 11/0 and 9/0, but I've lost the brand's label.
For the spiral effect, load beads alternating colours and finish with 2 beads of the same colour.

ds = double stitch.
B = bead on picot
vsp = very small picot
down join = pull a loop through the picot, down from front to back
Rings are numbered, that is R1 is the first ring, R2 the second, etc.

Important: beads should hang loose on picots, then when putting any bead on picot, the picot is wider than the bead size.

Ring1 : put 1 bead in the loop around the hand;  8ds, B, 8ds. Close ring.

Ring2 : put 2 beads in the loop around the hand;  8ds, B, 3ds, turn previous ring counterclockwise, on the back of current ring, then make a down join (to the beaded picot, previous ring), then 8ds. Finish with an additional first half stitch. Close ring (the second bead is trapped at the base).

Ring3 and every next rings : equal to Ring2
Repeat rings for the entire length of the bracelet.

End with a curled ring:
Curled Ring : 8ds, vsp, 8ds. Fold around previous ring, from back to front, normal join.
I tatted about 70 rings, then tatted the curled ring.

I've shared a video in my YouTube channel. This is the link: https://youtu.be/a8VQxyJ0NrI
Thank you for watching.

Have I discovered the wheel again? Maybe, but I enjoy the game!

Ciao,
Ninetta

Tuesday 1 October 2019

distractions

Last week I was almost ready to play on another pattern of mine, a new lanyard, that I hope to share soon, oh well... if I don't get distracted again!

The first distraction came from Muskaan. I really enjoyed tatting her pattern! It was fun, like a tat-along, because she engaged me and Anita Spotz Barry in modifying the original 8 arms pattern to obtain a snowflake. She called it "mutant snowflake", read the full story in her blog https://tipsaroundthehome.blogspot.com

(Update:
Direct link to Muskaan's post
https://tipsaroundthehome.blogspot.com/2019/09/the-jinx-of-13.html)

Thread is size 80 Dmc Special Dentelles, colours numbers are 740(orange) and 90(multicoloured yellow).

The next distraction came from the local association which I belong to. From the 26th to 29th of September it is our patron saint's festival. We joined other associations (musicians, poets, comedians) and worked in public, with our bobbin laces, netting, macrame and tatting, free teaching for curious passers-by. That was the original plan... but another Great Incredible Distraction came to the event in my city, interrupting her short holiday in Rome!! 😱😱😱 Wow! I still can't believe that Karen Cabrera was here, even if for few moments!! I'm extremely bad at speaking in English, but she is sweet and she's also learning Italian (lucky me 😅). 💓Thank you Karen for this unbelievable nice surprise! 😍You made my... year!😍

- (Picture courtesy by Karen, uploaded from FB) -
 

The last two distractions of the week are 2 new purchases. A book: "Illusion of 3-D in Split Ring Tatting", by Karen Bovard, and two shuttles decorated by "Dalì L'artista", her name is Lina and has a profile in Facebook (https://www.facebook.com/people/Dali-Lartista/100010034103450). She doesn't decorates many shuttles, only few each time, but she's nice and always try and satisfy who asks for them.


I will soon try something from the book.

Ciao,
Ninetta

Thank you very much for all your nice comments.

Ciao
Ninetta