I had almost forgotten my doily, the one showed here: http://ninettacaruso.blogspot.it/2014/01/flowery.html
It's been on my patterns-to-be-written-list for a year now, so I think its right name could be "forget-me-not"!
This is the central round. It's a round with 8 little daisy, each one it is 4 rings and 2 SR. All beads - if you like adding them - are loaded in the second shuttle.
1.
Start with a ring R:3-3-3-3. I put there a loop for the magic trick (for hiding one end).
Then another 2 rings, all rings here are 3-3-3-3.
Then start a split ring but tat only the first part: 3ds, picot, 3ds. I put there another magic loop for the end.
2.
Add another colour. This is optional 'cause obviously you could choose to work CTM instead, all in one colour. But I like the effect that a contrasting hue gives to the center. I added a second thread, hiding the end inside, so tat in reverse 3ds, picot (or bead in picot), 3ds. Beads are optional, too.
3.
Close the SR.
4. Second daisy:
SR: 3-3/3-3
I put a bead before starting the SR and another bead in the picot.
Then 4 normal rings with first shuttle. The first ring is joined to the previous fourth:
R: 3+(to SR) 3+(to previous daisy fourth ring) 3-3
R: 3+(previous ring) 3-3-3. Repeat another two times.
SR: 3+(previous ring)3 / 3+(previous SR) 3.
This daisy motif has to be repeated 8 times for the center and 6 times for little motifs around petals. In a next post I'll show you how I close the round of daisy.
Oh, and I almost forgot this:
Copyright@2014, Antonina Caruso
Ciao,
Ninetta
Handmade tatting lace blog with my own patterns, tutorials, how-to and links to useful resources. It's all about my passion and my joy.
Translate
====================
====================
Dear Reader,
I share here what I like and what works for me. If you've been following me, you know that I can change my mind from time to time, and feel free to comment that I'm completely wrong, you may be right. I'm not running a business. I'm not paid and have never received any compensation or facilitation for any review/brand/site here mentioned. In case one day we'll ever meet, I'll be the one offering you a cup of Italian coffee, too.
====================
Saturday, 2 May 2015
part I - pattern for the doily
Friday, 1 May 2015
another go
There's a doily that I wanted to tat again, also to write down the pattern, that is the one showed here: http://ninettacaruso.blogspot.it/2014/01/flowery.html
I remember that I went very slowly when I first tatted it, I didn't know if the pattern would have cupped and how many petals I would have to tat. I tatted petals first and then the circular center. Now I started from the center (yellow) and I feel as though it is a very quick pattern. It's always worth having another go.
But I've 2 other doilies already started: the Large Centerpiece by Anne Orr and the Floral Bouquet Doily by Tomoko Morimoto. I tat them here and then so they grew slowly, but I'll finish them. I hope. Not soon though...
I'm not completely sure about if I chose a nice colour mix, I'll see if it's a pleasant look:
I'm using a plastic collar stiffener as a picot gauge.
Ciao,
Ninetta
I remember that I went very slowly when I first tatted it, I didn't know if the pattern would have cupped and how many petals I would have to tat. I tatted petals first and then the circular center. Now I started from the center (yellow) and I feel as though it is a very quick pattern. It's always worth having another go.
But I've 2 other doilies already started: the Large Centerpiece by Anne Orr and the Floral Bouquet Doily by Tomoko Morimoto. I tat them here and then so they grew slowly, but I'll finish them. I hope. Not soon though...
I'm using a plastic collar stiffener as a picot gauge.
Ciao,
Ninetta
Wednesday, 22 April 2015
pride and prejudice
Do you have any prejudice against my laziness? I can hear your hearty laugh looking at my new pattern in flickr: yes, it is exactly that, only a cloverleaf pattern!! (or trefoil, how do you call it?) I admit, I'm quite ashamed for putting a copyright on it!!
But, then, here it is, the pattern for the edging with curled onion rings:
I'm quite proud, instead, of my "new tatter" friend Rosalba. She started tatting in January, and now she's almost independent. As a little reward (and because she decided to put tatting aside for a while and start learning bobbin lace) I gave her the first book by Annamaria, "Chiacchierino, i gioielli", very cheerful and full of lovely tatted jewellery (http://www.bellaonline.com/articles/art45778.asp)
This tatting was done by Rosalba:
Just to say sorry and to receive your forgiveness for not having new tatting by myself, I'd like to give you a link to an absolutely wonderful site of tatting, by a master of tatting in Ukraine, Elena Ignatova:
http://www.arahni.com.ua/engl/index.html
Ciao,
Ninetta
But, then, here it is, the pattern for the edging with curled onion rings:
![]() |
| edging with curled onion rings, a photo by ninettacaruso on Flickr |
I'm quite proud, instead, of my "new tatter" friend Rosalba. She started tatting in January, and now she's almost independent. As a little reward (and because she decided to put tatting aside for a while and start learning bobbin lace) I gave her the first book by Annamaria, "Chiacchierino, i gioielli", very cheerful and full of lovely tatted jewellery (http://www.bellaonline.com/articles/art45778.asp)
This tatting was done by Rosalba:
http://www.arahni.com.ua/engl/index.html
Ciao,
Ninetta
Friday, 17 April 2015
earrings' pattern
Thursday, 16 April 2015
tips off and top-secrets
I'm a follower of Muskaan's T*I*P*S blog, and you can imagine how happy I was, reading that she found the time to play with those curled - or folded - rings that I showed in my previous post.
I finished the bookmark of the month, tatted in dmc size 80 thread.
I wonder how it would have been tatting without so many people that generously share their work online. I've learned a lot from online classes, videos, sites, blogs... A big hug to all my web-teachers!
There're a lot of wonderful laces almost disappeared now, just because who could work it didn't share it.
I found an amazing site with a little known type of needle lace, hungarian, named "Halas Lace".
It's gorgeous, impressive, and .. oh well, you can add many more pretty adjectives, if you have a look at this site:
www.halasicsipke.hu
What captured my attention was a phrase that I found in this site:
http://budapestbug.tumblr.com/post/42497589258/a-lace-worthing-more-than-gold-halas-lace-of
"The needlework of Halas Lace is top secret; only a few, eleven in number, women and girls in Kiskunhalas know it at all times."
Eleven!!!
Ciao,
Ninetta
I finished the bookmark of the month, tatted in dmc size 80 thread.
![]() |
| segnalibro-aprile, a photo by ninettacaruso on Flickr |
I wonder how it would have been tatting without so many people that generously share their work online. I've learned a lot from online classes, videos, sites, blogs... A big hug to all my web-teachers!
There're a lot of wonderful laces almost disappeared now, just because who could work it didn't share it.
I found an amazing site with a little known type of needle lace, hungarian, named "Halas Lace".
It's gorgeous, impressive, and .. oh well, you can add many more pretty adjectives, if you have a look at this site:
www.halasicsipke.hu
What captured my attention was a phrase that I found in this site:
http://budapestbug.tumblr.com/post/42497589258/a-lace-worthing-more-than-gold-halas-lace-of
"The needlework of Halas Lace is top secret; only a few, eleven in number, women and girls in Kiskunhalas know it at all times."
Eleven!!!
Ciao,
Ninetta
Sunday, 12 April 2015
Thursday, 9 April 2015
put the right way up
Sorry, don't fret.
I don't want me to appear impudent if I say that this tatting has a back side... It isn't FS/BS tatting, in case you're wondering. If it happened, it was absolutely unintentional.
Ciao,
Ninetta
I don't want me to appear impudent if I say that this tatting has a back side... It isn't FS/BS tatting, in case you're wondering. If it happened, it was absolutely unintentional.
Ciao,
Ninetta
Wednesday, 8 April 2015
T. De Dillmont - Plate V, figure 25
dillmontPlateVfig25, a photo by ninettacaruso on Flickr
Thérèse de Dillmont, during her very short life, only 44 years, wrote the wondeful and evergreen handbook "The Encyclopedia of Needlework", that now we can also enjoy online:
http://encyclopediaofneedlework.com/
The chapter about tatting is chapter X. She also wrote a DMC pubblication specifically about tatting, that can be find here: Tatting by Thérèse de Dillmont, at
www.georgiaseitz.com/public/dmclibtat.pdf(Thank you Georgia!!!)
In last post, inspired by the motif tatted in 2011 by Gina Brummet, I tried to tat again the motif in fig. 25, PlateV, using more modern techniques.
The "modernized" pattern takes advantage of split rings and floating (or thrown off) rings.
Floating rings are simple rings thrown off a chain or off the second half of a split ring. Jane Eborall (thanks!!!) has one of her wonderful pages here: www.janeeborall.freeservers.com/TipsTechniques.htm
That is the basic technique. I played a little with the size of the central ring, that lift up like a little bas-relief. I like a lot the final effect.
Ciao,
Ninetta
Sunday, 5 April 2015
Gina's gift
That is she, who I'm referring to:
http://threadsofatattinggoddess.blogspot.it/2011/09/18-in-25-motif-challenge.html
She had a gift for tatting, she shared a lot giving us her beautiful tatting pics as a gift, an inspiration for everybody.
I started another bookmark, thread is dmc size 80. Playing with SRs and floating rings, the little central ring can be done continuosly.
Buona Pasqua!
Happy Easter!
Ciao,Ninetta
Sunday, 29 March 2015
repetita iuvant - at least, to myself!
Sorry for the Latin, that's only to introduce something that I've already posted somewhere else around...
(Post modified to add this translation: "repetita iuvant" means that there's a benefit from doing or saying something again)
**** My Personal gauge for tatting ****
Sometimes in a pattern a thread is recommended, different from what we have (and we have a lot! But not that! Urgh!). Instead, there's that very old ball, without a label, that seems likely to be perfect for the project... We'd be very happy to know the size of our thread. In these cases it's useful to have already prepared our "gauge for tatting "!
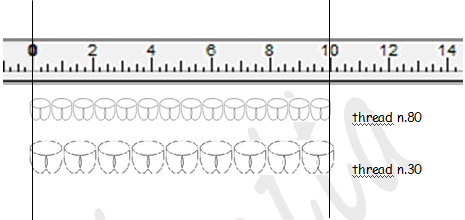
I tested my tatting to know how many ds there are in a chain that is 1 cm long. I repeated the process for each size of thread I had, and I obtained a table. That it is what I did:
I took a card and cut a rectangle of 10cm x 1cm. (I wrapped it with adhesive tape to reinforce it.) The size of 1 cm is my choice, but you can use 1 inch, or whatever it is your standard base to measure.
I tatted like for a normal ring, but before closing, I entered the card into the ring and tatted enough ds to reach the length of the gauge. Then I closed the half ring (the second half in the back had no ds).
I marked the thread number and how many ds in it.
Eventually I had my own table:
To double check (and because I use the table to design, too) with the help of a drawing tool, I’ve supposed that if 1cm has 7 ds, then 2cm should have had 14 ds. Tested it and discovered that’s not true with me, because I tend to be tighter as more as the length increase. But, in general my patterns hardly have long chains, more than 30 ds. So, the mathematical ratio works well for most of the time.
About rings, that's only a bit different, because I’m usually tighter. That means that the circumference of a ring made with 14 ds and thread n. 80, will be a little smaller than 1cm. I’ve obtained 0,90 cm (instead of 1cm). But in order to design, and in order to have only an idea of the number of ds a pattern could require (it’s an empirical fact), I’ve always supposed the same size and ds numbers both for chains and rings. Anyway, designing is a matter of trials and errors!
Do you like a cupcake now? But you'd need a magnifier for this!
Ciao,
Ninetta
(Post modified to add this translation: "repetita iuvant" means that there's a benefit from doing or saying something again)
**** My Personal gauge for tatting ****
Sometimes in a pattern a thread is recommended, different from what we have (and we have a lot! But not that! Urgh!). Instead, there's that very old ball, without a label, that seems likely to be perfect for the project... We'd be very happy to know the size of our thread. In these cases it's useful to have already prepared our "gauge for tatting "!
I tested my tatting to know how many ds there are in a chain that is 1 cm long. I repeated the process for each size of thread I had, and I obtained a table. That it is what I did:
I took a card and cut a rectangle of 10cm x 1cm. (I wrapped it with adhesive tape to reinforce it.) The size of 1 cm is my choice, but you can use 1 inch, or whatever it is your standard base to measure.
I tatted like for a normal ring, but before closing, I entered the card into the ring and tatted enough ds to reach the length of the gauge. Then I closed the half ring (the second half in the back had no ds).
I marked the thread number and how many ds in it.
Eventually I had my own table:
To double check (and because I use the table to design, too) with the help of a drawing tool, I’ve supposed that if 1cm has 7 ds, then 2cm should have had 14 ds. Tested it and discovered that’s not true with me, because I tend to be tighter as more as the length increase. But, in general my patterns hardly have long chains, more than 30 ds. So, the mathematical ratio works well for most of the time.
About rings, that's only a bit different, because I’m usually tighter. That means that the circumference of a ring made with 14 ds and thread n. 80, will be a little smaller than 1cm. I’ve obtained 0,90 cm (instead of 1cm). But in order to design, and in order to have only an idea of the number of ds a pattern could require (it’s an empirical fact), I’ve always supposed the same size and ds numbers both for chains and rings. Anyway, designing is a matter of trials and errors!
Do you like a cupcake now? But you'd need a magnifier for this!
Ciao,
Ninetta
Monday, 23 March 2015
words
I've been designing another bookmark, if you scroll down you will find it, finished. The coloured spool in the picture is the second gift I had from Maria, it's 100% cotton, too much soft for tatting, Venne Colcoton Multicolour. I web-surfing and found an amazing site, where it's shown miniature knitting made using that type of yarn: Miniature Knitting by Helena Bleeker
In the background, there are some dmc balls that I picked together to make up my mind to start Tomoko Morimoto's doily. I'm still dithering. I should wait for available Lizbeth size 80 (colour 131) in Italy (it seems only size 20 and 40 are arrived up to my country) to finish Anne Orr's large centerpiece, so I need another distraction to fiddle with!
I love learning new English words, it helps me to be as close as possible to what really I am like. Mother-tongue language is the flow of your thoughts, a second language is the attempt to be honestly you.
I discovered that yesterday (February 21) was also "the 15th anniversary of the UNESCO declaration of International Mother Language Day". So I've been "googling" around about machine translators and I found an interesting video in this site (that reinforce my firm belief that it's a sort of blender) :
But I love google translator! I had a comment in Vietnamese last week, I met a thai sweet lady and I chatted with a so kind polish friend, both in FB. A Korean follower has her own blog (http://2sunb.blog.me/) and I've become her follower. How could I've ever done any of this, without my dear trans-mixer?
Ninetta
Wednesday, 18 March 2015
never without a pochette
It's inconvenient for any Lady.
Not me, I often go out without a bag!
I didn't glue, it's all sewed.
It's 20cm high.
Ciao,
Ninetta
Not me, I often go out without a bag!
I didn't glue, it's all sewed.
It's 20cm high.
Ciao,
Ninetta
Monday, 16 March 2015
dress dolls games
When did I stop dressing dolls? I can't remember but it could be yesterday... I bought that little porcelain doll in a market stall and it's got perfect colour's match with the mad tiny doily.
More is coming soon!
Ciao,
Ninetta
More is coming soon!
Ciao,
Ninetta
Sunday, 8 March 2015
contagious
It's better to keep away from crazy tatters - madness could be contagious - but you simply can't, if they're sweet and so kind with you. So it happens with Maria.
She came for a couple of days to my town and gave me a wonderful thread - she said - that she was very confident that I could have liked tatting with.
Mad woman! (I know you're there reading!) It is Maidera Polyneon, 100% polyester, very thin embroidery thread. Tatting with it it's a true madness!! And what if I need to retrotat? Shivers down the back...
It is very strong, I've read that it's also resistant to chlorine bleach. Anyway, it is beautiful coloured and shining and I can't disappoint her, she is always very nice, she never forget to give me even a little gift. Thank you, dear friend!
Pattern is from a publication that I've had for many years, it was the first and only one tatting book that I had got for ages. I already tatted the doily some years ago using dmc size 80 thread, ecru and light blue.
Ciao,
Ninetta
She came for a couple of days to my town and gave me a wonderful thread - she said - that she was very confident that I could have liked tatting with.
Mad woman! (I know you're there reading!) It is Maidera Polyneon, 100% polyester, very thin embroidery thread. Tatting with it it's a true madness!! And what if I need to retrotat? Shivers down the back...
It is very strong, I've read that it's also resistant to chlorine bleach. Anyway, it is beautiful coloured and shining and I can't disappoint her, she is always very nice, she never forget to give me even a little gift. Thank you, dear friend!
Pattern is from a publication that I've had for many years, it was the first and only one tatting book that I had got for ages. I already tatted the doily some years ago using dmc size 80 thread, ecru and light blue.
Ciao,
Ninetta
Wednesday, 4 March 2015
part II - a photo-tutorial for quad_13
Part I is in previous post.
After the first corner, pattern repeats the side part with two ecrù rings and the coloured trefoil:

It's always there to bother, the gap between the first ds of the chain and the last ring. I try to use my middle finger of the left hand to get the first half closer, then keep it in place with thumb and forefinger and tat the second half. This works for me. I don't care too much about the core thread in this point, because then it will be pushed in place with the rest of the chain.
The second corner, with the coloured ring of 10-10 joined to the trefoil:
The third side is always the same: 2 rings ecrù (5+5+10-10 and 10+10-5-5) and a trefoil (10+5-5 then 5+5+(to center)5-5 then 5+5-10).
After the 3rd corner, while tatting the last ring in the trefoil, don't forget to join to the very first ring in the first trefoil:
Then remember to join the last ring in the last corner to the very first ring tatted in ecru:
The last chain is tatted normally but I learned - and love - this method from Frivole (thank you very much!) to hide ends at the end:
http://leblogdefrivole.blogspot.it/2011/03/more-hiding-ends-and-eightsome-reel.html
She has got a great photo-tutorial in one of her sets in flickr, but I don't put inside both ends, at the end only the core thread is inside the last chain. I'm afraid ends would pull out. I hide the other end with the help of the magic trick loop that I put in the start ring. At least, there's only one end to hide!
I finished, and you?
Ciao,
Ninetta
Sunday, 1 March 2015
a photo-tutorial for quad_13

This time I've used two shuttles wound with size 40 thread in two colours, DMC ecrú and Lizbeth col.157.
Last year I put a visual pattern for this square in flickr, here is the link:
https://www.flickr.com/photos/ninettacaruso/13316516885/
but I haven't had any feedback and there's an error, too. Sorry!
I like it a lot, so I thought to share with you some photos, while I was tatting it.
I start with two "detached" motifs, then I connect them in the very first chain. I also prepare a little loop for the magic thread trick to be used at the end of the square.
Then I put them together:
...and a bunch of rings with the ecrú thread:
Then I continue with another chain 5-5-5 and a ring, for the second side of the square:
Here it comes the SCMR in order to tat the little ring in the center:
I leave a little bare of thread when I start the central ring, that will be a mock picot there.
I should stop now but the tutorial isn't finished yet and I'll continue it in the next post.
Ciao,
Ninetta
Subscribe to:
Posts (Atom)
Thank you very much for all your nice comments.
Ciao
Ninetta
Ninetta