I updated the header bar here, to add the "TREBLE TATTING STITCH - SUMMARY" page. I hope it will be useful, it is a page which can be attached with any teaching pattern. The pdf version is available, too. ✿✿✿✿✿✿✿✿✿✿✿✿✿✿✿✿
That is a method resembling the appearance of treble stitches in tatting.
Video link in YouTube: https://youtu.be/ra0NnlqR0oA
Patterns in the video are original @Antonina Caruso 2018
It can be done in rings or chains.
Start with a normal double stitch, then a very small picot and another double stitch. Take a loop by laying the picot across the ball thread and pull the thread up, through the picot. Then, take another loop of the ball thread and pull it through the previous loop. Now slip the shuttle through the loop thus formed. Don't tighten it, yet.
I take a loop of the core thread in my ring finger, then pass the shuttle from back to front, through the loop, 3 times.
Tighten the ball thread and don't let the core thread slipping out.
Then, pull the core thread and tat another double stitch, leaving a very small picot.
Repeat, starting from the just tatted very small picot.
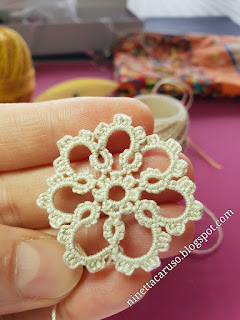
Treble tatting can be used to make any simple ring, all treble tatting. Alternatively, it can be used as a decorative picot.
Start always with a very small picot.
The space between treble stitches can be used to join elements in next round.
Thank you for watching.
🌻🌻🌻🌻🌻🌻ITALIANO🌻🌻🌻🌻🌻🌻
Gli schemi in questo video sono originali @Antonina Caruso 2018Punto alto a chiacchierino.
Può essere fatto sia nei cerchi che negli archi.
Si inizia con un normale nodo doppio, poi si fa un picot molto piccolo e un altro nodo doppio. Prendere un'asola di filo posizionando il picot sul filo del gomitolo e tirare il filo verso l'alto, attraverso il picot. Quindi, prendere un'altra asola del filo del gomitolo e tirala attraverso la precedente asola. Ora far scivolare la navetta attraverso la seconda asola così formata. Non stringere ancora.
Trattenere il filo della navetta nell'anulare, quindi passare la navetta da dietro a davanti, attraverso questo spazio tra l'anulare e l'asola, per 3 volte.
Stringere il filo del gomitolo stando attenti a non far sfilare e arrotolare il filo della navetta.
Quindi, in ultimo, tirare il filo della navetta e fare un altro nodo doppio,lasciando lo spazio di un picot molto piccolo.
Ripetere, ripartendo dal piccolo picot appena fatto.
Questi "punti alti" possono essere usati per creare un semplice anello. In alternativa, uno solo di questi può essere usato come picot decorativo.
Si inizia sempre con un picot molto piccolo.
Lo spazio tra i punti alti può essere utilizzato per unire gli elementi del giro successivo.
Vi ringrazio anticipatamente, nel caso che vogliate guardare il video: https://youtu.be/ra0NnlqR0oA
🌻🌻🌻🌻🌻🌻🌻🌻🌻🌻🌻🌻
Ciao,
Ninetta


 :)
:)
 :(
:(
 :))
:))
 :((
:((
 =))
=))
 =D>
=D>
 :D
:D
 :P
:P
 :-O
:-O
 :-?
:-?
 :-SS
:-SS
 :-f
:-f
 d(
d(
 :-*
:-*
 b-(
b-(
 h-(
h-(
 g-)
g-)
 5-p
5-p
 y-)
y-)
 c-)
c-)
 s-)
s-)
 d-)
d-)
 w-)
w-)
 :-h
:-h
 :X
:X
As always, a pleasure to watch and learn! Thank you!!
ReplyDeleteVery interesting technique, thanks for sharing!
ReplyDeleteThat is very interesting and looks wonderful!!! :)
ReplyDeleteWhat an interesting design element! Thank you so much for this excellent video :)
ReplyDeleteI love how your brain works. Great lesson.
ReplyDeleteYes, I agree with every one above I can't to try this out thankyou❤🍃🌹🍃❤
ReplyDeleteYou always have such unusual and amazing things to teach us!
ReplyDeleteYou are my genius Tatting Einstein :-h
ReplyDeleteAnd I am honoured to have you as my sneak peek friendly correspondent ;-P w-)
Interesting effect.
ReplyDeleteTerrific idea! Thanks for sharing, cant wait to use it!
ReplyDeleteTy everyone :-f I'm blessed to have you all very supportive friends d-) happy tatting!
ReplyDeleteBellissimo tutorial e tecnica interessante. Molto bello l'effetto ornamentale di questo elemento. Grazie, sei eccezionale!
ReplyDeleteNinett, another interesting element for tatting. You are a magician! According to the video, it works great. Thank you
ReplyDeleteVery interesting element and I will be trying this, certainly something new to try and brings something different to patterns
ReplyDeleteInteresting technique. Thanks for the tutorial.
ReplyDeleteHi Ninetta, I need your help. I’m trying to do the treble stitch, I’ve already done one motif. But now each time I close the stitch it locks up my ring. Sometimes it will unlock after I fiddle with it, but most times not. I just don’t understand what I’m doing wrong. I keep watching your tutorial and I think I’ve got it.... then I don’t. I’m probably over thinking it.
ReplyDeleteDear Charlotte, thank you for your comment and welcome.
ReplyDeleteThe treble stitch has movements that you already do in your normal tatting: pulling a loop, twist a picot, tat a double stitch. We didn't get the flip the first time we took the shuttle, neither the needle slid the first time. Keep on trying and don't be discouraged, try again 😊💕💕👍