- the onion dilemma – Part I
- variations on the onion recipe – Part II
- peeling the onion without crying – Part III
- onion rings - not fried yet – Part IV
- mock and split but still genuine – Part V (this post)
- the onion takes dimension - Part VI
- whichever way you choose - Part VII
https://tipsaroundthehome.blogspot.com/2020/05/captured-onion-rings.html)
To summarize, Onion Rings are concentric rings that can be tatted with:
- all true rings (Part I, and variations Part II)
- inner true ring and outer mock ring (three methods: Part III and Part IV)
- all mock rings (this post)
3. Tatting onion rings with all mock rings
Almost every ring can be done as a mock ring, needle tatters know that. There are exceptions, there are patterns that won’t look the same if you tat all mock rings in place of rings. But, as an exercise or just to try it, it would be a funny game to shuttle tat a pattern in that way. For example, even the basic flower/all rings will look different: with mock rings the hole in the center would be littler or rather disappear! Also, the tension may vary (between ring and mock ring with the same stitches’ count) and the method used to close the mock ring affects the final look (for a visual summary of the methods used to close a mock ring, here it is a drawing: https://flic.kr/p/24D988b).In the next there is only one example, I’m showing how I substituted both concentric rings with mock rings, that is very similar to a needle tatting method.
Inner and outer mock rings with core thread
At this point of my tutorial, just before starting the onion ring, the core shuttle is that one with the yellow thread and the second/ball shuttle is that one with the red thread. I used two shuttles, after finishing the chain I reversed work and exchanged shuttles, the red thread acting as the working shuttle, that is because I wanted the mock rings in yellow.(fig. 36) I tatted the inner mock ring from the frontside but with tatted reversed stitches (but this is optional) because that will be the backside for me. In fact, at the next step...
... (fig. 37, 38, 39) I tatted the outer mock ring from the frontside too. I took the loop for the mock ring, then the consequence of pulling threads is that the inner mock ring tips over.
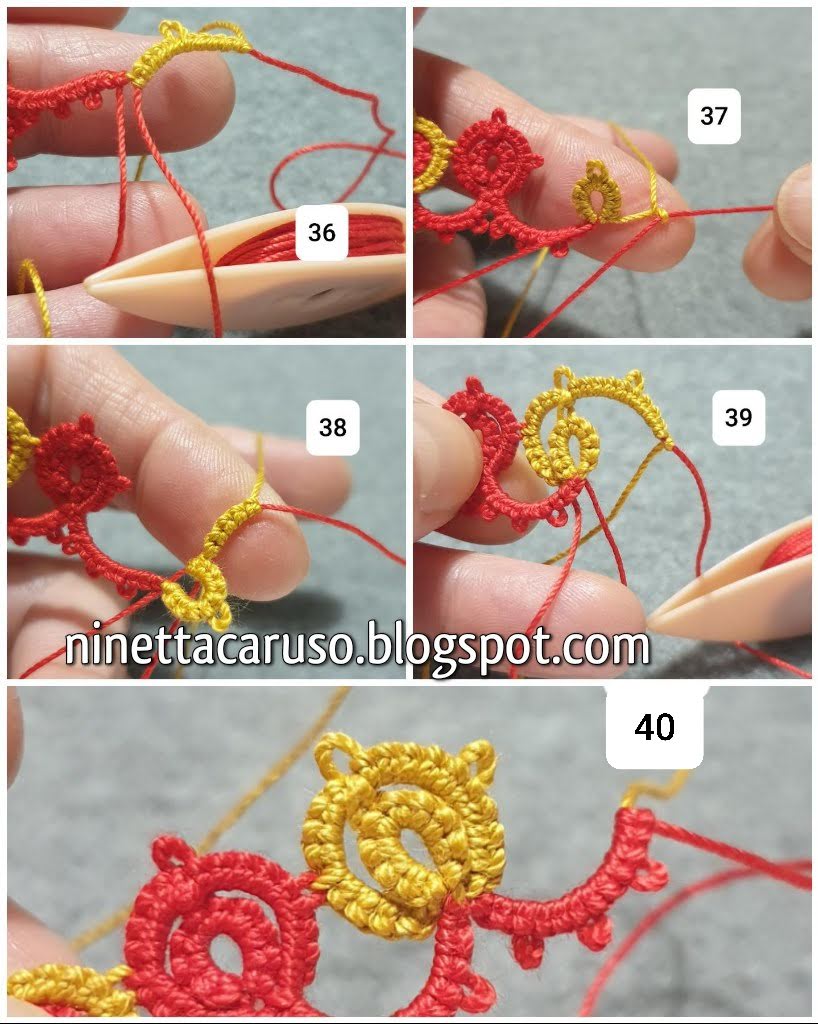
In fig. 40, the onion ring is finished, and it is still genuine 😁
🧅Now that you have all the recipes, you can have fun and choose according to your tastes!
But let’s add spices...
The ‘Onion Saga’ continues with...
4. Anne Orr’s lesson on Split Onion Rings
I learned a lot, tatting the "square medallion in leaf design", Anne Orr's pattern, from J&P Coats Crochet, Cross Stitch & Tatting Book #14, 1923. The square is at page 8 (Courtesy by Georgia Seitz, this publication is available here: http://www.bellaonline.com/articles/art30942.asp )Here it is the link to my tatting: https://ninettacaruso.blogspot.com/2020/03/square-medallion-in-leaf-design.html . I’ve already uploaded a diagram in Flickr: https://flic.kr/p/2iF7KhX.
I followed the original instructions and started from the center ring. Then I climbed out with a mock picot and tatted four elements that nowadays we call Split Onion Rings.
Aurora Lozada shared her method to tat Split Onion Ring that uses Double Core Single Shuttle Split Rings, you can find her pdf here:
http://www.georgiaseitz.com/2014/auroralozadamethodonionring.pdf
(Also, Aurora found an alternate way to tat the square medallion centre, with normal onion rings: https://tathelper.blogspot.com/2020/04/an-onion-ring-challenge-i-havent-tatted.html)
But following Anne Orr’s instructions, you tat split onion rings, using the shuttle on the second side (that one with reversed stitches) for tatting the inner ring, as though it was a ‘face inward’ floating/thrown-off ring.
I used two coloured threads, to better show the steps and to make it clear when I switched shuttle. But the pattern asks for two shuttles CTM (Continuous Thread Method).
It has been tatted all from the frontside. If you looked at my drawing in Flickr, I used two colors up there too.
In fig.41 I already tatted the center ring (3picots separated by 2ds), then left a short bare space and started the first split onion ring, but that side with normal stitches temporarily stops at the point where the join with the inner ring will be done (5ds, picot, 5ds).
As you see in fig. 42, with the other shuttle, at this point I tatted one second half stitch not flipped. This way, the red thread is blocked and already in the right position to start the inner ring.

(This reminded me the method I found myself to curl those "small curled rings", with the other thread trapped into a picot... we've always reinvented the wheel)
Then I tatted 4ds more and closed the inner ring. To come back to the split ring second side, I tatted one first half stitch not flipped (fig.45) and then (fig.46) continued with the 5 reversed stitches requested. (It's your choice to count the two half stiches - fig.42&45 - as one double and subtract it from the next, I didn't.)

In fig. 48 there is the second “split onion ring”. It is quite the same, except that before starting the inner ring I joined the center ring.
(fig 49) I used this method: http://janeeborall.freeservers.com/JoinSecondSideSR.pdf.
(the join replaces that one second half stitch that I did in the first element, see pic 42)

Then I did the same as in the first element, that is (fig. 52) one first half stitch not flipped and continued with the second side of the split ring (fig.53).
(fig. 54) The third split onion ring is equal to the second.
(fig. 55 and 56) The fourth split onion ring differs because the thread must end out in position to start the next round in the square medallion.

It’s been a great lesson for me, a challenging but beautiful pattern, really original and modern in its construction. I love this design.
🌹🌹🌹🌹🌹🌹🌹🌹🌹🌹🌹🌹🌹🌹
Next chapter in the “Onion Saga” will be a potpourri of options for layered and tridimensional onion rings, and I think that it will be the last part of this series (or the second last). Also, there is something else to say about the direction of tatting in the "outer mock ring" method (inner ring and outer chain - Part III) that's useful to remember when tatting "detached" onion rings or more than 2 concentric rings. But if you think there is still something missing, please leave me a comment, thank you very much.
... To be continued!
Ciao,
Ninetta
 :)
:)
 :(
:(
 :))
:))
 :((
:((
 =))
=))
 =D>
=D>
 :D
:D
 :P
:P
 :-O
:-O
 :-?
:-?
 :-SS
:-SS
 :-f
:-f
 d(
d(
 :-*
:-*
 b-(
b-(
 h-(
h-(
 g-)
g-)
 5-p
5-p
 y-)
y-)
 c-)
c-)
 s-)
s-)
 d-)
d-)
 w-)
w-)
 :-h
:-h
 :X
:X
It’s interesting that an old pattern is so technical, isn’t it? We tend to think of the techniques as ‘modern’. I don’t put a knot after a mock ring either, it’s normally held in place by the following element. Thanks for a thought provoking read.
ReplyDeleteThanks dear Jane :-f
DeleteI never make a knot after a mock ring, but that is the way needle tatters "close" rings (and someone do the same at the end of chains).
Wonderful post. I am so grateful you are sharing your clear well-thought ways to tat. Thank you!
ReplyDeleteThank you Mel, very kind of you :X
DeleteWow!! Great learning lessons!! :)
ReplyDelete:-f
DeleteThank you, Ninetta. Your pictures are so clear.
ReplyDeleteThank you very much :-f
DeleteAnother very interesting post! Thank you for sharing what you have learned!
ReplyDeleteThank you! :-f
DeleteGreat :-h
ReplyDelete:-f
Delete