Translate

====================

====================
Dear Reader,
I share here what I like and what works for me. If you've been following me, you know that I can change my mind from time to time, and feel free to comment that I'm completely wrong, you may be right. I'm not running a business. I'm not paid and have never received any compensation or facilitation for any review/brand/site here mentioned. In case one day we'll ever meet, I'll be the one offering you a cup of Italian coffee, too.
====================

Tuesday, 27 October 2020

Eleonore, that's difficult!

Despite the name of my blog, it happens that a pattern can be difficult, for many reasons: the stitch count is not easy to memorize, the direction of work changes often, tension is an issue, switch shuttles is needed but not clear where... Or all these together!


Eleonore put me on test. I'm not yet sure that I gave it justice. The red and ocher is already finished, I added a tail and it's about to go live alone, in one of my mum's book. You can start CTM, all one colour, but I chose to tat it in two colours to better follow the pattern. Thread is DMC Special Dentelles size 80. The pattern is the #24 in the "Schiffchen-Spitzen" book, by Eleonore Endrucks, from 1920, it is available here: http://www.georgiaseitz.com/public/publicindex.html


I've uploaded my diagram in Flickr (click to see a better image):

endrucks n.24

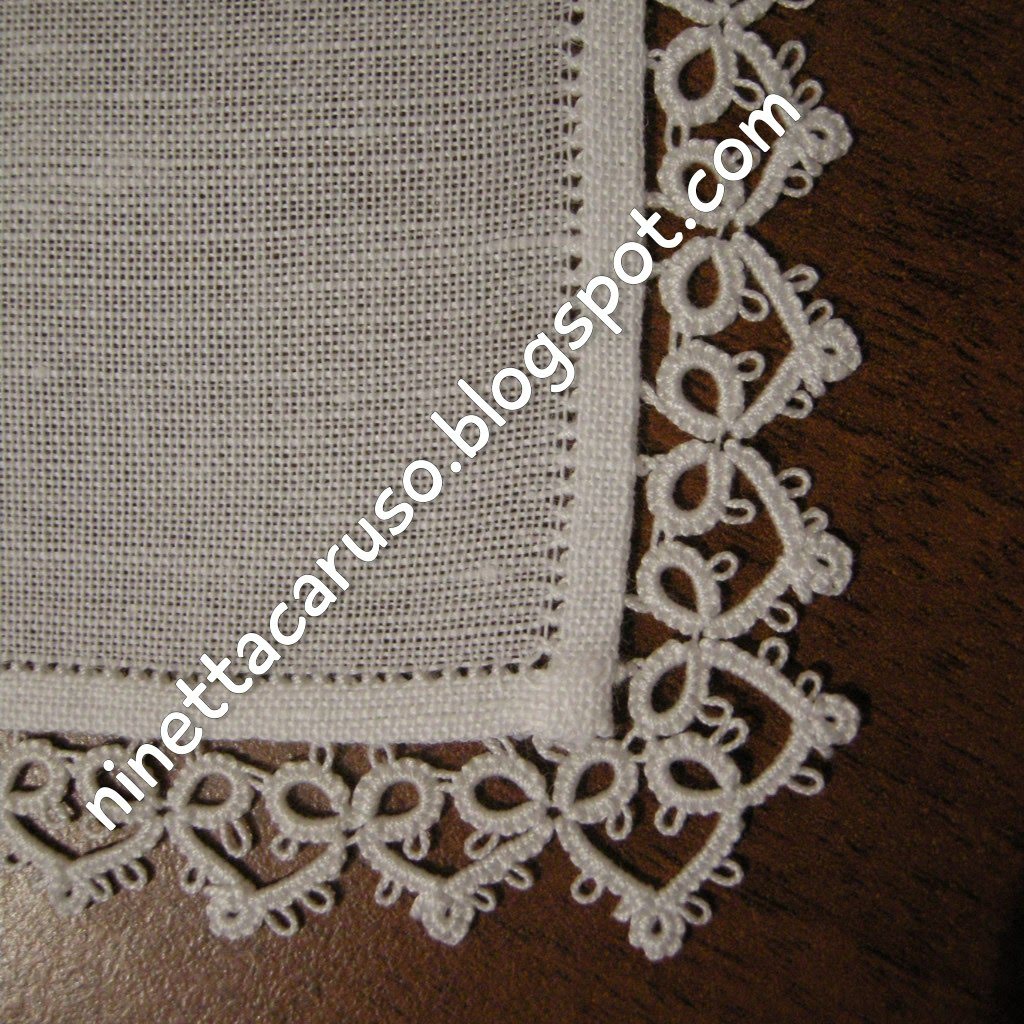
As in previous two edgings, there is block tatting and thrown off rings, that makes it a 2-shuttles pattern. In the original, as far as I understood and tatted, the first corner of the block tatting is done simply switching shuttles, then tat 1 ds, leave a very small picot and go on. The whole pattern is completed after a finishing external round, only chains, and I regret not having left another very small picot after the point where I switched shuttles, becouse I could have better joined the outer round.

In next picture, one of those corners is pointed by the blue arrow:


Next is a bracelet, with metallic Sanbest thread, 3 strands, color is a gold-pink hue, number 133. The coloured swarovski beads, that you can see in the first picture above, are only laid on top. I still don't know how to add a clasp, I think that I need a wide type of clasp, but at the moment I haven't any at home.


Ciao,
Ninetta

UPDATE (19Jan2022) - pattern in pdf (errors corrected) :

Tuesday, 20 October 2020

unusual scalloped edge

Another post for the "Endrucks 1920" project.

That is my tatting for the pattern #14 in the "Schiffchen-Spitzen" book, by E.Endrucks, from 1920, it is available here: http://www.georgiaseitz.com/public/publicindex.html

I think that I'll go on tatting that, at least about one meter, for a nice linen towel's edging. I like this scalloped edging a lot, a very unusual and original shape for tatting, it makes me forget that the pattern it's turning 100!

You can start CTM, all one colour, but I chose to tat it in two colours to better follow the pattern. Thread is DMC Special Dentelles size 80. 

As in previous pattern (the n.8, read previous post: vintage trees), the bottom part is the side of the edging that should be attached to the fabric.

In the pattern there are true thrown off (floating) rings, that makes it a 2 shuttles pattern. There are tatters who prefer tatting with shuttle and ball and transform all floating rings in mock rings. The difference is minimal but it can be spotted, because of the different effect on the chain, it changes the curve. The next is a narrow edging with mock rings on chains, that I've tatted some years ago:

I've uploaded my diagram in Flickr (click to see a better image):

endrucks n.14

The pattern starts with the little ring 6-6 on the left, but, alternatively, you can start directly with the block tatting part, omitting the first ring and the chain 6-6-6. In that case, the pattern would start with a picot, then a chain 4-4-4-4, something like in previous pattern n.8, that started directly with a chain. They usually call it the “dead end” start, but in this case it is with a starting picot. There are some links to various tutorials in Muskaan's page https://tipsaroundthehome.blogspot.com/p/tatting-resources.html, if some links there don't work, in the URL you should change blogspot.in with blogspot.com

The original instruction in previous Eldrucks' pattern number 8 was to start CTM with one double stitch, then leave a very small picot, then tat the first row of the block tatting. That is only one way to start the "dead end" chain without a clip. I think that it may be helpful to figure this method as if they started CTM in the "Diag.1" drawing in this photo: (Block Tatting how to by Julie Patterson: http://www.georgiaseitz.com/2012/blockpatterson.jpg) .

Ciao,
Ninetta

Tuesday, 13 October 2020

vintage trees

My tatting today is for the "Endrucks 1920" project. It is a collective project. It all started here:  https://tipsaroundthehome.blogspot.com/2015/11/pattern-eleonores-angels.html

That is only a short sample for the pattern #8 in the "Schiffchen-Spitzen" book, by E.Endrucks, from 1920, it is available here: http://www.georgiaseitz.com/public/publicindex.html

(direct link: http://www.georgiaseitz.com/public/endrucks/eleonoreendrucks-leichtensternschiffchenspitzenbook1920.pdf)

It is an edging and in the book's picture it is shown upside down, that is the bottom part is the side that should be attached to the fabric. It's lovely, it looks like trees, maybe the single tree can be used in greeting cards, just an idea.

It could have been one shuttle and ball pattern but there's one thrown off (floating) ring, that makes it a 2 shuttles pattern. You can start CTM, all one colour, but I chose to tat it in two colours to better follow the pattern. Thread is DMC Special Dentelles size 80.

The dense trunk is block tatting, you can follow your favourite method to do it. I tatted the rows in a way similar to that explained in Julie Patterson's drawing (2006): https://www.georgiaseitz.com/2012/blockpatterson.jpg

Each row is connected to the previous row with lock joins. But that is not the only way to join. I have a video in my channel in YouTube, comparing the Patterson's joining method to Jane Eborall's method (2007, amended in 2013: https://janeeborall.freeservers.com/BlockTattingEasy.pdf ). This is the link to the video in YouTube: https://youtu.be/oxGV7b3xK20. I think that if you use the J.Eborall's way of joining, you would need to leave very small picots in all rows for the trunk, just after each join, but I haven't tried that.

About YouTube, I'd like sending you all my heartfelt thanks, for I reached 1K subscribers on my channel! That is amazing, I can't believe it! Thank you, thank you! It's a long time since my last video, I don't know when I will post another one. With the "kids' restrictions" they deleted all comments and I lost the infos like the date posted, but I hope that it's not a problem! Videos are still there!

I've uploaded my diagram in Flickr (click to see a better image):

endrucks n.8

You have already noticed that in the diagram and in my tatting the first row was tatted, then I reversed work and tatted the first ring, then I didn't reverse work and switched shuttle, tatting the second row for the trunk. On the second row, there's no need to leave small picots because the lock joins itself let a very small space.

If you tat only one "tree" and attach the last ring to the first, a little tube will pop up. Sometimes it happens that you find things by chance, so... That are the earrings that sprung up from the tree:

The bottom part is a separated element, 4 rings flower (all 6-6-6-6 rings joined at the first picot), that contains the 8mm pearl, topped by a 6mm bicone swarovski; the "leaves" below are two rings, (21ds-3ds, and 3ds+21ds). I put 2mm bicone swarovski on picots, added one onion ring at the base of the "vintage tree" and finished with an SSSR, like in Miranda's tutorial -  http://tattingfool.blogspot.it/2011/07/finishing-with-sssr.html

Ciao,
Ninetta

Tuesday, 6 October 2020

seventh blog anniversary

Before everything else, VERY important news: thanks to Susan Fuller, Georgia Seitz's site is up again! Visit the new pages here: http://www.georgiaseitz.com/

🎂🎂🎂🎂🎂🎂🎂

Yesterday was my blog anniversary, it started in 2013. Wow, I can't believe that I've been blogging for so long! Thanks to you all, my readers, I couldn't have been here without you 💓 and thanks to all tatters that share their tatting online, so I could learn a bit more every day!

Sorry that I disappeared from the blogsphere for a month! I have been busy test tatting my own pattern, the Swirling Butterflies doily. In this moment the photo-tutorial for the pattern is in Italian and it is still a draft. There are over 20 pages, with a lot to amend! My heartfelt thanks to two sweet ladies and very expert tatters, who are helping me, testing all 11 rounds: one is Paola Bevilacqua (you can find her in Facebook) and the other is Muskaan. I hope to have the privilege to show you soon the doily tatted by Paola.

Now, you would ask, how Muskaan can read Italian... so: she can't, but she's a tatting Master and she is following my drawings, tracking down my mistakes! Her help is priceless, she's been sharing her thoughts and variations in her blog:

https://tipsaroundthehome.blogspot.com/2020/09/4-plus-1-is-5.html
https://tipsaroundthehome.blogspot.com/2020/09/7-plus-6-is-13.html
https://tipsaroundthehome.blogspot.com/2020/09/3-and-1-and-2.html
https://tipsaroundthehome.blogspot.com/2020/09/3rd-times-charm.html

She also partecipated to my tat-along, two years ago, when I shared the first 3 rounds: https://tipsaroundthehome.blogspot.com/2018/09/twist-n-twirl-spiral-n-swirl.html

The thread that I used in the green doily, the prototype, was Anchor size 70. In the new white version I've used DMC Special Dentelles size 80. The two doilies are the same size that is nearly 30cm from tip to tip. The Anchor thread is softer than DMC. I still didn't shorten the antennas in the white doily but it will be gifted away so I will cut them later.

The next picture is my own tatting, I can't remember when I did it (but few years ago), it was a gift and lately I've had the chance to take a photo, that I didn't take at the moment that I gave it away. It is a pattern by Jan Stawasz from the book "Tatting theory and patterns". Thread is dmc Special Dentelles size 80.

The doily is finished but I've some side projects. I still have the Bosa lace to be finished (almost there) and then I decided to join Muskaan in the "Endrucks 1920" project, that is to convert in modern tatting notation and diagrams the patterns in the "Schiffchen-Spitzen" (by E.Endrucks) 1920 book, that is available in Georgia Seitz's archive here: http://www.georgiaseitz.com/public/publicindex.html

I will tat and try to diagram patterns #8, #14, #24 and #40. In the next picture there's my first trial of the #8.

You can read about Muskaan project here:  https://tipsaroundthehome.blogspot.com/2015/11/pattern-eleonores-angels.html

Ciao,
Ninetta

Thank you very much for all your nice comments.

Ciao
Ninetta