Translate

====================

====================
Dear Reader,
I share here what I like and what works for me. If you've been following me, you know that I can change my mind from time to time, and feel free to comment that I'm completely wrong, you may be right. I'm not running a business. I'm not paid and have never received any compensation or facilitation for any review/brand/site here mentioned. In case one day we'll ever meet, I'll be the one offering you a cup of Italian coffee, too.
====================

Tuesday, 26 September 2017

radiant

When working with bugle beads, a very important thing  to remember is to look carefully at edges and discard broken beads, the sharp edge can break the thread. In that unfortunate case, a radiant tatting day could turn to autumn...

Bugle beads for this pattern are 6mm. Thread is Finca light gold (Hilo Metalizado, 1000mts, Presencia Hilaturas), double strand, 35% Polyester and 65% Viscose. I wound together two strands in two shuttles CTM. Thirty-six bugle beads have been loaded in one shuttle, the centre starts with the other shuttle without beads, then I climbed up with a split ring and the shuttle with beads is used as the core thread.

Pattern:
Centre:  Ring 4-4 repeat five times, SR 4/4
Round1: (mock picot) 1ds, slide one BugleBead from the core shuttle, 1ds, lock join, repeat six times
Round2: 2ds, BugleBead, 2ds, lock join, repeat six times
Round3: 3ds, BugleBead, 3ds, lock join, repeat six times
Round4: 4ds, BugleBead, 4ds, lock join, repeat six times
Round5: 5ds, BugleBead, 5ds, lock join, repeat six times
Round6: 6ds, BugleBead, 6ds, lock join, repeat six times
Round7:
climb up with a SR:8/8, *[Chain 8-8, Ring 8+8 (join over the lock join of round6), Chain 8-8; Ring 8+8 (join same place of previous ring)]repeat five times from *, then Chain 8-8, Ring 8+8 (join same place of first split ring), Split chain 8/8 (joining the start of first chain of this round)
Round8:
climb up with a SR:6-6, *[Chain 12ds, lock join to picot in chain of previous round7(chain aligned with beads), 12ds; Ring 6+6 (join to picot in chain between rings of previous round7 ), Chain 16ds; Ring 6+6 (join same place of previous ring)]repeat five times from *, then Chain 12ds, lock join to picot in chain of previous round7(chain aligned with beads), 12ds; Ring 6+6 (join to picot in chain between rings of previous round7 ), Chain 16ds, tie and cut.

❄❄❄❄❄❄❄❄❄❄❄❄❄❄❄❄❄❄

What do you call them? Wheels or snowflakes?

In Italian bugle-beads are called "baguette" or "tubicini".

Ciao,
Ninetta
P.S. Eye-candy: there's a page for Palmetto's Tat Days 2013, with a beautiful collection of tatting (but without patterns), one of those is a bird, the beak is made with two bugle beads, that's clever isn't it? here's the link:
http://palmettotatters.org/events/TatDays2013/ClassProjectPictures.shtml#Kaye

Related posts

Tuesday, 19 September 2017

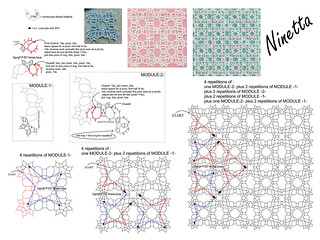
pattern for the quad_23 magic square

Pattern is in Flickr:
quad_23 magic square

I've tatted again the version with 4 repetitions, this time in two colours, threads are DMC size 80 ecrù and a shade of light blue but the ball was without the label, sorry.

I've also tatted again the basic square, just because I needed a pic to be put in the pattern, but I don't have a real use for it yet.

Instead, a friend suggested to sew the other one on the pocket of a shirt, I already found one with little light blue dots, difficult to take a picture as those are very soft dots but here it is

I tatted the "inverted square", too. I suspect I wasn't on task, in fact you see in the picture there are two rings not joined and I simply made knots with a spare bit of thread to take the picture.
and here it is the path, MODULE-2- was repeated four times:

I hope that the pattern in Flickr is clear enough. Thank you very much for visiting.

But it wasn't clear enough the pattern for the "star n.2 with tuft picots", for someone commented to ask how to do the OTT join in round E and also how to do the normal join to round C. I've filmed myself with the smartphone and now there's a new video in my channel. Please, tell me what do you think. Here is the link:


Last about this week: I managed to buy the catalogue I was looking for, it is about an exhibition held in Genova in 2006, "Gioielli di filo", beautiful laces, eye-candy 😍 ! But there isn't tatting, sigh.


Ciao,
Ninetta
Related posts

Tuesday, 12 September 2017

Robin's magic tutorial

I've followed with great interest Robin's blog, lately she shared her way to recreate a magic square starting from a repeatable square (here: http://tattingbythebay.blogspot.com/2017/07/designing-magic-squares.html ), I love how she explained everything so clearly, step-by-step, and the entire process fascinated me.

I haven't tried her onion ring magic square, though. It's beautiful! But I was curious to try the process, "to embark on my own magic square journeys" (she wrote these words!).

Thank you very much Robin for the fun!

There's a square of mine that is completed in one round and it actually needed a "revision". You may don't know but the most difficult part about designing is correcting your own pattern, when you are stuck and don't now if one double stitch would improve it or get it worse. So I did many tests with this little square, I even used one version in a mat that I gave to my mum (the picture of the square is "quad_23" in the album "granny's squares" in Flickr here: https://flic.kr/p/ou5tHa and here it is the finished mat: http://ninettacaruso.blogspot.com/2016/02/prototypes.html).

I updated the pattern eventually and I like it more, I changed the length of two chains and that made a good difference. I'll share the pattern, sorry it's not yet drawn. Thread is DMC size 80, color number Light Peach 754. Then, following Robin's tutorial, I obtained my quad_23 magic square:


But then I wanted more. It seems that these magic squares are addictive, one is never enough!
Playing with Apps is always fun, just like Robin says the "virtual" tatting saves a lot of time and I was curious to see as soon as possible the bigger square. I downloaded an App called "Photo Collage editor (by Zentertain)" in my smartphone and I had the next picture in an eye-blink!


I can see the inverted square and other squares too! But I don't know if and when I will try them all!
The actual tatting is very little, but I like it and I'm going to try it in two colors.


This week I also finished the Sardinian Bosa filet lace, so I'm ready for the weekend we will have in October with the Maestre who are coming again from Sardinia.

(see the frame with my work started last year here: spare wheels  and the embroidery finished but still on the frame here: don't lose the keys (and the tatting, too) )

Ciao,
Ninetta
Related posts

Tuesday, 5 September 2017

enough

It's 20x30cm, at this point it's clear that it could grew uncontrollable. A good reason for leave it as it is. Otherwise, could I tat an edging around it? what do you think?


Just like they say, the journey matters more than the destination. This has been a lovely journey.


Thread is DMC size 80, ecrù and pink (Light Peach n.754), pattern is saved in my notebook (well, it's not saved well enough, but it is there) and they are 2 motifs, the little one is one round, the big one is tatted in 2 rounds.


I can see some improvements, one or two ds less in some points. I cut the thread at each round and each motif, so now I have a lot of wasted thread. Spendthrift, carefree tatter! You'll soon need to go shopping for new thread!


Ciao,
Ninetta
Related post
 

Thank you very much for all your nice comments.

Ciao
Ninetta