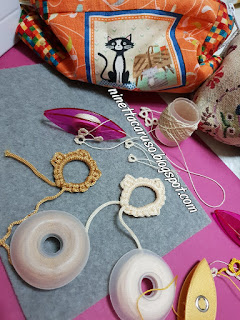
I had started with a dmc size 10 thread, but then those siblings look alike, as it happens in many families. A close up didn't help, so I switched tatting with a rope...
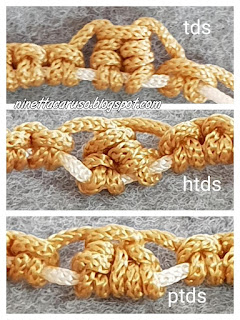
In pictures:
tds = treble tatting stitch
htds = half tds, kindly shared by Muskaan (you already know, she's the Smiling Lady);
ptds = padded tds, kindly shared by Lalla Caliò (you may find her in Facebook).
🌹🌹🌹🌹🌹🌹🌹🌹🌹🌹🌹🌹🌹🌹
If you're following her blog, you know that Muskaan already shared her variant, here: https://tipsaroundthehome.blogspot.com/2018/08/leaning-towers.htmlShe explained that forgot to pull the second loop (for the sequence of steps for tatting a tds, please refer to my post: treble tatting - ideas or this other post by Muskaan: dissecting tds).
Then, the first half of the tds lost its coils and the stitch leaned like a little Tower of Pisa! We agreed to call it the half treble (abbreviated: htds).
That is what she did with the half treble:
- Start with a very small picot and one double stitch.
- Laying the picot across the ball thread and pull up a loop of thread through the picot.
- Now slip the shuttle through the loop thus formed. Don't tighten it, yet.
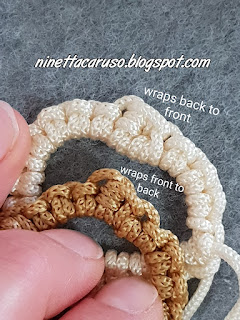
- Take a loop of the core thread in the ring finger, then pass the shuttle from back to front, through the loop, 3 times.
- Tighten the ball thread and don't let the core thread slip out of place.
- Then, pull the core thread.
🌹🌹🌹🌹🌹🌹🌹
The other variation is by Lalla Caliò.Provided that the second part of the original tds is very similar to a vapour stitch (you can find one of my drawing in Flickr and a video by Karen Cabrera in her YouTube channel), Lalla found that the second part of the tds can be substituted by something like a spiral knot. That is, the effect she obtained is that the wraps are coiled around the core thread. Actually, the spiral knot is a padded half stitch (there is another great video by Karen) and you may like reading again a very informative post by Muskaan about padded tatting (https://tipsaroundthehome.blogspot.com/2015/11/pds-padded-double-stitch.html).
So, I suggested her to call this the padded treble (abbreviated: ptds).
That is what Lalla did for tatting the padded treble:
- Start with a very small picot and one double stitch.
- Laying the picot across the ball thread and pull up a loop of thread through the picot.
- Then, take another loop of the ball thread and pull it through the previous loop.
- Now slip the shuttle 3 times through the loop thus formed. Don't tighten it, yet.
- Tighten the ball thread and don't let the core thread slip out of place.
- Then, pull the core thread.
That's just the theory. Many thanks to those nice friends who shared their ideas and gave me the permission to share with you, too. As a good friend said, "who know when or where someone might use it"!
The petals in the rose are tatted by Lalla with padded trebles. It's lovely, isn't it?
In the next picture, a family portrait:
The stitches' heigh decreases, the taller being the tds, then the half tds, then there's the ptds that is quite the same level as the ds.
🍬🍬🍬🍬🍬🍬🍬
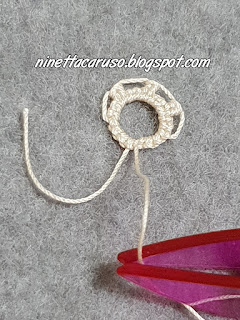
And what are you going to call that monster of mine?(details in a week!)
Ciao,
Ninetta


 :)
:)
 :(
:(
 :))
:))
 :((
:((
 =))
=))
 =D>
=D>
 :D
:D
 :P
:P
 :-O
:-O
 :-?
:-?
 :-SS
:-SS
 :-f
:-f
 d(
d(
 :-*
:-*
 b-(
b-(
 h-(
h-(
 g-)
g-)
 5-p
5-p
 y-)
y-)
 c-)
c-)
 s-)
s-)
 d-)
d-)
 w-)
w-)
 :-h
:-h
 :X
:X
Very interesting!! :) You are all so creative!!
ReplyDeleteNot sure if you were looking for a name for that last piece, but I thought it looked like Jump Ropes.
Thank you Sue! :-f
DeleteThat's a lovely name, you made me smile!
Its wonderful that your treble tatting has led to others making discoveries. Even more wonderful that you are all willing to share your discoveries and techniques.
ReplyDelete:X sharing is contagious!
DeleteI absolutely Love the kinship metaphors you've used throughout!!! Lalla's rose is superb g-)
ReplyDeleteI still maintain that your original tds is visually the best :-)
One point about the ptds - it is broader than the tds or htds at the base.
I used fs/bs in the swirling butterflies tat-along - I couldn't see much difference in the wrapped part of the tds, so I simply tatted the ds part of it as rods. It seems to work. But you judge when I blog about it with pics ...
:-f
DeleteLalla asked me to thank you for your compliments :)
DeleteThank you so much for sharing these fantastic tips! Even though in your last motif the thread doesn't go all around the ring, it made me think of a lifebuoy... go figure!
ReplyDeleteThanks to you! That's another nice name! :)
DeleteLooks interesting! Must spend some this Spring break going over your blog posts :).
ReplyDeleteTy Jenn :-f what a resolution!
DeleteVery interesting when I come back off holiday I will be trying this
ReplyDeleteThank you Margaret :-f
Delete